Dudes! We are overhauling a 1972 Bell Travel Trailer! Follow the entire series from the beginning here! This Nugget project is sponsored by my friends at The Home Depot.
I just need to say, that this project thus far on the Nugget has been my favorite.

The original plan for the little Nugs was to lay this gorgeous hardwood down in a herringbone pattern. Unfortunately after talking to a representative at Milstead headquarters (the company that makes the flooring) about it, I came to the conclusion that it was just not going to be a great plan. Hardwood is designed for use in a climate controlled area. Extreme temperature swings might make it behave like a 3 year old…in the checkout line at Old Navy (why do they do that to us?!) It is just not equipped to hold up under that type of stress. Spending lots of money on it just didn’t seem like a great plan.
Designing such a small space means that there can only be a few Stars. If everything tries to be center stage than the whole thing turns into a freaking circus. I really wanted the floor to be one of those star players. When I went back to Home Depot, I felt like everything else that I looked at was going to blend in too much. Granted it would be durable and very nice looking, but it wasn’t going to be something that you noticed right off the bat.
So after a heart to heart with myself about it, I decided to take it the completely opposite direction. Hand cut pine 1×4’s that cost us 2 days and $80 (for the entire floor!!). It is such a small space that doing something completely crazy like making your own floor is manageable. Is pine the most durable thing on the planet for flooring? Um, no. But I love character and with the way that we are planning on using The Nugs it is a pretty great solution. And hello, $80!!
I need to give a massive thank you to everyone on instagram that voted which pattern they loved the most. I love it when your friends confirm what your gut is already telling you.

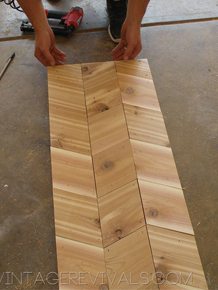
Once I knew what pattern I wanted, it was just a matter of cutting the wood. The triangles needed to have 30 and 120 degree angles.

*One thing to note, when you are working on a miter saw, 90 degrees is 0, you subtract your angle from that. So to cut a 30 degree angle, I needed to set my saw blade at 60 degrees. Because 30 + 60 is 90. (The reason most people overlook this is because the most common angle is 45 and that is exactly 1/2 of 90, so you set your blade at 45.)
This sliding compound miter saw from Dewalt is the stuff dreams are made out of. My little rinky dink miter saw didn’t cut up to 60 degrees, so I borrowed this one from my bro in law. It is at the top of my Christmas list.

This project is EXTREMELY simple, its just really repetitive. (Sort of like the hexagon wall that I did in Dylan’s room)
We went to Home Depot and bought (10) 1×4’s for this project. Then we cut approximately 5 zillion triangles out of them. Jk. It was only 4 trillion.
To make all of the triangles the same I marked a line on the saw base.

Then after I made a cut I would rotate the board and line it up.


Using a 1×4 gave us the perfect sized triangles, I also tried it with a 1×6 and 1×3’s and it is pretty crazy to see just how different the sizing is with adding or taking out an inch or two.

Each triangle got a light sanding on the edges and knots to get rid of any splinters, and then it was time to start laying it down!
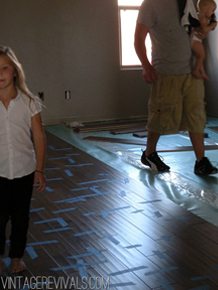
We prepped the floor by pulling out the carpet nails and scraping all of the paint and thinset off of the linoleum. Then we swept and vacuumed and swept and vacuumed until we were sure that it was nice and clean.

We started along the edge of the cabinets and dry fit the pieces.

You want to work in kind of a big section as opposed to fitting and nailing down each triangle on its own, that way you can make sure that everything is lined up before you commit.
Once we were happy with it, we used a finishing nailer to nail it to the floor on each corner. We used 2” finishing nails and double checked that they weren’t going all the way through the underside of the trailer. The nailer that we use and love is this one from Senco, but I have heard really great things about the Ryobi Airstrike Brad Nailer, and its about 1/2 the price.


Working on the edges wasn’t as hard as you might think. We made a template of the triangle out of paper and after lining it up, folded the paper so that we could see the exact angle that needed to be cut.


Inside the closet wasn’t horrible either, we just used the template and it worked great!

We used wood filler to fill all of the nail holes and finished it off with a few coats of satin polyacrylic.
I am completely and utterly obsessed with this floor.

It is so fun when people see it to find out what shape they see, the star? The tumbling blocks? Or the triangles?


One of the factors when it comes to working on trailers is adding weight. The total weight added for the flooring was around 40 lbs. Each pine board weighed in around 4 lbs, and we used 10!
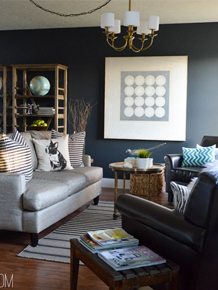
Maybe a new floor isn’t up your DIY alley, but um…can you image this pattern on a wall or a table top?! Dreamy.
HUGE thanks to my friends at Home Depot for teaming up with me on this project for The Nugget!!


Love it so so much and it has me thinking 😉 It’s so so good.
Oh my word! Love love love it! I’m already thinking that this would be amazing with tile!
I can’t wait to see the finished product! I see beautiful stars 🙂 such an awesome projects on this nugget, I love following it.
Yay! I’m so glad to see another post about The Nugget! I can see why this is your favorite project so far! You amaze me. It looks fantastic!
I literally cannot believe you did this. I was just thinking to myself YESTERDAY about how I can cheaply update the floor in my studio to get rid of the nasty carpet. The obvious answer was paint the subfloor, but I wanted a little more texture to it & I thought about buying boards & cutting them into tiles just like this!! Your version turned out amazing & it’s probably just the push I need to dive into mine! I’ll need to be borrowing tools from family members, too, though. All I own is a drill and an orbital sander. Christmas list is a long one this year 🙂
love the floor!!! its like a wood block quilt!!!
It’s amazing!!
This is so awesome, I love the pattern!
Looks great, what a creative idea! Can I ask if you considered any other wood types and why you decided to go with pine? I think a mix of several different kinds would look really cool!
Hey Rosie! That is a great question!! We used pine because it was inexpensive and easily available. Other wood types mixed in would be amazing! Especially if the pattern was deliberate. Depending on the way you laid it down you would see the shapes better! Great suggestion!
xo
m
Mandi!!! This is freaking amazing!! Like OMG…I am in love with this pattern! Love, Love, Love!!
I love the floors, I’m actually glad you brought up the temperature issue because I was worried about this when you mentioned the paint. We have been working on our pop-up and from all my research and extensive conversations with paint people I was told to only paint the inside with exterior paint. I didn’t want to because of the fungicides etc in the exterior paint, but I was told that my paint would chip and peel off in a few seasons if i used interior. Has anyone told you this?
Hey Nannette! I haven’t heard anything about interior paint being a problem. Hopefully it’s fine!
xo
m
Just when I think you can’t get more awesome.
I love this, quick question though, How did you finish it? Did you do a stain, then lacquer it? What did you do about any small gaps between pieces? I would love to do this!
I was wondering the exact same thing! Here’s to hoping Mandi has got it covered!
I would love to know the answer to this! Struggling with the raw wood and gaps in my camper!!
you never cease to amaze me girl, amazing project and one I hope to try out once we get into a new house. many thanks!
Kelly
http://www.yourcolorconsultant.com
Beautiful! I could totally see it stained in different tones if you wanted to bring out some of those different shapes you talked about. What a great idea.
whoa. love it!!!!
Oh my goodness, you did a terrific job and it looks amazing!
wow! It totally looks 3d, so cool! 🙂
Freaking amazing. Geometry goddess you are.
yessssssssss…. gorgeous!
I fall a little more in love with you each time you post! Gorgeous!
awesome! love the fancy patter in the small space.
Love it!!! How many square feet did you cover?
THIS LOOKS INCREDIBLE.
this totally made my day!
It is like a quilt, love it!! Now you have my already overloaded mind on other things, like what can I make next! 🙂 This is one of my favorite projects that you have done!!
soooo good. you all are total diy rockstars!
So, so cool. Thanks for sharing your brain with us!
You’re a G! lol, love it!
Absolutely delicious to the eyes! Let us know how it holds up to traffic.
Pam
Wow, you’re amazing. I love this floor, and your whole trailer overhaul so much. I’m working on my own, and have loved seeing your ideas. You may see a #myvintagerevivals on IG soon! Thanks for all your inspiration.
This is the most freakin amazing thing I have ever seen in my life!! So good!
I love this so much! It looks seriously amazing! Now I want to do this pattern everywhere!
This is absolutely incredible! Stunning!
OH. MY. GOSH. YOWZA! This is just spectacular! I would totally do an entire floor like this….wow…I’m dreaming now!
CC
Love it! What an awesome look!
Homerun.
Nice work.
Will you come to my house and help? I can pay in cookies and good conversation.
OMG. I love everything about it.
I love this so much that I hate you a little… is that a thing? But, then I remember that I actually love you.
FANTASTIC. I am just amazed at this floor! I really really love the idea of a table top too! I painted my kitchen table and missed a few things like the right kind of paint (no biggie, right?) and it looks terrible now. Maybe I can do this! The geometry is making my head spin though! I’m definitely saving this idea
Your imagination/genius knows NO bounds!!!! Wont you be my neighbor????
This is my most favorite of your projects. LOVE IT!!!
I think I died inside from jealousy! My brain doesn’t know whether to jump for joy or cry from happiness lol! I’m in LOVE! Who knew wood could make a girl so happy ; )
I absolutely love this! However, I do have one concern: What if the wood starts to expand/shrink due to changing weather? Did you take any measurements to avoid that from happening? Otherwise this would definitely be a great idea for inside a house (maybe using different wood though), but the humidity factor really worries me.
Hey Sarah!
Great question! Worrying about humidity isn’t really a concern living in Southern Utah, the ultra dry air is more of a concern because it sucks the life out of everything, including wood. We have a wooden playhouse that we built a few years ago that has been outside and is doing great, but I will definitely keep everyone posted about the floors!
This. is. WONDERFUL! I have been dreaming of creating a wood, hexagon backsplash for our bathroom remodel – and this post couldn’t be any more inspirational! And how perfect for The Nugget!
Holy Cow!!! I admire all of your projects, but this, my friend, is hands down my absolute favorite! Freakin’ LOVE it!
gasp! gorgeous!
This is beyond neat and impressive. I want to tackle this DIY now. Would you recommend this for a small bathroom floor?
Forget eye candy; this is a smorgasbord! Took my breath away!
So cool!! Would love to do this for my bathroom and would love to even try painting each piece a different color. Thank you for sharing.
Love, love, love this!
We planned on using a similar flooring method the spare room in our last house. It was a converted attached single-car garage in a 50’s house, so it was a small narrow space. The floor was just plywood., and we were going to nail down trapezoid shapes (the version that looks like cubes when put together). However, we figured that even in a smallish space, the number of cuts would be too exhausting. We instead went with just wood flooring. 🙁
I’m so glad to see this in person! It makes such a big impact!
Are you kidding me? This is so awesome. Mind blown!
What a great idea! This is incredible!
Holy Batfloor. Love it.
Ok girl,…i’ts official….you rock!!!!!!!
You’ve done it again! Soooo impressive! Also, believe it or not, I rekon the old lino is exactly the same we had on our kitchen floor when I was little….memories!
How do you come up with this stuff? AMAZING!!!!!
I don’t usually comment, but let me just say! You are an inspiration! This is amazing, really.
I am OBSESSED with this floor. I will expect you next Thursday to come help me to this in my office. Did I say I’m OBSESSED, BONKERS, CRAZY IN LOVE with this floor. And, I like it a little bit!!!
You are amazing. Whenever you come to a problem situation, you solve it easy-easy. The floor is absolutely beautiful. I want a floor like this in my bedroom.
Can I ask about what the square footage is for the Nugget? Trying to figure out if this would translate well to our somewhat small living room. We were planning on doing cheap plywood planks as kind of a temporary fix until we eventually saved enough for hardwoods, but I’m thinking if its going to be a cheaper option just for our personal enjoyment (and not for resell value) then why not make it pretty! 🙂
Oh. My. Goodness. This is just amazing!! I love the pattern and the texture of the wood and the color! Just brilliant <3
WOW, totally love this floor you did. We just finished laying bamboo floors and we have all this leftover. My husband might even be onboard for me to do this on the stair landing. Thank you for the inspiration…Oh, and I LOVE the pattern you chose!
I am so in love with this floor, like hard core. Thank you for being so freaking inspiring! I mean, who makes their own floor?!! Awesome.
this is so beautiful!
Just found this post via a pin on pinterest. Since it was not pinned from here, I found it through your watermark! This may be the coolest floor I have ever seen. Now I have to find a tiny space so I can try it! Now I will be pinning from the original source.
and here we go again with similar ideas https://www.behance.net/gallery/20150639/Fold-It-Up-Tent-London-2014
Wow Kinga, that is BEAUTIFUL!!
xo
m
Love following this project, and LOVE the star patterned floor! What did you seal it with, I’m sure you did…just a clear poly?
FANTASTIC!!! IT LOOKS LIKE SO SIMPLE AND SOOO AMAZING RESULT. 🙂
Its Amazing..!! I am impressed..!! 🙂
I love the look of that floor! How has it held up to use, the rolling of the trailer, and water and weather? Thanks, Paul
Congrats on a very creative job well done.
FYI, there is a name for the category of woodworking that assembles geometric pieces as you have done: “parquetry”. Thus, what you made was a “parquet floor”.
Question: you said you used 1x4s, but to my eye, those pieces of wood are not 3/4″ thick, as all 1x lumber is. It appears in the pics to be half that or less. So what are the dimensions of the lumber that you started with? (Use a ruler because what they call it and what it measures are 2 different things.)
Hmmm, “speak my mind”? I am disappointed you haven’t the time or interest to answer my question. Bye.
I should have known this was one of your projects the moment I saw it on Pinterest and fell in love with it. Big congrats, girlie 🙂
Creative, gutsy, frugal and beautiful!! Is there a post with the finished floor somewhere?
i know you said you filled the nail holes with filler. what about the gaps between each board piece? it seems like a lot of dirt would get in those cracks. Great work and idea. beautiful.
Could you tell me how to cut these angels on a table saw
Could you tell me how to cut these angels on a table saw
Such a beautiful project. What finish did you use on the wood to protect it from scuff marks/water/dirt from walking on it?
What what what??? This is fantastic!
Mandi, I noticed above that you were reporting on all the nice things stated about the Ryobi Airstrike. IMO it is grossly overrated, if it is to be used on a regular basis. I have owned a Ryobi One system, before Ryobi came out with the Lithium ion battery, and have upgraded my drills. But compared to the pneumatic air system, there is simply no comparison.
I’m a self-employed person, who makes beautiful things for the interior design field, and use my old Craftsman compressor as much as I can. overall, its cheaper to have those tools, and they are more heavy duty. Oh, and they are good for production speeds, which the Airstrike can only wish. As for portability, I also have a three gallon portable compressor, which allows me to take it anywhere there is electricity.
I also have a suggestion for you and your husband. If you haven’t converted your compressor over to 220V, you really should do as soon as possible. When you double the voltage(highway), you half the requirement for amperage(less traffic congestion). I converted my compressor, and Craftsman table saw to 220V when I purchased them. And they are going strong 34 years later. There is far less strain on the motor.
Oh, and here is an added bonus, of which I’m sure you are award, but most of your readers aren’t. When your husband starts to come back inside, and he is filthy, all you have to do is point him to the shop and “Go blow yourself off”, and that compressor will easily save the day, cleanup wise. Women just love this asset, and I have heard several swear by their family’s air compressor.
Oh, I forgot something: I really do LOVE your work above. I’m getting ready to make some tables, and sliding barn doors for a designer client, who is a partner in a furniture store, https://www.inspirationsraleigh.com, and she has been bugging me to start making them for her. Your idea is well worth the time spent reading about it. Congratulations.
Is there some where that I can view the jig for cutting the. Pieces on a miter saw my only goes to 45 I don’t quite understand I’ve went over the one I read picture would sue help. Thank you
Oh my word! Wow, I am sure you have been asked this before but… You want to come live in my house for a year or so? LOL
this project is too good to be ignored. one of a kind floor designs.
Looks great! Aren’t you worried that miles of travel and walking on the floor is going to cause the boards to pop up? There’s no tongue and groove, and you used finish nails rather than flooring nails. I see no mention of glue.
Hi Mandi! I loved this floor so much!! My apartment has just been through a major makeover, and what once was a balcony became my new closet. As it is easy to imagine, the floor is not very appropriate for a closet, and the renovation took our finances somewhere far far away… I am thinking this might be a good solution!
Just one question: the current floor is ceramic tiles. What do you think is the best way to prepare the base before and fix (attach) the wood after?
So why haven’t we seen the finished product or is that it? Did you varnish? Sorry at work , don’t have time to read everything 🙂 just loving the pics.
Oh my lord. Its absolutely beautiful.
Definitely the most gorgerous floor I´v ever seen <3
This floor is stunning! I was actually wondering what the actual measurement is on the long slde of the triangle? Does that come automatically when you have the angles right? Just wondering because I am totally in love and have the cutest Red Dale vintage canned ham that the previous owner put a flooring in that is not real wood and as soon as it gets wet, the edges peel up and the masonite is exposed. You are brilliant! This design is gorgeous and you did a beautiful job! I am amazed! Thank you in advance for taking the time to read and respond to this!
I’m wondering this too! We’re using this to make a headboard, but I’m not sure if it matters the length of the side, as long as they’re all the same?
Okay so you say that this flooring is not the most durable… would this work in a kitchen or front room? How long do you think it will last?
Very best step by step explanation ever!
Would have love to seen after stained.
I would love do this in my large living room What size would you suggest in such a large space plus how would you adhere it to a cement floor?
I love the floor. I am designing and planning to build my tiny home on wheels this year. I think the triangle wood floor would be great in my bathroom. The bathroom will be 6′ x 6′, which is huge for a tiny home. I will have a four foot corrugated steel animal trough as my tub/shower combo. Do you have any ideas for my shower walls? I like the rustic/country/industrial look, but weight is a factor for my tiny home as well. My tiny home named “Serenity” will be 22′ long and 8.6′ wide. I had started to build my tiny home in Peterborough, Ontario Canada and decided to move to Mission, British Columbia, Canada and start all over! Great job 🙂
Nicely Done! You have a great set of photos from start, middle and end but where is the finished photos? Did you stain or leave it natural? What type of finish was applied? Would you lay it down differently now that this post is almost 2 years old?
what do you do with the gaps between the boards due to temperature change and humidity
I read blogs a lot. This post was the most interesting and instructive and humorous without that desperate trying way too hard to be humorous way seen on many blogs out there…that I’ve read in a long time. Looooooove all the tip and insight!!
I just found this on Pinterest and I love it. I’m in the process of redoing a closet that was added to one of the rooms in my 1920 house. The flooring in the room (original to the house) is narrow oak strips about 1 1/8″. I can’t find that type of flooring any more so was thinking of some sort of sheet goods until I saw this. Since the room this closet is attached to is going to be my quilting studio I think this floor will be perfect. I think I want to use oak. I can hardly wait to have it completed.
I came here from Houzz.com, where this same floor pattern was used by a designer with acknowledgment: https://www.houzz.com/ideabooks/84367879?utm_source=Houzz&utm_campaign=u5442&utm_medium=email&utm_content=gallery0&newsletterId=5442.
To put it mildly, I was floored!! I’ve spent a couple years pouring over flooring options (copper penny floor, who knew?), what could be original, unique (not “bland”), and be as budget-friendly as possible – I have 300 sq. ft. to cover in my 1965 ranch. I’m now onto searching out the mentioned tools, who I can borrow what from, and literally cannot wait to get started. The Houzz version took a further step of white-washing some of the triangles, blow-torching some to get the grain to pop, and leaving the rest natural – completed with 5 coats of polyurethane.
Thank you thank you thank you!
I don’t know if you look at comments from past projects, but I was wondering if you ever ended up sealing the floor. Thanks!
I am in the process of buying a home. Since so many homes have carpet (which I detest), I have been putting a lot of thought into things flooring, as well as accent walls and kitchen/bathroom backsplashes and countertops. Quilt patterns have been the inspiration for several of my favorite possible floors/walls. Seeing this star/tumbling block/triangle floor has moved it to the top of my list. I’m also considering your hexagon wall. Thanks for sharing them!
Really, really beautiful job. I can’t believe how cheap it was. I’m wondering how it was sealed.
Wow, was just researching flooring, and would love to apply this one day in a shipping container home.
Thanks for the idea and instructions.
What a great idea. I love the fact were willing to go outside the box (so to speak) and try something unusual.
Looks wonderful.
Utterly indited written content, Really enjoyed examining.