If I have said it once, I’ve said it 1000 times. Art is hard. Art is either expensive, or so mainstream everyone knows that you bought it at Target. I would LOVE to learn how to paint (sigh, one day friends.) but best news ever… you can totally make this art with zero skills.
Last month I was flipping through the September issue of HGTV Magazine (my fave!)and saw this image.

It stung me to my freaking core. Now I know that there was probably mad technique involved. But to my pick-it-apart-until-I-figure-it-out mind, I saw peg board, straight lines, lots of color, and texture. And immediately thought, I can do that. Or at least do something that is inspired by it.

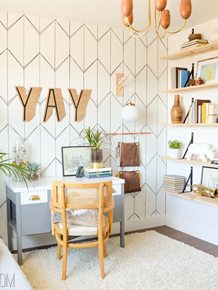
In Cara’s office we needed some art that was large and in charge to balance the entire wall of shelves that are on the opposite wall. Without something that took up a lot of space the room would feel very weak on one side. I also knew that filling in all of the spaces would be too much for the calming, comfortable vibe that I was going for. Hence the inspired by, not exact replica mentality. Side note: if you see something that you love, the funnest part of the entire operation is taking what you love about it, and making it your own.

Surprisingly the biggest hurdle that I ran into in this project was the fact that Cara and I both have small cars and couldn’t fit a 4×4 piece of ply in them. Which lead to using 2 2×4’s. In this case we had to take a page from my girl Nester and just say “It doesn’t have to be perfect to be beautiful.”
Start by gathering your supplies. You will need a few different types and colors of paint. Acrylic, Watercolor, Gold Leaf Paint![]() , and plaster are the ones that I chose. The Plaster
, and plaster are the ones that I chose. The Plaster![]() that I used had really great packaging, so that is why I bought it. Valid reason right? I mean, that guy is so cute.
that I used had really great packaging, so that is why I bought it. Valid reason right? I mean, that guy is so cute.

The most important supply in this art project is a roll of painters tape.

I am a ScotchBlue™ girl until I die, for this particular project I recommend using the ScotchBlue Advanced Multi Surface with Edgelock. Because you are painting on Ply you wont need to worry about pulling up the fresh paint. So get the one with the green writing.
 girl until I die, for this particular project I recommend using the ScotchBlue Advanced Multi Surface with Edgelock. Because you are painting on Ply you wont need to worry about pulling up the fresh paint. So get the one with the green writing.
Start by finding the center point on your wood. I chose to make mine off center to make it a little more interesting (*cough* and so I didn’t have to measure anything *cough*) from there you just start taping.
Make sure that your center point is where both pieces of tape meet (seems a little obvious, but I had to retape a few times because I missed the mark.)
Mix your paint, water, plaster, whatever you have planned for this strip, and get to it. Quality tape=perfect paint lines every time.

When you are using water putty, mix it with an acrylic paint color. If you try and use an oil based paint you are going to have major problems. Remember my love, that when you are rocking the plaster that you want a lot of texture. Smoothness= Lameness. Got it?

Peel off your tape while your paint/plaster is still wet, it will hold its shape, but you will see some seepage from the water. This is totally fine and will dry.

I LOVE the loose watery effect of using watercolor on wood. Because there is so much water involved in this paint, once again seepage will happen, but that is what makes it look SO AWESOME. These stripes are like the cool kids in high school, they don’t care, they are just going to do what they are going to do and everyone is going to be insanely jealous and try and figure out how they are so effortlessly awesome.


The really fun part of this project is customizing it to something that is perfect for your house. Mix colors, channel your inner Da Vinci and make sure you send me pictures!


This post is a collaboration with ScotchBlue™ Painter’s Tape. To join the creative community, visit www.facebook.com/ScotchBlue.

Gorgeous!! Absolutely love it!
i loved that art from HGTV mag too. Great job on yours! Can’t wait to see the wall tutorial!
The artwork from the HGTV magazine was made by BART VARGAS from Omaha, NE. Unfortunately he did not receive credit in the magazine when the issue came out but hopefully Mandi will give him due credit after seeing this post. It is wonderful that Bart’s artwork is inspiring others, he is a very talented and hardworking artist!
I love your guts. That is all.
i love how you describe in detail what you did, and what products you used. i have a big wall in need of pizzazz, and i can see it now! and thanks to you showing me what i need, i can get right on it 🙂
that is, after i paint our bedroom concrete floor. found your blog yesterday when i researched options on that. posthaste saved screenshots of the paint and gloss you used on the faux bois floor in your daughter’s room.
chapeau!
[p.s.: and of course i watched your ‘arranging stuff on shelves’ video and am now contemplating ditching the ‘i won’t take it home from the thrift store if i don’t know where to put it’ attitude.]
long ramble. in short: vielen dank.
Wow.wow.wow! I’m going to make one for my bedroom and I think one for my dining room. I’ve had a huge blank wall just begging to be decorated! I heart you!
love love love! how did you hang it?
love love love~! what mechanism did you use to hang it?
Hey Claire!
I just used small finishing nails through the front of it to hang it on the wall (it is my favorite way to get something completely flush!)
xo
mandi
I love it! Can you tell us what colors you used? The brand? Where did you buy your supplies?
We are in some major need of wall art in our house, and this is the PERFECT project for it! These colors are just to die for too!
Beautiful. I guess I’m confused. After doing the first color, do you let it dry and tape over it before doing a color next to it, or do you free hand colors next to each other after the initial one? I imagine you couldn’t tape over the putty and still get a crisp line. I feel like I am missing something.
Good question Nicole! The putty creates a barrier on one side so you will only need to tape the other side to do that stripe. For the paints just wait until they are dry and then tape over them!
xo
m
Thanks! I re-read it like 5 times and I figured it much be a common sense thing, but I just couldn’t get it. 🙂 Now it’s like, “Well, Duh!” Thanks again.
I love the texture on this! It makes it very painterly. The off-center is nice too. It makes it much more visually interesting. I think your version of this project rocks!
You are pretty much the coolest kid I (don’t) know! Thanks for another amazing project.
I loooove this so much. What a fun mix of paints and textures. It fits the room perfectly! Love!!
Hi Mandy! Your colors are beautiful. How do you choose?
gorgeous!! perfect mix of colors and textures.
Yours is way better than the original, I must say. The off-centeredness of it, the open spaces, the various textures. Just fantastic. I’m thinking I might let my kids help paint some small canvas versions of this.
love, love LOVE it! I made a much smaller and simplified version of something similar last year (in clock format!), and now I’m feeling inspired to tackle it in a much larger wall piece. The texture is amazing! Totally gorgeous! 🙂
UH!!! Knock me over! In love with this pinwheel idea. SO happy you shared.
This is amazing! Yours it totally more awesome than the inspiration. I am definitely going to have to give this a try.
Such a fun piece Mandi–thanks for the walk through!
What?! You don’t do the redneck thing and just stick your arm out the window and hold stuff to the top of your car fervently praying the whole time? That’s my method. 🙂
I love it! You’re right, you definitely needed a big piece of art to balance that wall and this was a wonderful (and cheap!) way to do so.
I would never think to us watercolor on wood…because apparently I don’t think outside the box like that. Way to think outside the box. 🙂 Looks really great!
I fell in love with this piece right away but I love it 25x more now. I couldn’t tell from the original post that there was texture in there! Awesome. I just love it.
I LOVE how you made it kind of 3D… I wouldn’t have thought of that!
I can see this as four 4×4 squares and done as a triptych-type piece of art – a fourtych if you will. You know, cause you may have a REALLY small car or ride a bike. Thanks for the inspiration!
I have an extra peg board just begging to look like the one above. So creative!
The original artist from the HGTV piece is Bart Vargas just FYI
Awesome! Thanks for letting us know Quinn! Here is a link to his website https://bartvargas.com/paintings/nova
xo
m
I am going to use the idea for a headboard for my bed. I love the water Colorado on the wood.
that is really beautiful! thanks for the tutorial.
this is pretty legit. looks amazing in your space!
I love this! I am in the process of making my own. How thick was your plywood? I got the only 4×4 piece I saw at HD but it feels a little heavy to mount with finishing nails. Maybe I will nail it as though I bought the 2×2 pieces. Just wondered if I accidentally bought a much thicker piece than I should have.
They ply that we used was 1/8 but I have used up to 1/2″ and it was fine with finishing nails (just make sure with something heavier that you are hitting a stud!)
xo
m
Love this! The colours, the textures. Everything about it is awesome. Great job!
Meet the original artist behind the inspiration for this whole thing. https://bartvargas.com/
He’s been doing this for years and has an international following. In fact the piece that was originally featured in the HGTV article was his. Props where props are due.
I have some plaster of paris (POP) laying around the house. Do you have any experience using this instead of water putty? If so how do you recommend tinting the POP?
Thanks!