This post brought to you by Flood Wood Care. All opinions are 100% mine.
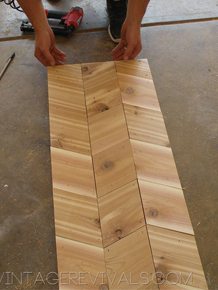
(Read Part 1 on how to cut and assemble your shutters here!)
Part 2 of the Herringbone/Chevron Shutter tutorial is all about staining. Once you are finished building your shutters its time to make them your own.
![]()
We all know that I am not a long drawn out process type girl. I like things that are fast and that work. Living in Southern Utah our houses are exposed to a lot of sun (one thing that Court and I both noticed when we got back from Paris was how sun-bleached everything looked. Like EVERYTHING.) I knew that I wanted my shutters to match my front door but I didn’t want to have to put 9 coats of stain and poly on them.
Here is where Flood® Wood Care comes in. This is literally a one step process if you are using new wood (HOORAY!!)

Flood® OneCoat Waterproofing Finish is an Exterior Waterproofing Finish Stain, which sounds like a mouthful but, here is what you really need to know. If paint and stain had a baby it would be One Coat. When you typically stain something you put the stain on and then wipe it off, your color will then lighten as the stain dries. Where as, paint is the opposite. You put it on, let it dry, and it darkens to your chosen color. One Coat is like paint in that you put it on and it darkens, BUT it also becomes transparent so you can see the wood grain like you would with stain.
And because its waterproof and has Climate Guard there is no need for a top coat. BAM. I LOVE stuff like that.

One Coat comes in 6 different colors,(none of which I loved, they all read pretty orange and none of them were dark enough to match the existing color of my front door) BUT here is the best part, it is tintable! I had my friend at Home Depot tint it to Coffee Bean (a color from a different Flood line). One Coat is available exclusively at Home Depot FYI.
Originally I thought that I wanted the shutters to be high contrast:

But when we had them mounted they were just too…what’s the word…fairytale story?
![]()
But I still loved the idea, so whats a DIYer to do? Just keep swimming, oh wait..that’s what a fish would do. I just kept staining.
To get the slightly varied finish instead of painting it on and letting it dry, I rubbed it on with a white rag and did 2 coats. You can see the difference in the last image.
![]()
Much better right?
I loved how easy One Coat was to use and how error proof it was, just make sure that you use a plastic drop cloth when you are staining because its waterproof, and you would not have a happy husband if you had permanent stain on your driveway.

If your outdoor project is a deck, a patio, shutters, a fence, or a dog house its surprisingly easy to get great results with a product that takes all the guess work out of the situation. If your wood is not new and needs prepping Flood has some great products for that too and because One Coat is so revolutionary you don’t have to wait the standard 3-4 days for the wood to dry, you can wash and finish it all within a few hours. Beth has a great post about prepping and staining her old fence.
And because sometimes we all need a little excitement in our lives (especially when it comes to working outdoors) Flood is hosting a killer sweepstakes! Flood® Sweepstakes are helping you to get your deck refinished and get some big bucks to help celebrate! If you win, Flood® Wood Care will provide all the supplies AND labor to prep and stain your deck PLUS $2,000 for the deck party of your dreams! (You better invite me if you win!!)
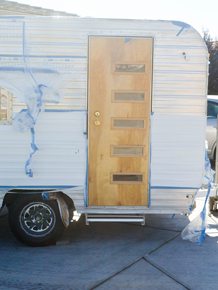
Part 3 of the shutter saga will be all about mounting (I am waiting for something to arrive in the mail still) and cost. And just for fun, here is another before and after.
![]()
Love Your Guts, Mandi


You are such a rockstar! Do you realize how you are changing and improving the world? Your creativity and originality is astounding! Wow! LOve this idea too!
Do we really need to ask twice about the shoes?
Nice job, btw
Those look awesome!
That really looks like you if you were a shutter…lol. Great job bringing your personality outside! 🙂
Awesome. How do you keep coming up with this great stuff!!!!
Her grandpa made them for her. (I think… I don’t remember 100%) Anyway, she did a post about them awhile back, called (something to the effect of) “More about me than you ever wanted to know”.
Her grandpa made them for her. (I think… I don’t remember 100%) Anyway, she did a post about them awhile back, called (something to the effect of) “More about me than you ever wanted to know”.
Epic! I love them!
Wow! Seriously AMAZING!
Danielle
Yep…I was right in my comment from your last post. You even finished them in the traditional European way to stain/paint herringbone shutters. I think it’s cute that so many people think this is an original idea 😉 You can tell that many of your readers haven’t traveled outside the U.S. I’m glad you had such a great time in Europe that you brought home a little of the flavor to add to your own home 😉 They look really cute with your house style & give the front of your house a big pop of personality!
You’re passive aggressive rudeness is annoying.
LOL Mandi has been talking about these shutters for 6 months back when she used herringbone in her entryway.
These are really cool! And no matter where they first originated, you’re an original in my eyes. 🙂
Donna
What a great change – a little facelift, if you will. The planter and garden stool by the door look great, too.
Seriously fabulous. It was just what the exterior was missing!
Champagne Lifestyle on a Beer Budget
These are VERY cool, Mandi. I’m with Donna…this is the first I’ve seen of them and I love.