Thin Brick, Faux Brick, Half Brick, whatever they call it in your neck of the woods, brick veneer installed on a interior wall it can look like a million bucks. This post is a step by step guide on how to install a faux brick wall inside your home.

Everyone Loves a Brick Wall
Our house is a builder basic beige box in Utah, very far from the urban loft vibe that I want in my heart. Once I decided to capture my inner New Yorker it was time for a makeover. The very obvious first step in turning the living room into a loft was a brick wall.

(Just a reminder, this is what we started with)

Where To Buy Brick Veneer
I bought my brick veneer from a local mason (the same amazing guys that we used at the restaurant). I paid $5.00+ per sq/ft. because I took all of their remnants. (The original plan was to paint it but I sort of loved it how it was!) You can also buy it at Home Depot but I would definitely check out local shops first! There are also companies that sell whole wall systems that include metal tracks and brackets. We’re on a budget over here so we’re doing it the full DIY route!
Supplies You’ll Need:
- Brick Veneer
- OmniGrip Mastic (you can find this at Home Depot)
- Trowel
- Laser Level (see other suggestions below!)
- Marker
How To Install A Faux Brick Wall
I found a lot of conflicting info online about how to actually install brick veneer over dry wall. Some online sources recommend installing concrete backer board, or metal lath to your drywall before you put the brick on. Others said that it was totally fine to install it directly to the drywall if you are using the right kind of thinset. So I decided to ask the experts actually in my life (that do this day in and day out) what they thought. They said that installing directly to the drywall is the way that they do it, and have done it for the last 25+ years. So that is what I did.
Continue reading to see the debate resolution!
Step 1: Clean Your Drywall
Because we decided to install the brick directly over drywall, the first thing that we did was clean the wall really well. Make sure that all of the dust is off the wall and wipe everything down with a slightly damp rag. If you are dealing with grease and/or grime you’ll want to use something more heavy duty like TSP to get all of the oils off.
Step 2: Draw Level Lines on Your Wall
You can use a chalk line, a laser level, or (if you are lucky like me!) you might already have lines on it! You can see the tutorial for our faux wallpaper here! The look that we were going for was a little imperfect, having such a large space between the level lines worked out so well (That way I’d have something to recheck everything on every 4 rows or so, but it isn’t row by row perfection.)

Step 3: Spread A Thin Layer of Mastic on the Wall
Like I mentioned earlier, using the right product for the job is CRITICAL. We used OmniGrip (you can order it on Prime or pick it up in person at The Home Depot) Its is a spreadable mastic and it worked so so well.
When you are ready with your lines, the first step is to spread a thin layer of OmniGrip all over your wall and let it dry. This will give the adhesive that you are putting on the brick something to grab to so your bricks aren’t sliding all over the place. Don’t skip this step!


Step 4: Spread Mastic On The Backside of Your Brick and Place
When you are spreading adhesive to the back of your brick veneer, you want a good thick layer. Like a perfectly frosted sugar cookie for those of us that love frosting.

Then, once you have the entire brick covered, use your trowel to scrape out a line in the center. This creates a suction cup when you are sticking the brick to the wall.

Press it down firmly. You’ll get the hang of the entire process really quickly.
How To Space The Bricks
The best way to work is to start at the bottom and work up in a medium sized section. I didn’t want the brick to be perfectly spaced, so I just used my finger to check the spacing. In the picture below you can see a piece of wood that is the new baseboard. We used this to figure out the spacing from the floor. If you want your bricks to be perfectly spaced you can use tile spacers.

It took about a day and 1/2 to get to this point (with 2 people buttering the bricks and 1 placing them).

Brick Patterns Above Windows and Doorways
When we started working on the second wall I decided that I wanted the brick Soldier style above the windows. Soldier style is when the brick stands in a uniform vertical line.

Which meant that we needed to change the brick above the doorway that had already been installed. Lets go back to the installation debate. The conflicting info on the internets say installing veneer to drywall is a bad idea because you are essentially only adhering the heavy wall to paper.
That sounds absolutely HORRIFYING right?
But. There is not a doubt in my mind that installing it directly over drywall is a great option. Check out the brick that we pulled to change the style above the doorway.

That is the paper from the OTHER SIDE of the sheetrock.

Crazy right?
Cutting Faux Brick Veneer
To finish off the rows along the windows and doorway we tried a few different techniques.

Using a Brick Hammer
The first (pictured on the left) was using a brick hammer. Which is basically a hammer with a chisel on one side. On a scale of 1-10 I would rate this technique around a 5. If you are going for rough imperfect edges it is great, but if the edges along the doorway are the only places that the brick is broken it looks a little weird. And it is hard to break the piece in an exact size.
Using a Tile Saw
The next technique (on the right) that we used was a wet tile saw and it worked SO well. It was easy to control the cuts and worked especially well for the long cuts along the ceiling. This is what we ended up using and I HIGHLY recommend it.
Now that your faux brick is installed, its time to grout and finish it off! Check out Part 2 of this tutorial here!


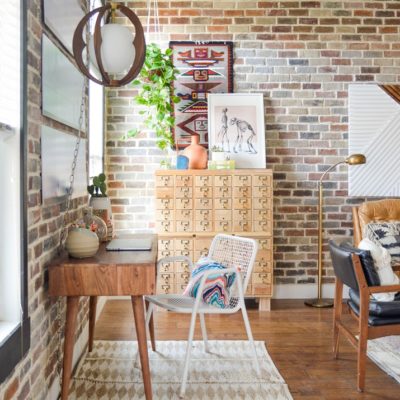
I’m basically hyperventilating over the “finished” photo.
that really is an impressive job
Wow! It’s like buying a whole new house without moving. What a transformation! I can’t wait to see how you decorate & style it.
Really, really love the look of the upright bricks over the windows and door. That was worth going back and changing. It totally gives it the old warehouse/architectural/been here forever look. Great project! I can’t wait to see if/how you install art/shelves etc on the brick!
I have to say that your projects are like nothing I see anywhere else, I’m always amazed.
I’m so curious to see how this project turns out! But I have to say I’m a little sad to see those shelves between the windows go — they were my favorite part of the old room design. But I trust you have something awesome up your sleeve for this design!
I really like the way you never follow the “in” trend. You have your own style and go after it. Everywhere in design you see things getting painted, such as brick and wood. You on the other hand do the opposite. Cuddo’s to you. I hope you like the finished product. looks like lots of work to me.
I love it! I would worry that when you go to change the wall again that it will destroy it when you take the bricks down.
I am soooo glad you’re sharing this. I really want a white brick wall on one wall in my kitchen extending out to the dining room, but was nervous because of the drywall. This looks relatively painless. :0)
Debbi
Looks GREAT! I love the look of exposed brick – always. I hear you on the installation though – we gave our fireplace a new lease on life with stone veneer, and the idea of a heavy wall of stone (or brick) falling on you is a scary one! I just posted the how-to today! Great work!
https://evolutionofstyleblog.blogspot.com/2015/03/how-to-update-your-fireplace-with-stone.html
It looks awesome, but I have to admit it seems out of place in a stuccoed tract home. I feel like your soul belongs in a house with history. Do you plan to stay? Because this is a project that many cookie-cutter homebuyers just won’t get.
Beautiful, I love it.
in general i’m against any kind of decorating trick that makes an interior look structurally different. there is some pretty cheesy looking brick veneer (borderline textured wallpaper). i think the key to making sure this doesn’t look weird is to 1) understand the architectural style and period and even the location of your house and 2) limit the brick to a small area like a feature wall. are other homes in your neighborhood built out of brick? is there brick in other parts of your home? it seems like a lot of interior design blogs focus on trends and room makeovers but it needs to make sense for the whole house. consider the exterior. this is not easy to change if you get tired of it.
Fantastic! I love interior brick walls & wondered about installation. Our den has a fireplace of the same brick as our home exterior; I’d love to brick the entire wall it’s on for texture & contrast to the painted walls. Thanks for your inspiration & practical guidance. Can’t wait for the next installment!
Amazing! Love it!
I LOVE this! Where did you get your brick from?
I LOVE IT SOOOOO MUCH!! Amazing transformation~
This is amazing. I thought the first photo was one of your inspiration photos: it looks like a completely different space. Nice, nice job.
This is SUCH a cool idea!!! I love how fearless it is – can’t wait to see how it turns out!!
Just voted for you. Good luck! “Operation Lofty Intentions” is going beautifully. Fingers crossed for no “do, redo” redux all over agains!
Looks amazing.
Girl you have some major balls to do that! You are amazing. I would never have in a million years though to add my own brick. Why not stick with the cool faux 80’s brick wallpaper route. Oh wait, that’s out? Who knew!
I can’t wait to see the finished! I would love to add a brick wall in my basement, so I’m pins and needles!
Great job! Our first apartment had brick walls in both bedrooms but were not insulated! But, man, did they look nice!
$5 a square foot! I’ve been wanting to do this for over a year, but I priced it about $9 a square foot (https://www.homedepot.com/p/Old-Mill-Brick-Boston-Mill-Brickweb-Thin-Brick-Flats-BW-37001CS/203431771).
Unfortunely, I’m in NJ so Quickstone isn’t on option but I’d love any resources you could send my way.
Pretty, pretty, pretty please!
Check out the thin brick from General Shale. They run around $5-5.50 a sq ft. https://generalshale.com/products.php?type=Thin_Brick
I FREAKING LOVE THIS! Haven’t been this excited by a blog post in a looong time! Can’t wait for the next post but I totally get the loft vibe allready!
You’re bad a$$. The brick veneer looks amazing! We’re truly blown away.
Holy Cow! Talk about transformation!
Thanks for the tips! I’ve been wanting to do exposed brick when we get a home, so I’m so glad you’re doing this to yours first. That way I’ll know what I’m doing when the time comes.
Wow Mandi! Such an incredibly cool feature! I really wish I lived in a neighbrood I thought I’d want to be in long term. But I’ll definitely reference back if I ever get the chance to try this out!
Looks great, just one thing. That’s a lot of weight to be applying to the cardboard face of the drywall, I really hope it lasts. A better and safer way of doing it would be to replace the dry wall with cement board and glue the bricks to that. I’d hate to be sitting next to that wall if/when it comes down.
You also post that applying it over drywall is safe and use the brick you pulled out from above the door as an example. Well, that small patch of drywall is not holding up NEARLY the same amount of weight as the larger expanse so that argument is moot. Now add the weight of the grout and…bad idea all around. Again good luck to you and anyone else thinking of doing this but I strongly encourage a cement backer.
I laid it 20 feet high on drywall
hi mandi! I love how your brick wall turned out, i especially like the painted one you put in your restaurant. This is such a great idea! Beautiful!
Hi, you have totally inspired me to do this! ?. We did an addition to the back of our home an I wanted to keep wall unfinished brick, but contractor said we couldn’t. ?.
I do have two questions though… My wall has several outlets, cable an 2 electrical, did you use wet saw to cut these out? And how were you able to keep them flush?
I don’t see an answer posted about this question, but I also want to know about the electrical outlets!
where did you get the brick, I want to do this. thanks, angela
Congrats on the work few suggestions though i would try to keep all my head joints in a vertical line and make it work out a whole brick at the top of the wall as well as hit doors heights.
Omg omg ahhhhh! I can’t tell you how exciting it is to come across this post! I actually make my own bricks, and also make various cement and hypertufa work. It never occurred to me that I could use my own bricks on a wall in my home…exposed brick is one of my favorite design elements in a home or business. Thank you for the inspiration!
hi – great stuff – really valuable article – i’m afraid i can’t find Part II though? and the mastic you applied to the wall to have something to stick to – did you let that sit and dry first? or did you just go for it right then and there? thank you!! I’m about to undertake the same project and i found the same conflicting information re hardi backer vs no hardi backer (cement board). I would love to know how you applied the grout after brick was up. thanks in advance!
I’ve been toying with doing a brick wall in my tiny eat in kitchen to cover up a rather dreadful drywalling job done by a previous owner. I was always afraid of how much work it would be, and time. Plus expense according to the other sites I’ve looked at… so much more work than what you have demonstrated here. How long have you had the brick up on the drywall? Is it still working out ok? Im just curious if I could really get away with just putting the brick against the dry wall … Im apprehensive…
Hi-we just started this project and are experiencing brick slippage not the wall_ I was wondering why you decided to apply your omnigrip to the wall and let it dry and to backbiter the brick-I have not come across anyone else doing anything like that -did you ever experience slippage/sag?
Hi Lolla!
We had some friends that are brick masons tell us to do it like that, so thats why we did it that way ;). We had very minimal slippage but when there was some we just readjusted it and pushed the brick harder into the wall and that did the trick! Hope this helps!!
xo
m
Hi Mandi
I absolutely love what you’ve done. I was contemplating installing a similar brick veneer to the common wall in my circa 1890’s home row house…. I was assuming that I had to apply the metal lathe to existing drywall but if it can be done without that …. I am even more inspired. I had a question though….do you know if the existing drywall needs to be a specific thickness? and… secondly…. I will be applying it onto the common wall that runs up my stairs ( about 17 feet at the highest point )….has your brick held up well without any problems without the metal lathe?
Thanks so much
Cheers
Marcia
I think your work looks fantastic! I just think it would look a little more authentic if you removed the white trim because a real brick wall would never have trim like that.
Where did you get your brick and what colors are you using? I LOVE it!
Hoping you are still replying to this post. I would love to do this as a back splash in my kitchen the problem is the previous owners put 12×12 mirrors (cutting here and there to “fit” it in….behind the stove, refrigerator… You get the idea) so when I removed them (hot gun, wood shims & putty knife) needless to say there is drywall damage from the glue they used. Not as bad as where you removed already placed brick…. Question do you think I can install these without repairing the ripped drywall? I do not object to anything else on the wall, it’s a very big kitchen and I am trying to avoid fixing the drywall to put something over it. All ideas are welcome!
Hey Cindy! I think it would probably be fine, but if you’re concerned it wouldn’t be super hard to replace the drywall.
xo
m
HI! I’m hoping you are still replying to this post. I was very blessed to get my hands on about 250 sq ft of high end brick veneers for $100! I’ve gotten all the materials needed to start my wall, but was curious as to what adhesive you are using on the back of your bricks? I will be applying mine over cement backer board, but am torn on what adhesive I should use. Help! Love love love your wall! Thanks!
BEST tutorial ive seen! im getting ready to backsplash our kitchen in veneer and this helps me so much! thank youuuuuu
I’ll be working on this project for month of may, what adhesive did you use on the brick. Your frosting, u wasn’t sure if that was more omnigrip or thinset, please advise.
It was OmniGrip!
xo
m
Thanks, I can’t wait. I had a professional do my bedroom last year, now I’m gonna tackle doing the fireplace myself with the leftover bricks! Your post was inspiring, loved it.. Did you do a YouTube video?
Great job on the brick wall 🙂 I also recently installed brick veneer over at my condo loft feature wall up to the ceiling (17ft).
I was looking for the realistic vintage wall look, and it turned out great!
thanks for the info. just finished a fireplace/tv wall with brick veneer, and also stained pallet wood on the side walls – oh and a barn board fireplace mantel I made for 50.00
I never found out where she actually got the brick vaneer from. I’ve been looking for this color combo but having trouble? Did anyone find out where it came from?
-Jeff
i am interested in this, too.
Do you think it would be okay to install brick veneer on a wall that has 30-year old wall paper on it?
I love love love your site but I don’t get this — it looks really fake. Plus it made the room look dark and cheesy.
Wow! Your wall is awesome. Thank you for sharing. Would you mind sharing the total cost of this job with labor? I am planning to do the same in an almost identical space and would like to know cost to prepare. Again, nice work it’s beautiful.
Love your wall. I am doing my kitchen back splash and was wondering what color of grout did you use. Thanks 🙂
After a couple of years any problems with the wall?
None at all!
Love this! We are doing a column in our kitchen with a very similar brick. Your instructions were very helpful as they confirmed my plan that I already had in place. I know you said you used the “finger spacing” method, but I am extremely A-type and am nervous about things being straight enough. I would like to use some spacers and I am wondering if 1/4″ are wide enough or if I need to get some 1/2″. I love your grout to brick ratio so I am wondering how wide your grout lines are.
Whitney