Hello and Happy Wednesday to you! Yesterday I shared part 1 of the sliding bypass barn door tutorial, and today we are chatting about the string art portion.

The inspiration for this project came to me in the 3rd grade. Apparently inspiration doesn’t have an expiration date. If you were lucky enough to make one of these string art projects back in the day you are already a professional on these closet doors. Congratulations!

If you’ve never ventured into this geometric string art world, let me be your tour guide.
Basically for a project like this you are using straight lines at lots of different angles to create a rounded shape. (we’ll get into this deeper in a second)
There is one rule for creating art like this. You need to have the same number of holes on your horizontal and vertical axis. That is it.
Because my vertical pieces were roughly twice as long as the horizontal ones, the spacing between holes had to be different but each piece had 44 holes in it. I settled on 44 because that is what I could evenly divide the length of the horizontal board into. And once I had the number the holes on the vertical board were spaced accordingly.

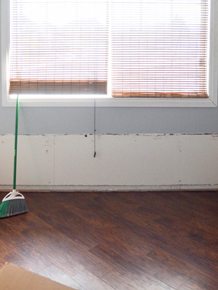
Notice in the picture above that the marks aren’t centered on the board. I compensated the measurement for the boards that fit on the inside of the frame once it’s built (and I wanted to make sure that the string art was far enough away from the back.)

Because we were making 2 doors, we needed holes on 2 vertical and 2 horizontal boards for our frame. Instead of marking all 4 boards, I marked the spaces on one of each and then we stacked them and clamped the corresponding board underneath so that we could drill them 2 at a time. We put a 3rd board at the bottom so that the drill bit didn’t hit the concrete, and a piece of painters tape on the drill bit to mark how deep the bit needed to go.


Once this was done we assembled the doors (see part 1 for more info on that!)
For the actual string part of the string art I bought 3 packages of white cotton clothesline from Home Depot. I made a giant 5 gallon bucket of instant coffee and let the rope sit in it for 12 hours. After 12 hours I took it out and let it air dry completely over night. Then I put it in the bathtub and rinsed it with cold water until the water ran clear.
Then I made a HUGE mistake. I put it in the dryer.
Do you know what 300 feet of rope looks like when it comes out of a dryer?
It looks like a knot the size of a 6 year old.

…we had it separated and ready to go.
Start by numbering your holes (mentally) as follows:

To make things easier I added a piece of painters tape to the end of the rope so that it could fit in the holes, and so that it didn’t fray more.

On the other end I tied a simple knot (always start on the bottom, that way you can hide the knot!)

So if you start (like I did) on the far hole on the horizontal piece, you will take your rope and thread it through the bottom hole on the vertical piece. 1 to 1.


Then you will take your string to the next hole (#2) on the vertical piece and thread it to the next hole (#2) on the horizontal piece.

Keep going all the way up your door, making sure that you are pulling it super tight.


When you are done, tie off a knot and step back and admire your handiwork!


Want more info on this room? Check out Ashy’s Room reveal here!


oh mandi you made me laugh when you said do you know what happens when you put 300 ft of rope in the dryer….. oh i can’t even imagine what that may have looked like. but the doors look fabulous!
This door is beyond words. I love it. I’ve been reading your blog since there were only like 20 pages of “previous” to click on, and I’m pretty sure I’ve never commented, or if I have it was such a lame comment that I have erased the memory to free up brain space. Anyway, this post just pushed it over the edge for me. You are probably one of my favorite people on the internet, and I love your blog. I live in Utah too, and even though I’m three hours north of you, I feel a little cooler just because I’m ‘close’. *Embarrassing!* I also want to to know where you get your energy! Anyway, that’s all. Carry on!
Emily Henderson just listed your blog as one of the best to check out! Been reading for awhile and never really posted but wanted to let you know in case you didn’t see. Go Mandi!
https://stylebyemilyhenderson.com/blog/3-new-blogs-to-read-while-watching-the-bachelor/
Oh my word. “A knot the size of a 6 year old.” I needed that laugh. And I’m so glad to know I’m not alone in making those kind of mistakes. 🙂 Absolutely love these doors and that string art makes it completely one of a kind. Time for me to find something that needs some string art around my house.
I love it. I do remember using this craft as a kid but it’s nice to see the refresher on the details as I wasn’t totally sure I remembered it completely. I bet it’d make a cool piece in nearly any room with any decor style
Great Spongebob reference….hilarious! (The doors are great, too :))
girl, that is hottttttttt.
I found you via yahoo’s 10 best blogs to follow in 2015 and found the key to making the doors that I so want to make! I love your blog and was so very happy to find you! Congratulations and wishes in the year ahead! I look forward to meeting you here!
You never cease to impress Mandi! So creative……
Hi Mandi and drill operating dude in photos. I know you both are young right now so working off the floor seems OK to do, but once you become an old dude like me working off the floor wears you down. Here is my suggestion for you. Buy one of those 6 or 8 foot long plastic folding tables to work off of. Easy to set up and store, plus you will work faster and last longer than constant squatting, bending etc. Really enjoying your posts, keep up the creative work.
Mike
72 hours later, that had me lol.