Hey hey!! Lets chat about closets, shall we? Some are good, some are bad, most are completely boring. But guess what? Boring isn’t a word in our vocabulary any more alright?

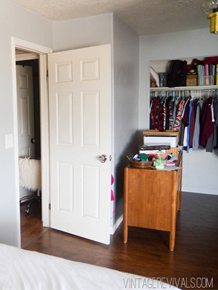
The closet in Ashy’s room is pretty huge. Not walk in huge, but it takes up an entire wall. When we replaced the carpet with hardwood a year ago, we pulled out the bi-fold doors and made the executive decision that we were not allowing them back inside (think hippy chained to an oak tree style). So for a year Ashy’s closet has been open (its a good think my mother in law likes to keep things organized!) When we did my MIL’s office, we build a lightweight sliding barn door out of conduit from the Home Depot, it is still one of my favorite projects. So naturally the urge to do something similar was ginormous. This tutorial piggybacks a lot of what we did for that project, so check that out if you are trying this out. The difference is that Ashy had 2 doors, not one. And so that meant that it had to be a bypass door. Just for fun, Google bypass barn door hardware.
It is as much as a mortgage payment.
Daaaaaang.
Double closet doors are something that a huge amount of us live with, and so a solution was in order. And not the solution of spend all of your grocery money for the next 6 months. After thinking about it long and hard, I feel like we came up with a pretty great, budget friendly solution.
First things first, lets talk about the doors themselves.
The whole point is to make them as lightweight and sturdy as possible.
Because DIY (at least Vintage Revivals DIY) is full of failures and readjustments I thought you guys might enjoy the real life situation that we had. So lets get that out of the way first, that way there wont be any confusion about the instructions.
When you are creating ideas from scratch sometimes (um…all the time) there can be things that you miss when you are working through the design process. These closet doors had a huge miss. Because I had made the actual door before I used the same measuring technique for these ones. Do you know what that left me with? See if you can guess the problem from the picture below.

2 doors.
No bypass.
A GIANT gaping space. (The doors have to be able to cross in front of each other so one of the doors has to be about 6 inches off of the wall. You could see straight into the middle of the closet from a side view. It was like looking down the barrel of a loaded gun.) Also, I may have cropped out Court’s “ARE YOU FREAKING KIDDING ME?” face from this picture…but I get the feeling that you’ll be able to sense the frustration coming from his hand.
 So there are a few things added to this tutorial that are compensating for this little situation I created (I’ll let you know what is of utmost importance!)
Start by taking 4 measurements.
1. The width of the wall
2. The width of where the closet doors need to be (Make sure that you are accounting for the bypass!) *The actual closet door openings aren’t centered on this wall (look at each corner) But I wanted the doors to be the same size, so they bypass directly in the middle of the entire wall, not necessarily the center of the closet openings.
3. The height of your ceiling.
4. The width from the truss on one side of the wall to the next. We are mounting the hardware into the trusses and they don’t need to be the ones that the walls actually attach to. You can adjust the eyehooks on your doors to compensate for spacing.

The way that we built the doors themselves are part of the string art design. If you aren’t doing something like that on them, I would TOTALLY recommend using this tutorial for the actual door structure.
If you are doing something like the string art, lets get started.
You will need:
Premium 1×4’s for the outer frame
Non-premium 1×4’s for the backside (they’re cheaper!)
4×8’ sheets of underlayment (you can have this cut to size at your local Home Depot if you need to)
Drill and bits
Saw
Nail Gun
(4) eyehooks
(4) 2” fixed wheel casters (make sure that they are fixed, you don’t want the kind that can spin all willy nilly.)
(2) 1/2” Steel Conduit pipes cut and threaded to 2” less length of measurement #4 (Home Depot will cut and thread the pipe for you!)
(4) 1/2” 90 Degree Elbows
(2) 1/2” T fitting
(8) Bolts
(4) 1/2”x1” pipe nipples (these connect the elbows to the T)
(2) nipples that will connect the floor flange to the T fitting (we got a bunch of different lengths and returned the ones we didn’t use) *We ended up using a 3” nipple.
(2) Floor Flanges
Start by measuring and cutting the outer frame of your door. We mitered the edges at 45 degree angles, but you don’t have to if you don’t love that look.
I marked and drilled the holes for the string art (I will go into detail about these measurements and how to in part 2 of this tutorial tomorrow)

Once all of the boards were prepped, we started assembly. We used self drilling wood screws, wood glue, and finishing nails the hold everything together. (Wood glue first, then finishing nails, then a few screws)

We attached both the top and bottom frame pieces to 1×4’s that measure the width of the door.

Then we attached the mitered side pieces to complete the frame.

We filled in the frame with 1×4’s to give it stability and something to attach the backboard to.


The underlayment got a coat of paint before it went into the frame (much easier!!)
It was at this point that we moved them inside and saw the giant disaster. I will admit, I about lost it. This was at the exact same time that I was struggling with The Nugget and it just seemed like everything that I touched turned to devastation. But the show (project?) must go on, so I went back to Home Depot, and got a few more pieces of wood and went back to the drawing board.
We ended up redoing the top and bottom frame pieces, as well as the cross pieces to widen each door about 5.5”.
We also added a row of vertical pieces so that there was something to attach the new section of underlayment to. This isn’t necessary, just a fix for our flub. (You can see it in the picture below)

We attached the backboard to the crosspieces using finishing nails, then puttied the holes. (We obviously had to putty the seam that was created by adding the new piece in.)

We added the eyehooks and wheels to each door (see this post for more info on that!) and took the doors back upstairs. They fit perfectly!! I celebrated with an instagram post. (and probably a cookie)

When it comes to attaching the pipe to the ceiling, you need to remember 1 thing. The weight of the door needs to be on the wheels, not on the pipe. The pipe/eyehook situation is to guide the doors, not to support them. Got it?
Once you have your wheels and eyehooks on the doors it is just a simple measurement to figure out how low your pipe needs to hang (I bought pipe nipples in a bunch of different lengths and returned the ones that we didn’t need to make the process easier)
We started by stacking the doors on top of each other and assembling the hardware.

Then we lifted the doors up and made whatever adjustments we needed to (changing out the pipe nipples for something longer etc.) and marked where the pilot holes needed to be drilled. Remember when you are using large bolts a pilot hole is a MUST.

We finished it off by bolting the floor flanges to the ceiling.


Part 2 is coming at you tomorrow! Remember, if you are using this tutorial, you will want to read THIS one too!
Questions? Leave them in the comments!


Does the eye-bolt-on-pipe cause any kind of metal-on-metal icky scraping sound when you slide the doors? I know they’re guides only since the weight rests on the wheels, but I imagine the kind of occasional screeching that sends shivers down the back.
My question too Kelly.
Kelly-it shouldn’t because the wheels are fixed and the pipe should be centered in the eyehooks. In theory since the wheels are fixed you dont need the guide except to ensure that the doors dont fall over if they ever get bumped.
I have been loving barn doors – but yes! They can be so expensive. Even just the hardware alone! But they have been on my wish list 🙂 Looks a little more doable for us now. Thanks for the great idea!
They’re amazing, of course! I’d like to explore a similar style for my future laundry closet in my family room. But they would need to be swing out doors. I’d love to hear suggestions for modifying these mandi style to swing out doors.
Hey Mandi,
Check out Emily Henderson’s blog, she mentioned you, the nugget and other spectacular things you did. Congrats you are awesome!
https://stylebyemilyhenderson.com/blog/3-new-blogs-to-read-while-watching-the-bachelor/
Could you mount this to the wall, rather than the ceiling? I’m trying to wrap my brain around how I could do the double rod but mounted to the wall, like you did with the first one you built.
Come off the wall with a floor flange and short nipple, then a tee, short nipple and last a 90 degree elbow. Should get you the same outcome, just off the wall instead.
This is incredible!
x kaitlin from 5ftave.blogspot.com
I have the same question as Kelly about the sound. Is the pipe threaded thought the eye hook? Thanks for sharing!
Hi Mandi, excellent work!
I am going to build FIVE doors (with “normal”, off the shelf sliding trails, though) using your fabulous tutorial for the doors. I have a question though: did you use some special kind of nails to attach the panel to the frame? It seems that most of the nails have quite a bulky head; since they are going to be on the visible side, I am worried they might be impossible to hide with putty. Is there a special flat-head kind I should look for?
Full disclosure: my boyfriend doesn’t know it’s all coming from your blog. I’ll tell him when we’ll be done or there is no way he is going to let me try (“from something they wrote on the internet??? do you know how much crap they write??”). I’m acting all super confident as if I’ve always known how to make a door. I mean: didn’t they teach you that in kindergarden?
Use brad nails. They are often used in reupholstering and have no nail head just like nails use with air nailers.
Thank you for this tutorial. it was really easy to understand and implement. I tried making a barn door for my house, and i was successful in doing it.
thanks for sharing such an nice post. keep on sharing good post. looking forward for more useful post.
I like your design. I’m trying to conceptualize something similar. I don’t have a lot of space and want to make doors that swing out. Since I’d like to also add a shoe rack of sorts to the inside of the doors, it would have to be pretty light weight. Have you done anything that swings out? Working on anything pertaining to shoes/jewelry on doors?
Looking at doing this for a tiny home build and putting shallow shelves for miscellaneous bathroom items with no other dedicated storage space. What was the depth of the overall build from the closet wall? I’m curious about the clearance between the doors themselves as well as the wall.
I recently built a door with the same hardware. For me there is a small amount of scraping, but rubbing some soap on it makes it no louder than a pocketdoor or bi-fold doors). The top bar is just a guide, but I think my floors are a bit slanted. I’m so pleased with the look, and our costs were under $200 total for everything (our door is 48in wide and 85in tall 3in deep-the wood was the most expensive cost-some use free pallet wood and that would bring your costs down to $72 with an 8ft pipe), that we will continue the same design for our washer/dryer closet we are building next. I was looking for the by pass door design, and I am glad I found this!
You have literally just saved our 800 sq.ft. life!!!! Hubby and I have been racking our brains over how to get doors in front of a storage area. The genius is in the casters – as usual. THANK YOU!!!
We are wanting to try this for our bedroom closets. We have two side-by-side closets that currently have mirrored bifold doors (can’t wait to take those down). Our room is carpeted. Do you have any suggestions on the castors for carpet?
How many feet do you think is the max length be for needing a suport and is there a way to make a support. Love this closet doors are so pricey thank you
This is genius if you have a narrow space and still want sliding barn doors!