I know that The Nugget has been revealed so this post may not interest some, but I still have a few more tutorials to finish up before we can shut this series down!
One of the first things that I knew would need to be replaced was the moulding on the outside of the trailer.

On my trip to Jim’s RV I found out that it was actually called J trim. It is sort of like a mini rain gutter that runs along the entire outside frame of the trailer. It also covers up where the aluminum sheets are stapled together.

We needed (6) 8’ pieces to go around the outside of the Nugs. This was the first thing off the trailer, and the last thing on, and I may have cried tears of joy when we were finally at that point.

Attaching the J Trim was pretty simple. Even though its made out of aluminum, it didn’t seem very bendy, so I was nervous. We started by putting the entire top center piece on. Then we cut a small piece to reinforce the second pieces so that they could sit flush and still be bent. The best way that we found to make the curve was to screw and then bend it to the next screw. Doing this made it a really controlled process so that we didn’t get any kinks or major problems. (We put the putty tape along the outside of the trailer for this part, not on the J trim.)
Lets just talk about screws for a minute. One of the biggest cosmetic problems that trailers can have are rust marks from screws. I knew I didn’t want to put the plastic trim on that covered the screws (I love the look of just the screws!) so that meant that I needed something with superior coating to prevent rust. When we were at Home Depot we came across these Teks roofing screws that had a sealing washer on them. This was a major win. Any sort of hole that you put in a trailer is not your friend, but these screws would be sealed off twice, once with the washer, and again with the putty tape.

Right smack dab in the middle of the painting process we decided it would be easier to tape off actual windows than giant gaping holes…also the 2 day storm that was rolling in was super good motivation.
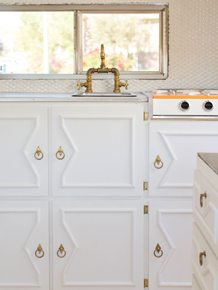
Court cleaned and polished the windows using ultra fine steel wool (0000) and brake cleaner, I could not believe how much prettier they looked!
First I put all of the little corner pieces of aluminum moulding inside the windows, this is what trims them out from the inside. Then we covered the inside of the window (where the screws go) with Putty Tape. A trick to working with putty tape is to keep it as cold as possible. Store it in the fridge until you are ready to use it, because when it isn’t cold this stuff is like working with Satan brand bubble gum.

Next step is to put the window on and screw it into place. Start with a screw in the middle of each side and work your way around. Don’t get overly zealous on the tightening front, just make sure that they are even and tight.
When you screw on your windows the putty tape will ooze out. Just use a clean razor blade to trim it off. Make sure that its clean, when it starts to get gunky its hard to get a clean line.

We had to improvise a little when it came to the kitchen window. Because we added cement board, and the tile, the interior trim piece was too far away to reach the window.

We cut long strips of aluminum sheeting and covered the entire inner frame of the window.

Then we put the moulding and the window back on. You would never be able to tell that there was a little bit of finagling happening because the trim reaches (just barely) the window.

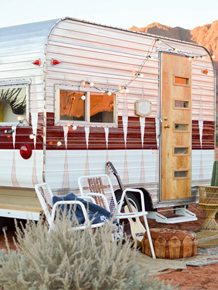
One of the first things that I was excited about was replacing the lights on the trailer. Don’t these little teardrops look so much cuter than the old ovals?
![]()
Because we had to replace the entire backside of aluminum I could place the back tail lights where ever I wanted. I decided to move them up a little higher.
And really, The Nugget’s backside did break the internet or at least the blog (sorry Kim.)

I used my Cricut Explore to make the little sign by the door, and the big Nugget logo on the back. I have plans to put the Bell logo back on the front, just waiting for the outdoor vinyl to arrive!


Have an awesome day friends!!


If I recall, you bought The Nugget from someone local, right? An older gentleman? Have you thought about letting him see it now? He’d be soooo amazed at the transformation….and probably want to buy it back 🙂
You never cease to amaze me, Mandi! Love the Nugget inside and out. So. Well. Done.
Does anyone know where the leather pouf came from? I’ve been dying for one similar but can’t seem to find a good one.
Hey Britt!
I found it at the thrift store about a month ago!
xo
m
You lucky duck! I never find anything good. Thanks for letting me know!
Such an amazing transformation! Good work, Mandi. And, I love that you’re sharing all the nitty gritty bits with us, even post reveal. It’s all about the journey!
While I have no idea what you’re talking about because I’ve never dealt with these kind of renovations, it’s still really interesting! Thanks for sharing. There’s an old camper sitting on my grandparents property, it would be fun to attempt a similar project (like a bajillion years into the future of course) so it’s good to know things like refrigerating the putty tape!
Be still my heart!! LOVE everything about your beautiful sunshine saturated trailer including the stunning desert setting. Totally geek out every time you pull out your quadrangle, whatever the heck it is, and start doing MATH to make it beautiful!! Kudos for all the blood,sweat & tears on this makeover, this was like hand to hand combat, wrestling this trailer into the belle of the ball. Can’t wait for more! All the best to you & your crew!
Love how it turned out! That butyl putty is ridiculously painful to work with — I love the Satan brand bubble gum analogy. 🙂 Congratulations. It looks beautiful!
I have thoroughly enjoyed your creative journey with the Nugget. Lots of great tips…hope Home Depot pays you well for your excellent advertising because it worked on me!!!
the nugget’s backside did break the internet. thank you!!!!!!
I stumbled across this adorableness on Etsy and thought of you.
You NEED this: https://www.etsy.com/listing/210594502/trailer-ornaments-bird-house-ornament?ref=fp_item&atr_uid=5338713&aref=20759263673
Another amazing job well done! Do you ever run out of ideas? Congrats!
Hey Mandi,
I am working on remodeling a travel trailer as well and am looking for a source for new “J-trim”. Where did you source yours from? Thanks a ton, your work is always incredible!
I bought it from a local RV shop. They have some really great resources that I wouldn’t have been able to find elsewhere!
xo
m
Very good blog! Do you have any suggestions for aspiring writers? I’m planning to start my own site soon but I’m a little lost on everything. Would you advise starting with a free platform like WordPress or go for a paid option? There are so many options out there that I’m totally confused .. Any ideas? Thanks!