Dudes! We are overhauling a 1972 Bell Travel Trailer! Follow the entire series from the beginning here!
So the Nugs, the Nugs has been a little MIA lately. It needed a good long time out before things got more out of control than they already were. Remember this post about the creative conundrum I was in? Well I was in deep. It is really easy for me to rip something out if I don’t like it (a little too easy) and I didn’t want to make any rash decisions because I was a ball of frustration over the design. So the trailer and I had to take a break for a minute.
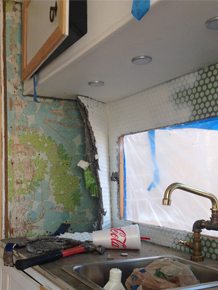
I came back after a few weeks with a clear vision of what I wanted to do. The first part of said vision, was changing the tile. I LOVE the green penny tile. Like so much. But with the other elements in the trailer it was starting to feel really Easter egg-y. Sometimes living with unfavorable choices is just the reality, but in the case of our backsplash, it was less than $80 to fix it, and we were able to bust it out really quick like because we actually knew what we were doing this time (the tile job looks SO much better!)

We used Merola’s White Ceramic penny tile in gloss with Bright White grout. While it might not be the most cutting edge choice in blogland, I love the nod to retro and that it is adding texture vs.. the color/pattern/texture that was happening before.

Instead of saying “Here is the new tile. Bye!” I wanted to share a few things that we learned the second go around. (because there is ALWAYS something new to learn, am I right?!)
With the first job, we mistakenly used a floor trowel for the walls. Which wasn’t a huge problem because the thinset and the grout were nearly identical in color. But we had to be extra careful this go round because we were using Bright White grout and any bit of thinset that poked through would have to be scraped out. So to combat this we used a wall trowel (novel idea!) it leaves a much smaller ridge and a lot less thinset, so you have less of a chance for ooze that is taller than your tile.

The second thing that we did was flip the direction of the mat. Before, we started by laying the full row of un-staggered tiles horizontally (to accommodate for the countertops) and filled in 1/2 tiles along the vertical edge. This this time we decided to put it against the transition trim and used 1/2 tiles along the countertop edge. The whole thing worked SO much better.

The last thing is something that you sort of cant control, but really made all the difference in the world. The weather. We installed the green tile, mid afternoon in the dead of summer in Southern Utah. The thinset started to dry instantly and we had a very short window of time to work with it. The weather this time was much more forgiving and made the whole process significantly smoother.
So there you go! A few more tips that you can add to your tile laying arsenal!


looking good. sometimes you really do gotta take a step back. hopefully things will come together smoothly this time around!
It’s beautiful! So neat & clean looking!
Beautiful! I love that you’ve been true to yourself and honest about what was working and what wasn’t – it looks great!
Mandi that looks SOOOO GOOD. Well done 🙂
Looks great Mandi! No harm in redoing it now rather than living with any regret later 😉
So much better – good call.
This tile may not be earthshattering, but I love it! It looks so crisp and clean and fresh looking. Two thumbs up from this member of the peanut gallery!
Looks awesome! Glad that you followed your instinct. 🙂
Love the texture of the white on white tile and grout. It is so polished looking!
Perfect!
Looks Great! Just a quick question. Why didn’t you just paint or spray paint the tile and grout white?
Such a good question!! We replaced it because I wanted a difference between the glossy tile and matte grout. But if matte tile was the look, then painting it would have been a really great option!
xo
m
I went back and looked at the pics of the green penny grout. I think you absolutely made the right choice. This looks so much cleaner and brighter!
I love love love it. I tried to like the dark grout on the green penny tile but it didn’t sing to me. This looks bright and clean with an understated elegance. Nicely done.
I also wanted to thank you for sharing your learning process, and showing us how even the “pros” don’t always get it right the first time. I can’t tell you how inspiring it is too see you tear apart something you made because you weren’t satisfied and you knew it could be better. I feel so much more empowered to try bold ideas and learn from my mistakes rather than live with something I don’t like and feel down on myself for not being perfect. Truly, thank you. You’ve given me confidence.
Amen!!
Omg!! I had sorta pictured a clean white penny tile (a favorite)!! Especially love it with the bright white grout. Looks amazing, Mandi. Can’t wait to see what’s next!!
I love how calm and airy it is! It provides lovely texture without shouting against that diva yellow wall.
Changing the tile was my reply when you asked for opinions. Much better.
Very pretty. We can’t win them all – and your transparency in the process is so refreshing.
I know it was mentioned above, but it really is so nice to know that I’m not the only one who second guesses themselves after it’s finished. And that redoing it, rather than living with it and hating it, is really not that big of a deal. I’ve said for years that paint color & hair color are easily changed, but to apply that to bigger projects is something I need to add to the “Easily Changed” list. Thanks for being open and honest with your readers! And for the “lessons learned” tips you give.
**Hand claps!** Much better. That little nugget is going to be gorgeous Mandi!
Yes!! That’s it! Looks great.
LOVE how the white penny tile looks. This would look so good in my bathroom.
It’s beautiful! I liked the green, too, but this is a great change.
This is awesome! And the tile job looks pro- so well done… I love that you’re willing to go back and start over on things after you posted them. Fearless is right 🙂
Boring. Safe. Disappointing.
Not cool, Gaby. Mandi ~ The change is great, and most importantly, YOU are happy with it. Well Done!
Wow. I guess everyone has the right to an opinion but jeeze, that’s mean.
Mandi- I liked the green but I love the gloss. I must add that I am not a gloss person. I am not even a tile person. You are opening my DIY self to try so many new things. Thank you for sharing your visions. Thank you for sharing how your visions change and that change is OK.
I have recently started following this project and I love it. I’m excited to see how it progresses now that you’ve taken such a loud element out of the Nug and replaced it with something a lot more subtle – room for more excitement elsewhere?! Definitely looking forward to seeing how the cabinets turn out, too!
So fresh and bright, and the understatedness of it will really allow the other creative elements you’ve added to stand out instead of competing with them like before. Good for you for not giving up! Any plans to clean up the rough edge around the window? Excited to see the finished product!
I thought the green penny tile was cute, but I LOVE the white!!!!! I think it IS the perfect choice!
Much better!
Hi Mandi…did you reuse the aluminum window frames other new ones? I’m wondering if they still covered the window/wall seam with the added depth of the additional wall and tile.
I meant to say “or get new ones”.
We used the old ones! There was a little bit of a gap so we used aluminum flashing underneath and then put the old ones on top and you can’t tell at all! https://vintagerevivals.com/2014/11/the-nugget-finishing-off-the-exterior.html
xo
m
Thank you…totally missed that!
Thank you..