Dudes! We are overhauling a 1972 Bell Travel Trailer! Follow the entire series from the beginning here!

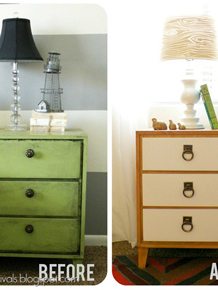
Dun dun dun dun dun dun duuuuuuuun! I feel like these cabinets have been the biggest saga of my whole life. So many failed attempts, so much frustration, but we finally came up with something that I LOVE. Taking a step back for a bit gave me a chance to see with a clear mind what I loved and didn’t love about what was going on. I came to this conclusion, I loved the handles. I loved the white. I loved the exposed hinges. I didn’t love all of the other things.
So armed with the knowledge of love, the situation then became, finding a way to make the teeny handles a bigger part of the design. So that they didn’t look like an undersized afterthought like they did before.
Undersized afterthought just isn’t a good look. Not for outfit choices, and not for cabinets.
That is a fun visual.
My first few new ideas were to put something behind the knobs to make them seem bigger. Guess what? I was hating all of those things, and I couldn’t put my thumb on the reason. Then I had a come to Jesus with myself (and I wish I could have had it with the company that made the trailer.)
Literally every single door was a different size (even the ones that were supposed to be the same!) It was just adding unnecessary activity to the already small space. (Also, just to clarify because there were some questions on the old cabinet post, we hadn’t installed the tension locks on the doors so they weren’t shut completely tight, that is why they look so wonkfest.)

The solution was apparent. We had to make new doors.
Son of a #$(*.
Insert wailing and gnashing of teeth. Followed by standing up, brushing off my paint covered sweats, drying my eyes and telling myself to shut up and get back to work.
This is what square one looks like.

Before we could build, we needed to make some important adjustments so that we could remake doors that had the same measurements. The center board needed to be wider so that the doors on the left could be made smaller and not have a giant gap. We glued/nailed a new piece of wood in and widened the entire thing, instead of taking out the existing piece and moving it over (it was supporting the front of the countertop and honestly, who wants to find out what happens when that comes out? NOT ME.)

Then there was the ceremonial ritual of putty, sanding, more putty, more sanding and paint.

The doors themselves are made out of MDF because I wanted them completely texture free. We cut them down to size on the table saw and glory, they were SO much better.
So now that we were starting with an evenly spaced blank canvas, we can go back to the door design.
At this point I had given up on the idea of putting something behind the knob, I just wanted it to be part of the door.
I got this idea of using 1/2 round moulding to follow the outline of the door + knob and it just would not leave. I wasn’t 100% sure of it, and Court thought it was a horrible idea (his suggestion was to leave them plain and get new pulls) but I had to try it. Home Depot doesn’t sell 1/2 Round in store, but they do sell it online and I was super shocked at how inexpensive it was! So I ordered it and mocked one up. (Don’t mind the fridge door. It has a mind of it’s own.)
")
I didn’t hate it. Court didn’t love it. But I thought that it had some serious potential. So I decided to just go with it, and if we had to flip the doors around and use the other side for cabinet door build out #193094 then so be it. (Jumping a little ahead of myself but notice the piece that the top doors are resting on, we used this to evenly space every gap. It is a lot easier to fill a few nail holes after the doors are installed than to get a divorce because YOU MOVED AGAIN!?! …
")
Because this design was full of freaky angles, a protractor was an absolute necessity. I started by figuring out the angles that I needed by measuring the diamond shaped back plate. Once I knew what angle I needed, I then divided it in 1/2 (because 2 pieces meet to make up the angle). Then (this is super important) remember that on a miter saw 90 degrees is 0, so you have to subtract the angle that you need from 90, and then set your blade there. For example, the center angle that goes around the pull is 125 degrees. Divide that by 2 and you get 62.5. 90-62.5 is 27.5, so you set your blade at 27.5.

I used a guide to mark 1 1/2” all the way around the door. Then I traced the diamond shaped back plate and marked 1 1/2” on the inside of that for our notch. This made it so that I could measure and line up each of the pieces of trim.
")
After they were glued on, we puttied, sanded, primed, and painted them. A screw driver worked best for getting the putty out of the hard to reach corners.

And while this was one of the most technical projects that I have done (it had to be PERFECT or else it would stand out like a sore thumb) I have to say that I am pretty proud of how great they turned out.
The one hiccup that I had was, when I designed the idea, I was using the lower cabinets as my template. I loved that there was a short piece on the outside before it notched in, and that was how I was anticipating all of the doors looking. When I started working on the cabinets that were shorter I found out that to keep the angles (and the 1 1/2” cushion around everything) that those small pieces just couldn’t exist. (It has to do with how teeny they would have to be and the fact that we were using 1/2 round).

One other small update was taking the tarnish off of the brass pulls. I am a huge fan of mixing metals but mixing this finish with the brighter brass on the lawyer shelves, just made them look like such an addition. And not in a good way. I used Brasso and an old washcloth to remove the tarnish and it worked like magic!

All in all I am THRILLED with how everything is coming together over there. The new backsplash looks awesome, and the cabinets are full of the vintage-y charm that I was going for from the get go.


")

And Court? He loves them. In fact every time we talk about them he says and I quote “Those are the most legit thing you have ever made”. Which makes me happy and gives me a complex all at the same time.


it’s looking amaaazing! all the extra vowels are needed!
AHHHHHHH much better. Hardware and cabinet design are like a perfect marriage!
Yes, legit. 🙂 Good job with all those angles!
love!!!!!
Ah-ma-zing!
They are INCREDIBLE Mandi! Seriously, so, so good.
I love it! It is wonderful how you repeated the diamond shape on the floor, cabinets and accent wall. Way to get your mojo back!
Yep, that’s just what those cabinets needed. The geometry in this nugget is insane! and i mean that in the best way possible. Keeping everything really neutral and white is making it not only look bigger but keeping it from getting too chaotic. loving it. good work. def legit.
You lost me at protractor but they do look awesome. You are for sure fearless. Get on with your bad geometry self! Can’t wait to see what you add in the future to make it all pop.
wow! WOW! i am so impressed. the cabinets look fantastic.
So good.
Great work! I have to admit, the backsplash and the cabinet doors were two things that drove me a bit crazy on your work so far. I’m not one to comment negatively, so I didn’t say anything (not that you know me or care what I think anyway, ha!), but your changes look great! It looks so much more cohesive now.
You NAILED it with this design! It’s perfect! I’ll admit that I wasn’t crazy about the first cabinet door design – I’m so glad you were bold enough to start over because this one is so awesome! All the angles (the cabinet door fronts, the diamond hardware backing plates, the floor pattern) look amazing together!
When a hubby says LEGIT it must be too LEGIT TO QUIT. Sorry I couldn’t help it.
Those are gorgeous! Great job. Now you need a vacation to do NOTHING. 🙂
I. LOVE. THEM! They look PERFECT, and I love the repeating motif of diamonds throughout the design, from the floors to the pulls to the 1/2 round. Perfect, perfect, perfect. I was one of the naysayers on the old cabinet design, and seriously, these are beautiful and perfect. These were the cabinets this camper was meant to have.
Bravo, Mandi!
I LOVE IT! Seriously, it looks so good! I almost hesitate to say this, but I think the upper two cabinet doors would make my eyes twitch since they don’t match the dimensions of the cabinets below. Plus I feel like there is a bunch of wasted space behind that extra wide middle support. What is behind there?
Honestly though, the doors look amazing!
Good question Tiff! We contemplated widening the doors (but then they would be like a foot tall and 3 feet wide) or adding a faux door in the center, but ultimately decided it would just be better to put something in-between them. So I am on the hunt for a cute clock, let me know if you see one!!
xo
m
I am so certain that your skillz could make a clock that’s perfect for that spot & cooler than any on the market. Just sayin… =)
You should totally DIY one like this https://www.almostmakesperfect.com/2013/10/29/diy-color-block-clock !!
Your trailer kitchen kicks the crap out of my house kitchen. I agree with your man. legit doesn’t even begin to cover it.
I also love all the angles. It turned out so well!
you nailed it☺️
Serious Love – Love It. All of the angles (cabinets, pulls, floor,wall) make this all fill so cohesive. The brass is beautiful, and all white – divine. truly amazing. I might have to actually buy a trailer now – I am so inspired. 😀
I have been following this whole nugget process, and WOW! these cabinets are AMAZING!! I love that you went with your gut, and knocked it out of the park!!
These are fabulous! So much better than the cabinets 1.0. Resizing the doors was a stroke of brilliance in itself. Can’t wait to see this baby finished!
omg, these are so freaking amazing, i can’t even find words. well done. seeeeeeriously.
SO MUCH BETTER! Well done. And thanks for posting about the Brasso. I’ve been meaning to ask you if you’ve needed to polish all your copper stuff and what you use. I made a copper pipe light fixture and it needs polishing so bad but none of the natural suggestions I’ve tried has worked. Off to try Brasso!
It looks wonderful!!!! I thought the first rendition was good but this is amazing.
I didn’t mind the last version, but these are awesome! What a beautiful job and am impressed w/the math as I would never have figured it out.
I love how this is shaping up! I didn’t like the pulls with the old doors, but I’m loving everything about them now.
It looks REALLY good! I never hated what you did the first time around but now this is SO much better!
wow!!!!! Gorgeous!!! You should’ve added a before picture at the bottom yet. 🙂
Wow Mandy, you are a true designer at heart. These cabinet fronts work so perfectly with the pulls as well as the rest of the motifs in the Nugget .. YOU are super legit 🙂
Oh my goodness…LOVE the way these turned out! It’s so creative and it’s definitely the cutest little trailer I’ve ever seen. I’ve been following along for the whole process and while I think the other cabinets were cute, these are amazing!!! Awesome job!
Seriously awesome. I think I’m going to go back up to the pictures and stare at them for a few hours now.
These look amazing! I’m so glad you kept the pulls, they were my favorite part of the old cabinets — and I love the way you found to make them look a little more substantial! Honestly, my style preference is a little less 1960s and a little more 1860s, but I think these look great. ^_^ Thanks for sharing your journey! It must be difficult to backtrack so many times (and so publicly! I wouldn’t be a fan of that), but it’s so inspiring to see people I admire admit that they don’t always get it right the first time, either.
I’ve never commented before but I’ve been a reader for a bit now. I have to say that I think this looks great. I also really appreciate that you changed what you didn’t love and have been so open and honest about this whole process. In blogging a lot of the time you just see a before and a finished product. I have enjoyed following along including all the hiccups along the way. I’m excited to see what comes next with the Nugget.
I’m obsessed!!!!! Love love love how everything is turning out!
Girl, you’ve got vision! Love it!
Mandi, you’ve pulled off some amazing things, but those cabinets…WOW. Simply fantastic.
really nice choice on the cabinets. This seems much more your style than the last iteration. Sometimes the best thing for a project is to stop and walk away for a little bit!
Frikken Fantastic. Perfect. You did it again 🙂
I couldn’t put my finger on what was wrong with the old design – I love everything you do. But I think it was just to busy for the small space. This looks so classy & beautiful.
Thumbs Up = Again 🙂
wow, looking at these new cabinets and comparing them with the old cabinets (round 1) — its really apparent how much better these are… It’s great that you stuck to your guns and kept the hardware because the vintage feel you created is seriously awesome. By the way, you put in some serious hardwork this week–, you should rest now and just stare at your nugget all day.
P.S. Tell Court that ‘Legit’ is not a good compliment– he needs to try harder with his words.
So, so, so much better. It’s worth all of the extra work. It takes the trailer from DIY to professional. Good job!
Those are the coolest cabinets ever, I love your originality in creating this and also that you are ok with going back to the drawing board when you dislike the final result. It was a great move! And although I really liked the originality of the first set of doors these new doors are just perfect for the space and don’t hog all the attention!
Love love love these new cabinets
I’m just in awe of your creativity and innovation Mandi! The nugget is truly coming together – modern and fresh, but with all the vintage charm you were going for. It’s so frustrating to have to go back to the drawing board and start over. But this is proof positive that almost always, it leads to a better solution. Well done!
Wow, I was excited to see an update but those really do look SO much better! They suit the space so perfectly and look right in place, like they really are vintage to the space.
I am stealing this for the kitchen of our new home!!!
AMAZING! And whoa – so much work! But I definitely agree that building entirely new doors was what you needed – the old ones were an obvious mismatched, undersized mess. The trim pattern is where your brilliance truly shines though. That would never have occurred to me, and it really makes those cabinets into something incredible. Again – AMAZING job!
I didn’t mind the ones before, but this looks SO GOOD. So clean and vintage and cohesive. Loving the diamond motif.
Those cabinets looks awesome!! Totally love the new design, it fits the Nugget perfectly. Great job!
This. Is Perfect!
So much better. Now the hardware is the star instead of the unfinished looking trim. Nice job.
These look absolutely amazing!!!! They are lovely! <3
yes. amen. amazing. mandilicious. love it all. way to go back to the drawing board.
you couldn’t have nailed it harder, great work woman! angles confuse the bejeezus out of me, so i applaud you there 🙂
I only check in from time to time, and the last visit you displayed version 873 of the cabinets, which I did not like at all, but I knew you’d make them amazing..and yet again! They should put Mandilicious in the dictionary. I LURVE the new cabinets. You’ve got a gift lady! I knew it was just a matter of time…Gorge!
Those are so fantastic … the wait was SO worth it!!!!
YES. these cabinets are better than sex.
Haha, Greatest comment ever.
LOVE, LOVE, LOVE!!!!!!!!!!!!!!!!!!!!!!!! Amazing!
Holy Moses!!! Those are absolutely stunning!!! Loooooooovvvvveeeeee them x a million!! Great job!!
Mandi – I LOOOOOVE this. I really wasn’t digging the cabinets before, but held my tongue (err..fingers?) because I’ve learned to trust your vision. These, however, are just stunning. So proud of you for taking the step back and fixing it all…even if it was the hard route! Bravo!
You NAILED it!!!!!!!
It was so amazing to read this post Mandi. It is awesome to have you talk about your behind-the-scenes process and relate so much — that feeling of @#$& when you just KNOW something isn’t right and you don’t know how to fix it. It gives me warm fuzzy to see you pulling through in an awesome way. 😀
I literally just stared at that last photo for 5 minutes. I am in awe of the things that you come up with and how you pull them off. If I can create half the things that you have created someday I will be thrilled with myself! Kudos to you! Very impressive and I cannot wait to see the final product!
SO MUCH BETTER!!! Amazing job!
Yaassss! That looks so rad. The angles mesh with the floor and sharpie wall but nothing competes. A+ save!
LOVE, LOVE, LOVE, LOVE, LOVE, LOVE, LOVE IT!!! Your creativity is SO inspiring!!!
And that, kids, is how you use Geometry in real life. Totally in love with them, they look amazing!
BaBam! You got it! Lovelovelove. Great work, you two!
WOW! AH.MAZE.ING!
THEY ARE FREAKIN AWESOME!!!!!!!!!!!!!!!!!!!!! that is all that needs to be said, plus your maths just blew my mind!
This time it is perfect. That can happen when you don’t give up. You rock!!!!!
I freaking love it! It looks much better this way.
Holy cow. Absolute perfection. The Nug owes you a debt of gratitude. You are seriously a genius in so many ways. Hello! Those geometry skillz!!
Just another comment to solidify that yes indeed…this is it. You did it. You hit the sweet spot. Those are perfect. Vintage-y + modern = cabinet-gasm.
Is ok to say I sorta hate you for being this good?
This is one of the most impressive things I’ve seen in the world of DIY. It’s even more impressive when I realize how much you had to take a step back and tweak what was there before. I would not have thought of making all the doors the same size, not in a million years.
You are really, really good at this, Mandi.
SO LEGIT these are gorgeous I hope you feel all the frustration was worth it because you have broken on thru, lady! Great great work!
You nailed it. Spot on. So good.
Those are absolutely GORGEOUS. And it’s actually really inspiring that it took you a couple of tries to get it right, because I think DIY (especially when you are just starting) is kind of intimidating. I am more of the hammer-and-drill than fabric-and-paint kind of DIYer, I can repair things no prob Bob, but anything requiring design decisions gives me *flappyhands.* I tried painting some ladderback chairs that I ‘rescued’ from the curb. It would be charitable to say it is not a Pintrest-worthy before and after. Instead of hiding them in the furnace room I am going to break out the Citri-strip and sandpaper and try again!
Absolutely incredible!!!
LOVE the cupboards. Perfect. The back splash looks better than the green. Very restful. Love your guts back!! I like that you try something, don’t like it and start OVER! How many people would ‘settle’?
Sue
So so pretty! Love the shape of the molding
Spot.On! Those look amazing!! Kudos to not giving up.
Mandi…this is amazing. The trim on the cabinets goes with the shape of the floor and it goes with the lines of the hardware. This is cohesive, quirky, unique and fabulous. What is even more fabulous is you shared your mistakes. Everyone makes them…even the most amazing and talented people. The most talented people
(people like you)… hear others well, don’t get defensive, know how to filter out the comments that you don’t need to hear and discern which ones line up with what you are already feeling, and know how to make it right with YOU in mind not others. (not that it was wrong before but this kitchen is 10 times more you than the other.) Great job. Love seeing what you do.
Wow. Breathtaking. I love how unique they are – I love how you took cues from the pulls – and I love how they coordinate with the floor & the Sharpie wall. Your perseverance is absolutely inspiring. Editing and starting over can be so painful – but you have done it so well. Thanks for being amazing you. Rock on!
Not one to comment, but this definitely deserves one… BRAVO!!!
It looks so awesome! I love that you shared the whole process with us. So many times when I’m doing DIY projects and it just doesn’t look right, it makes me feel like I’m failing at life. You’re such an inspiration for sticking with it and trusting your instincts, and it turns out beautiful every time!
Thank you for all the white goodness. I was hating the green tiles and chunky molding on the old doors. It looks soooooo much better now. I feel for your husband. 🙂
Vast improvement over the earlier version. The new design picks up the diamond shapes on the sharpie walls and the parquet floor.
love, love, love the new cabinet design! all the diamonds and triangles work together now. white penny tile is spot on.
SO cool! everything’s coming together so well. props on all that math too 🙂
Holy moly, so much better!!! Great job 🙂
Soooooo good.
I just had to take a moment and comment. This looks sooo AWESOME!!!! So much better than earlier. Absolutely love it! Thanks for all the inspiration – finding and reading your blog for the last few months made me dare to totally sand, paint and revamp my old and shabby dresser. Thanks Mandy! Will be sneaking around here 🙂
YAY!!! Katarina I want to see pictures of it!!
xo
m
Ohhhh my gosh. This is it, this looks so awesome.
Mandi, they look fantastic! And with the new, brighter backsplash-you’re outdoing yourself, lady!
This is insane. I love this project so much. In fact I finally checked off my list the ‘add Vintage Revivals to my blog roll on the blog’ box. It was ABOUT TIME!!!! xx
Thanks Em! You’re the best!!
xo
m
i love all of the re-dos you’ve (re-) done. the new wall/backsplash/cabinets are so great. also holy cow… it’s emily henderson!!!!
Um. Amazing. Plus you’ve got the Emily Henderson stamp of approval so…you’re def doing something right. I think the floors are my favorite. So beautiful!
Love the motion (perfect for a travel trailer) and the motif reiterations (diamonds and circles). This is a great example of how repeating a shape or element ties things together (unexpectedly, Court). Jo @ Let’s Face the Music
Oh!! Yes,..now it’s perfect. Mandy you are amazing!!!
Your geometry teacher must be so proud! They look just fabulous!
So I totally LOVE them and my other half really hates them, just shows why you and I both have the final say in the decorating in our houses!!! HA
0x0x
For sure!
xo
m
Wow! They’re awesome!! And I think building doors of the same size made such a difference, well done!
Agreed! That is what saved the day more than anything!
xo
m
OMG OMG OMG YESSSSSS! this is a million times better and looks like it’s meant to be like that!!! so glad you had to painstakingly do them over but it rocks so hard!
Amazing! This looks so perfect. I’d say it was worth your effort to make those doors again from scratch.
So So So Good!!! This is my favorite series in the history of ever…. I log on everyday hoping to see a “nugget” post and it is crazy how disappointed I am if there isn’t one lol.
I am so glad to hear this!! You just never know if people are sick of it, ya know!?
xo
m
I’ll admit it. I was totally one of the commentators that was on the fence with the last cabinets. But you pulled it off this time and I’m a huge fan. Great job!
These doors are SO worth all the trouble you went through! They look amazing!!
I have been a silent follower for awhile now, but I just have to say, I LOVE the new cabinet doors! I wasn’t a fan of the first ones; I felt they just weren’t right for the space, but, like I said, I LOOOVE the new design/colors! <3
Thanks Kellie!!
xo
m
Much much better ~ love them. I love the Nugget posts too!! 🙂
LOVE. I didn’t hate the old ones, but these….holy crap. So wonderful.
These are GORGEOUS!!!!! Love the new cabinets.
I think you hit the nail on the head with those.
Well, that settles it. You are a friggin design genius! I actually liked the old cabinets until I saw these. No comparison. Totally legit indeed.
LOVE. That’s it. LOVE.
Nailed it!!
Love this! So unique and fresh.
http://www.endlesshouseaffair.com
Those cabinets are amazing!!! Love love love the new design and lines with the pulls….so so awesome, and another home-run yet again. Can’t wait to see what’s next! 🙂
OMG, I can’t even describe how much I am blown away by these doors! They look AMAZING and even if I did not realize how much work it took, I would be in awe. I mean, I’ve been reading this blog since the Homies, but I don’t ever feel like I can add anything to the conversation, but I had to de-lurk to comment on this.
It’s such a great design, I love that you went through extra trouble to make things even, but that design!!! Oh, it seems silly to say it, given the state of the world, but these doors are kind of restoring my faith in humanity (how’s this for overly dramatic? sorry)
Congrats on getting over your conundrum and making the most beautifully designed doors!
OK….now I am OBSESSED!!! Could you imagine this camper kitchen blown up…..The cabinet door detail would be killer in a house!
ADORE<3
YAAAAASSSS. So good. And so inspiring that you stuck through the tough parts and came out with perfection.
Took me forever to find the “hiccup” you mentioned, it blends so well, I absolutely love your cabinet design!!!
Saddness, for some reason your blog is not showing up in my Digg reader! The last post I saw was Oct 1. Happiness, I have a months worth of posts to catch up on tonight! Any idea on why it’s not showing up? Has anyone else mentioned this problem?
It looks so good, friend!!! I can totally relate to your “ever single thing needs to be awesome!” issue. It’s been hard for me to learn that some pieces have to be quieter for others to shine. And it doesn’t mean they have to be boring, none of your elements are!, but the monochromatic palette is nice on the eyes. So glad you came over the hurdle victorious (as if there was any doubt). 🙂 Can’t wait to see what you do next!
They are GORGEOUS!!!!!
You are like kid “DyNoMite”!!!! Those cabinets are the bomb!! I love them
I love it! What a wonderful and creative design! It looks really great on the drawers, too.
I wasn’t a huge fan of the pulls before, but this is the way to bring them alive! They and the moldings play so well with the yellow diamond wall and the floors.
really creative solution! and, the perfect mix of modern and vintage!
Mandy, I actually didnt mind the original re-design off the doors, but it didnt feel cohesive. This design, though, is AWESOME! I think I can hear angls singing when I look at it…not too matchy matchy, just a nod to the geometric goodness elsewhere.
I love how the cabinets turned out!
See, everyone knew you could do it! The cabinets turned out AWESOME!
Bravo!!! I think this is the perfect cabinet option for the Nugget! Love the molding, and less contrast! Thanks for always inspiring!
WOW. Fantastic hunch with the round border. Looks amazing and bright 🙂
MAN DI…I know I am.super late to comment on this post but I wanted to tell you how much I just love your cabinet door project such a great job! and offer An important piece of advice I learned from MDF doors under a sink…My doors gradually became ruined even after being really careful about any water getting on the very top and I wanted to suggest, because yours are white, to buy the iron on trim for the top edges so that the MDF doesn’t swell if you haven’t already done so!! Leaving cut edges of MDF untrimmed, even though they’re primed and painted is a recipe for disaster around any water even if the source is just occasional use. I know it’s a pain if it needs a light sand to iron on the trim but you’ll be so glad you did years from now considering u took so much time to make them beautiful!! I ended up having to redo a few flat panels where the finish chipped off over time and let in just the tiniest amount of moisture… Maybe even just doing the top edge of door fronts directly below the sink? your big brain probably already considered this….Love love loved the finished pattern….The whole project was an inspiration!
These are the most beautiful cabinets. You did such a fantastic job…
I LOVE your trailer! It inspired me to buy my own last week! I want to get rid of my oven and keep the stovetop like you did. How did you do that? Any info would be greatly appreciated! Thanks!
Currently renovating a trailer very similar to this and for some reason picking out a white paint color has got me stressed out. I looked through the comments and tried to find what color you used, I couldn’t find that info. Would you mind sharing?