Dudes! We are overhauling a 1972 Bell Travel Trailer! Follow the entire series from the beginning here!
Hey guys!! Happy Wednesday! If you have read Vintage Revivals for any amount of time you probably know that Sharpie Paint Pens are my right hand man for awesome walls. They are just so great for designs that are too detailed for tape or stencils, and they are SO much cheaper and easier to cover up than wallpaper.

I knew that a largeish scale pattern for the the walls in The Nugget was what I wanted. (You know when you just picture something that way from the get go?) But I had a hard time trying to decide what pattern to do. I tried (and failed) a few with a black paint pen on the white walls and it just didn’t look right. The patterns were too weird and it just looked crappy.
So much trial and error is happening in this little guy. *sob
After the little “come to Jesus” that I had with myself over the blah-ness I went out on a Google quest to find a really amazing retro but not too retro pattern. One search lead to another and I stumbled upon this amazing wallpaper pattern by Romo.

Isn’t it so good!?! The paper itself didn’t come in the colors that I was looking for but the pattern was perfect.
Trying to find the easiest way to replicate it was a bit of a brain bender. Stenciling was out because of the negative space and the lines are just so teensy. Vinyl would have been a great option but The Nugget lives outside all year round and I can picture walking outside in the heat of the Southern Utah summer and see it rolling off the walls. Of course the answer was a Sharpie but getting them all exactly the same needed a little bit more than just a ruler.
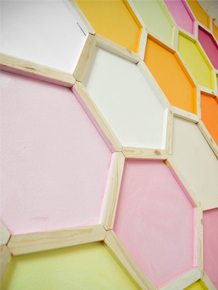
A stencil for the dots was just the ticket. They are evenly lined up, and easy to replicate, and all of the guesswork is taken out of it.
We recreated the image of the wallpaper in Photoshop and marked all of the corners and spots where the lines joined up. Ok, so notice how I only marked 1/2 of the lines on the right diamonds? I did that so that I could line the left side of the pattern up on top of them. That way everything was nice and even. Its totally one of those 3 steps forward 1 step back projects.

Then I saved that layer as a PNG and uploaded it into Design Space and cut it out with my Cricut Explore. I cut it out of heavyweight posterboard and in hindsight, I didn’t need something that heavy, but it worked really well.
I placed the stencil on the wall and used the paint pen and marked all of the dots. When I pulled the stencil away I was left with a sea of perfectly positioned marks.

When I reached this point I used a ruler to connect the outer dots on all of the diamonds first (to make sure that the spacing was right before I finished all of the inside details.


Then I just connected the top point to each mark in the middle, and down to the bottom point.

This is one of those simple but time consuming projects. (Sheesh, doesn’t it seem like I am doing a lot of those lately?)

Now for a PSA about Sharpie Paint Pens. Please note that these are PAINT PENS not regular Sharpie Markers. You can paint over these without having to prime your walls. If you use a regular Sharpie it will haunt you until the day that you die and then it will haunt your children. Please for the love of all that is good in the world do not use a regular Sharpie marker. PAINT PENS not Markers. PAINT. PENS. (Do you guys think this was clear enough to not get emails about it?)
This project just about did me in. It took 2 project days (about 10 hours) and sort of made me want to give up on life, but every time I would come back after a break and my heart would skip a beat because the walls looked so amazing I knew that it was worth the time.
So there you go, an amazing wall treatment for less than $10!


If you need more Sharpie Wall ideas, check out these projects (click the picture to go to the tutorial):

![DIY Wallpaper Tutorial @ Vintage Revivals-1[3]](https://vintagerevivals.com/wp-content/uploads/2014/09/DIYWallpaperTutorialVintageRevivals13.jpg "DIY Wallpaper Tutorial @ Vintage Revivals-1[3]")


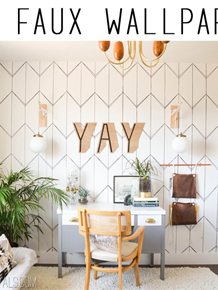
Time consuming but SO worth it, you won’t regret it for a second, it looks A-mazing!!! Love, love love.
Arrgghhhh I want to Sharpie a wall so bad! lol. Just trying to figure out where is the hard part!
I ADORE this wall! Love the color, love the pattern. Love everything about this!
Oh my god. I would NOT have the patience. But it looks incredible…..huge respect.
X
You continue to amaze! You must have the patience of a Saint! it is amazing!
Raddest. Wall treatment. Ever.
I am obsessed with this wall treatment! Awesome!
Amazing, and worth every minute of effort!
so so so so worth it!
LOVE IT! I did your gold diamond wall in my lower level that has 11 foot ceilings- it looks amazing, thanks! The walls are BM Simply White and I used the gold Sharpie PEN. The ceilings are the same color that YHL used in their show-house office- with the 1 foot drop of color down the walls. The combo together is really pretty- if I do say so myself:) Look forward to more of your imaginative designs.
I want to see this Adrienne!!
Mad props! That looks so good. And I like that you ended up doing yellow and white. It feels a lot cooler than black and white.
I just picked myself up off the floor from laughing so stinkin’ hard. Your comment about using a regular Sharpie almost made me pee my pants. I mean, people REALLY think you should do that?
Onto the important part… That wall looks bright, happy and ah-may-zing! The Nugs is growing up so fast and becoming such a beautiful creature.
This looks absolutely amazing. I LOVE it! I would love to try something similar. xxx
I love this, it’s so String arty 🙂 Its nice to see the progression of the projects, it reminds my inner four year old to calm down…I’m slowly learning that makeovers and updates on a recently purchased house cant be accomplished in a day…I go through a daily “I want it now”… Keep up the awesomeness!!!
I wasn’t too sure I was going to like this, but it turned out great!! I really love it…now it is my turn to try something with those paint pens. Where can I find them??
It looks amazing! xx
https://shititsmidnight.blogspot.pt/
Oh my gosh woman, you are amazing!! I’d have probably given up – I hate frustrating DIY trials and tribulations haha – but it’s often the hardest ones that turn out the best and this just goes to prove that! Looks AH-FREAKING-MAZING, like to the max! Thanks for the heavy dose of inspiration XO, D
Wowza. I lurve this so much! Worth the effort.
It’s fresh and fun, attention-getting but not too busy. Perfect!
I’m assuming you need both patience and a steady hand to do this, of which I don’t have too much of either, but am admiring your ability to pull this off! Everyone needs a good cheering squad and I’m a member of yours! Good job! Mary http://www.mytributejournal.com
Worth every single second and/or tear. So SO good!
Thanks Jen!
Mandi, this looks amazing. Any thoughts on how I could reproduce it if I don’t have a Cricut?
I think you could totally do it without an Explore. You’ll just have to measure more and maybe cut the holes with an exacto knife or punch a hole in the poster board with a nail?
Love the yellow, love the pattern! I love that you seem to never give up on getting what you want. And if it doesn’t turn out like you wanted you try again. You’re such and inspiration!
xo
Gorgeous! Indeed the Sharpies strike again! Obsessed with the yellow & mint!
Love it but I know if I tried it there would be sharpies thrown in frustration and bitter tears lol. Wish I had your patience.
That might have happened….twice.
I tried the paint pens and they didn’t like my stencil, I ended up using real (black) sharpies on all four walls of my hallway. Im never painting over it. Ever.
I LOVE this, they yellow and the white + the pattern? Amazing.
This is amazing, but oh my God I would not have survived something so tedious. (Says the girl who is already eyeing that one wall in my house where this would love awesome.)
I hear you lady. Sometimes its nice to have a mind numbing project that you don’t really have to think about! If you do it I want to see pictures!
How long does it take each line to dry??? I am picturing marking a line, then moving the ruler and blurring the paint i just did. or blurring one of the previous lines. thanks
It dries almost immediately, but I didn’t drag it to the next line, I lifted it up a little.
I was checking out the paint pens and was wondering what size tip you chose and if you used oil or water based? Thanks! Awesome job lady!
Medium tip, water-based for this wall because the oil based didn’t show up as well! Great question lady!
Beautiful job Mandi…would u include particulars and video of how u deal w globby paint pens?? I think a video for this application would be SO appreciated by everyone! I never am able to maintain the thickness of the lines, it seems every pen I’ve ever had either skips, globs or vascillates from thin to too much paint and there’s no consistency!! Also since they are OIL why do u say u don’t need to prime over them? Is there a latex based sharpie in the states? Do u buy them from Michaels? We are in Toronto! Thanks so much for the great tutorials…the more detail the better! Even talking about what fails is fantastic and educational….loves it!
You are a genius Mandi! This is just stunning and the yellow is the perfect shade….I am loving this series….you never fail to amaze me with your talent.
Although I didn’t do the 10 hours of labor this took I totally would have for you after seeing the result. It’s great! I love the colors and the design is incredible.
Keep at it, I’m so excited to see the final product!
LOL so true about not using actual sharpies on the wall… my dad told me a story that once when he was in his 20’s he was really drunk and wrote a phone number on the wall with a sharpie and no matter how many times he painted over it, it always bled through!
this went really great! Crongrats
beautiful! quick question: how do you keep the paint from smudging as you move the ruler?
it looks great…that is such a happy yellow! I used to have a desk that color and everyone told me I was crazy to paint it that color but I ignored the haters…haha aka my husband 🙂
LOVE, LOVE the pattern and the effect and your brilliance to come up with a way to pull that off! You obviously have the patience of a saint to complete this DIY, but the end result was soooo worth it.
I just started doing this on a wall in my livingroom around a big bay window. Loving it so far! I painted the wall a purple-blue and I’ve just started outlining the diamonds. Just wanted to ask how many paint pens you went through on this project. I’m finding that the coverage isn’t great with my pens – am I missing something or does it just take quite a few? Thanks!!!
I love this! I’m planning to do this to my powder room this weekend, except I’m using the original colours (my bathroom is conveniently already painted that goldy beige colour).
What are the dimensions of your diamond? I’m having trouble deciding how big they should be …
Thanks!!!
It’s so late but I can’t stop reading about the Nugget!
Loving this yellow paint. Can you advise manufacturer/color? Thanks so much!
Hello there!
I enjoyed your post. This project was really time-consuming but so worth it!
Thank you for posting!
Thank you for sharing this! I tried it in my RV with my own pattern and I love it! Everyone says it looks like wallpaper. Sharpies are magic!!!