Dudes! We are overhauling a 1972 Bell Travel Trailer! Follow the entire series from the beginning here!
One word.
Finally.

You would think that, you know, rebuilding the entire front and back ends of our little vintage trailer would cause some major satisfaction. But anyone who has ever done a room makeover knows that the real pat on the back moment comes after the paint.
I could not wait to start painting.
And what a world of difference! (Taking out the bunk didn’t hurt…)


Notice the the darker tone along the top of the wall, along the ceiling? One thing that happened that I didn’t anticipate was bleed through.
Where the wood paneling had a little bit of water damage, even though it had been sanded, there was a yellowish color that seeped through after the paint was dry.

So out came my trusty can of Kilz Primer (it has a stain blocker in it!)
I sprayed it everywhere that had potential water damage. Around the corners and windows, along the seams in the ceiling, even around the ice block fridge.

And it worked fantastically!
(Sometimes this thing feels like Mary Poppins bag with the sheer amount of crap that we can fit inside.)


At this point I was feeling mighty grateful for the prep work that I had done.

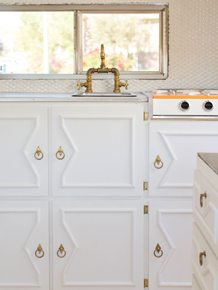
One little reminder, take into account your wall texture when choosing a paint roller. The walls in the Nugs are smooth with a little bit of faux wood grain. Using a roller that is for a semi smooth surface is going to leave more texture than we want. The rollers that I used were Wooster 3/8” High Density (they are the white fluffy ones). It is also CRUCIAL that you use a good paint brush for edging. Why spend all of the time painting, and redoing the countertops, only to have the spot they meet at have major paint brush texture?

In March when I went to the Home Depot Manager’s meeting, they were previewing the new Behr Interior Marquee line. It still isn’t sold in every Home Depot (they are working on it!) so I was really excited when Behr said they would send me a few gallons to try. I always want to give you guys the best info, so constantly trying new things is really important to me. Overall I was extremely impressed with the quality. The paint has a much thicker consistency than regular Behr Paint+Primer, which I really liked. I am really looking forward to trying it in a regular interior setting so that I can see how it performs there. I can say that I have had to wipe the walls down multiple times because of dust and dirt and greasy handprints and it comes clean like a breeze.

So now that I have a giant blank white space, the real fun can begin…stay tuned!


awesome job, I love it! keep up the inspiration, your blog is the best!
Kelly @ yourcolorconsultant.com
wow, it’s really starting to come together!
Wow you’re doing a ton of work. I can’t wait to see the end!
Ah – the freshness of a new, white coat of paint! Yay – can’t wait for all the pretties to come!
Looking great!! It’s amazing what some paint can do!
So what’s the end game here? Will you keep it? Rent it out? Man, that’d be a great place to rent out on airbnb…
Wow Mandi, that looks amazing! I can’t wait to see how you decorate it!
I love it Mandi, I’m so excited to see it finished!!!
Hi. We have a 1972 Bell Trailer. We are looking to get rid of it but have no idea what price to ask. It is in fair condition. The furnace, fridge and stove/oven all work along with the water pump. It had leaked in the past but my hubby fixed that issue. Appreciate any help you can give. We are located in Montesano, WA.
Thanks, Cindy
Good tip on the primer! Mine has slight water damage to the walls as well I’ll have to remember that. Also I was at the home depot this weekend and they have a floating floor that would be perfect!
The power of paint! Looking so great, Mandi!
Hi! Recently became completely obsessed with your site and everything you do, I’m here with you everyday!
I also recently just moved into the tiniest one bedroom apartment and have been turning to you for inspiration for how to deal with the space and wishing I had someone like you in my life to come help me sort it all out! ps. completely in love with Macie’s room redo! Keep the inspiration coming!
WOW…. what a diff a lil paint does. Looks great. 🙂
Hi Mandi! Just wondering what color white you used on the walls? Thanks!
I will never do something like this again- actually never did something this grand. But I love reading it. Thank you.
Did you just completely give up on the Nugget????? I am so disappointed.
Hey Sherry!!
Nope, we are still working on the nugget like crazy!!
As a commercial painter reviewing your blog, I am very impressed with many of your creative ideas. However, use the term “cutting-in” or “cut-ins” instead of “edging”. In my experience “edging” is a term only used by people that don’t want to and probably shouldn’t paint, hense they resort to using an edging pad. Invest in a good 2″ to 2.5″ chinex bristle brush (Wooster pro, Purdy clear-cut or Corona Excalibur) with a comfy handle and practice. A sharp, clean brush with strait bristles practically does the work for you! Just my two cents from a guy who does this kind of work everyday.