Hey guys!! I have had this weird phenomenon happen. Working on the Nugget day and night has made me really appreciate normal home DIY. Like a lot. It seems like the more we use our creativity, the more we have, right? A few weeks ago I shared my die heard obsession over Ben at HomeMade Modern. Apparently I am not the only one that loves him, because Cara, and my Mother in Law both requested furniture using his stacked plywood technique.
Then I saw these adorable modified hairpin legs that the always amazing Emily used and just decided to facilitate a love child between them.

The one thing that was a bit daunting for me was the inevitable use of a table saw for cutting the ply. To me, it is the scariest of all saws, and the one that I am least comfortable with. Then out of the blue I got an email from the folks at GRR-RIPPER. I did some research and the GRR-RIPPER 3D Pushblock looked sort of too good to be true. But I was game for a try.
You.guys.
One pass with the GRR-RIPPER and Court and I looked at each other like “did that really just happen?!” it was AMAZING. Like you know on infomercials how they do something and it is SO simple, and then they smile and have a little sparkle gleam on their teeth?
THAT.
The first project we used it on was for the Nugget (coming down the pipeline soon), but I knew I had to put the GRR-RIPPER to use on a project that I could talk about right this second and share it with the planet!
To make the bench we used 2 pieces of Plywood. While you are at the hardware store, have them rip (2) 4’x8’x3/4” sheets into (6) 2×4’ sheets and (1) 2×8’ sheet.
The smaller 2×4 sheets are going to be cut every 3 inches. (This is going to determine the height of your bench/table top so adjust accordingly.) 3” for me gave it a really hefty industrial butcher block vibe.
We started out by ripping 2×4’ sheets of 3/4” ply using the Smart Hook Pushblock GRR-RIPPER. The underside is rubber and holds on to the wood, and on either end are little gravity hooks that help push the piece along. (they dont actually hook into the piece, they lay flat against the wood if they are on top of it, the magic is when they are hanging off the wood. Major leverage.


As amazing as the Smart Hook Pushblock is, the real magic is in the GRR-RIPPER 3D Pushblock. You guys, this thing can guide a cut down to an 1/8th of an inch. Lets just let that marinate for a sec.
You can practically make toothpicks on a table saw.

The way that it works is truly genius.
You move the sliding bridge so that it is between your saw guide and the saw blade, then you just push your wood through…OVER the saw blade. The saw blade goes between the edge and the bridge and you have so much control. Table saws are sort of notorious for lifting up your material as it is being fed in. That doesn’t happen when you are pushing on the material as the saw is cutting it.
The most important part is that it is safe. Your hands are nowhere near the saw blade.
Cut all 6 of your 2×4’ boards. This will give you enough material for a 4 1/2 foot bench/table.

Wood glue is a must for this project. A thin line between each board goes a long way when it comes to sturdiness.

Stack 3 boards high (with glue in between!) and then on the last one add glue to the top.

Place this glue side down, on the boards that you just installed.

Then using 3” wood screws, attach your boards to the stack.

We did this against a block wall to make sure that it was nice and straight-ish. If its not perfect, its ok, this project rocks the laid back DIY vibe.
Attach the 2 end pieces with a nail gun. (You will just need 1 board for each end, not 3.)

Cut your 2×8’ board so that it fits on the underside of your table.
Real life DIY alert! The original plan was not to have this support board. But after we installed the legs our bench was looking a little droopy in the mid section (sort of like me!) so it was a bit of a super hero. Now that it’s on, I really love the way it adds just a little more detail.
I used inexpensive plywood and it was really splintery and needed a good sanding. I recommend 150 grit for a project like this. It will smooth everything down really well without taking the character out of the wood, if that makes sense.

For a bench I ordered these 18” table legs, if you want to make this for a coffee table, I would order the 14”.
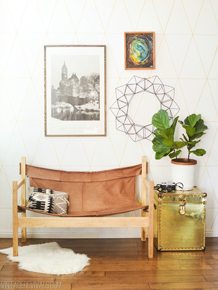
We did a little rearranging in Alicia’s Living Room and really love how dramatic the bench is against the black wall. Now just to find some art!


For more info on the MICROJIG GRR-RIPPER visit 3dpushblock.com.
This project was sponsored by MICRO-JIG, all project ideas and opinions are 1000% mine. (pssst….this thing really is life changing folks.)

this is so rad.
After too many close calls with the table saw monster, I MUST buy me one of those handy dandy little tools. What the what? Why didn’t I think of that?
After using a commercial 10 inch table saw for over thirty years without incident I tried to shorten my left thumb recently while doing a project. It cost me three weeks out of the shop for it to heal. After being rightly chastised by my wife for looking at the gripper and not buying it this really convinced me to get one. I now have two for those longer boards where you would have to reach or take your pressure off the board to move the gripper closer to you. This is one of the best and safest ideas out there for using a table saw, band saw or router table where close in work puts your fingers close to the chewing parts of equipment.
Oh my word, that is so stinking cool! I love how the bench turned out! Where is that gorgeous rug from?
Heather its Nate Berkus for Target. I am not sure if it is still in store, but definitely check! Its reversible so you can also have a white rug with black triangles.
xo
m
Thank you so much Mandi! You’re amazing. 🙂
Sooo awesome per usual. Totally going to be making this into a coffee table. Maybe staining some of the wood pieces to add some contrast?
I SOOO need this thing. Seriously, I’m ordering today! We have a table saw and the guide is slightly askew so the wood always stops at that point until we manually adjust, thus we NEVER get perfectly straight cuts. That hasn’t been a bad thing for our projects so far, but I’ve been delaying other projects based on this inability to get a straight cut. I’m excited to get this tool and tackle those projects that have been on standby!
I freaking love this look! I am already formulating ideas in my head of what i could use this idea for in my house!!!
This looks so great! I love plywood and I’ve never seen it used all stacked together like this, amazing! Definitely going to be trying this 🙂
emily xx
Totally in love with this!
You had me at plywood!! Another masterpiece Mandi! It looks amazing; but then everything you do is.:) Nice work.:)
Love that bench! I really wish I had known about the GRR-RIPPER this weekend when we were trying to rip down massive sheets of plywood! Table saws are terrifying and I was just assisting haha
Those legs are AMAZING!
I’m in love with that bench. But almost $100 for those (amazing) legs, has me hesitant. But it’s absolutely gorgeous!
Wow that’s so unique! I especially love the way it looks with that rug!
I super love this!! It looks incredible next to that dark wall!
Totally unrelated but…do you remember half an eternity ago when you said you would post a tutorial about how you did the wood plank wall in Maskcara’s office? Did I miss that? I don’t remember ever seeing it but would love to try it.
Thanks so much! Table saws scare me too. That is why I haven’t bought one yet. Now maybe I will!
LOVE THIS! This is my favorite project you’ve ever done. Ordered legs to make a table of similar sorts today.
Cant wait to see it!!
That bench is gorgeous! I’ve just started some DIY in my own room. Not quite up to table saw level yet, but maybe one day?!
Good Job
Hello! I was just wondering, I know you only made it a wee while ago but has it stood the (short) test of time so far? Would you have done anything differently? I am wanting to make a small bench for out entrance way as kind of like a micro-mudroom and thought this looked doable (especially given that I work part-time at a hardware store). Hope to hear from you, Jayde.
I love that bench look. It looks so classy. What a beautiful D.I.Y
I LOVED this bench so much that I had to try making my own. My husband and I made a similar bench to fit over a radiator in our daughter and son-in-law’s apartment. It was a Christmas gift and they love it so much. It was such a long bench that we worried about it sagging. Instead of a piece of plywood on the bottom we used 2 pieces of angle iron (from Home Depot) to reinforce it along the front and back bottom corners, The angle iron gave it a cool, industrial vibe and looked great with the hairpin legs. The only problem was I loved it so much I almost didn’t want to give it away! I have since made myself a coffee table (which I stained gray and put on a couple of coats of poly), and this week I’m making a sofa table to go with it. I’ve gotten so many compliments!
Thank you so much for the inspiration!