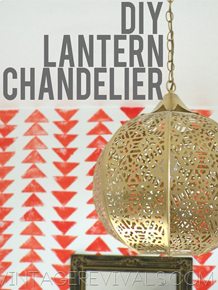
You guys, this tutorial is an easy one! Get excited for amazing lighting!!
This little hang out corner of Macie’s Bedroom was just itching for a really great statement light. Keeping with the laid back boho theme of the room I thought that a bunch of swaggy lights would be perfect. I was totally inspired by these halo lights that my girls over at A Beautiful Mess created last year. But of course like all things that inspire, its fun to make it your own. And wood and brass? Best combo ever.

To make this light you will need:

(1) Brass Socket Cup
(1) Brass Gas Cap
(1) Brass Tube
(1) Porcelain Socket
(1) Embroidery Hoop
Button Plug (unless you are hard wiring it)
Glue
FYI: You can find some of the supplies at Home Depot. The brass tube can be found in the plumbing section but the longest length that it comes in is 4”, if you want something longer you need to order it from Grand Brass. You can also buy the light sockets and plug at HD.
If you are ordering from Grand Brass you will need to um…tread lightly? Their website is really hard to use, so I have linked everything that I have used in the supply list. If you venture off of the beaten path make sure that you check the measurements of everything before you hit purchase. Otherwise you will end up with a few things that don’t fit together. Like me. Whoopsie.
Start by taking the cap, pipe, cup, and socket end (the metal part of the socket)

Assemble them with the cap on one end, the socket on the other and the cup in the middle, with the open end facing the socket.

Thread your wire through the pipe.

Wire the white part of the socket.

Attach it to the metal part.

Wire your plug.

You can leave it like this and enjoy the crap out of it.

Or you can attach the halo (halo, halo.)

For this we are using the outer ring of the embroidery hoop (the one with the metal tabs)

Basically you are just going to glue the tabs to the brass pipe. To hold mine in place while the glue dried I wrapped it with a little piece of leather (of course it was leather), but you can be a patient soul and just hold it if you want.

Hang it up and let it dry (that way it will dry straight!)

Make 1, 5, or 32. It is amazing however you group them.


In Mace’s room, we had a light fixture that we removed and had a perfect spot to hardwire them. But if you don’t have that option it is still awesome!


Love these – they were one of the first things I gravitated to in your original room makeover post. Your tutorial is great – thanks for all of the details. Lighting is one thing that I have been afraid of to DIY – but this post definitely pushed me one step closer to jumping in!
I love these lights, as well as the Target sconce DIY. So creative! One thing I have always wondered, however, is if the lights are NOT hardwired, how do they work.look? Most pictures never show a full shot of a hanging light with a plug-in cord, so I can’t get a sense of it. Can you help explain this? Or post a picture? Thank you, thank you!
Hey Laurie!
Great question! These lights are hardwired, so they work with the light switch that is already on the wall. The sconce lights just plug in to the outlets on the wall behind the nightstands! xo
Where can I find those amazing lightbulbs??
That’s what I want to know too! I’m facinated by these awesome light bulbs, it wouldn’t look the same with a regular bulb!
You might still be able to get them at Home Depot or Lowes!
How did you wire the three lights together to hardwire into the box?
I also want to know how to hardwire the 3 lights. I’m replacing a track light in my kitchen and wanted to do 3 lights, so this is just perfect timing.
Because there were only 3 we just used really big wire nuts and wired it the same way that you would wire 1. I think you can also piggyback them. Check with an electrician or someone at Home Depot and see what they say too! xo
Loving the DIY tutorials and thank god you’re back I missed your blogs! I’ve basically been stocking the blog hoping the tutorial for the sliding barn doors will appear at any moment and my prayers will have been answered! Haha! Love u Mandi you’re such an inspiration!
I am on such a brass kick and you alwys have THE best ideas! Thanks for sharing Mandi!!
Love this, but wonder why you didn’t trim the cording a bit so that you wouldn’t have so much extra hanging up there?
What size is the embroidery hoop that was used? I love this tutorial. I’ve been waiting for this one!!
How many units of wire did you order from Grand Brass? And how long was it in feet?
hi, i was just wondering what size of the embroidery hoops did you use for this project?
10″ and 12″ if I remember correctly!
xo
m
that’s what I was planning to purchase from Amazon too. thanks Mandi 🙂
Hi– I absolutely love the print that is in the background. The print- “There ought to be more dancing” -! Do you know where I could buy it?
Thanks!
I second that! Would love to know how to track down that print. Thanks in advance. 🙂
What’s the wallpaper, anyone know?
how did you make the wall? is it wallpaper or is it D.I.Y.?
i mean the wall with tree stump markings~!
Did you need to screw in the little hooks for each light that you made into a place in the ceiling supported by a stud? Or did the weight not matter so much?
May they are super light, so just into the sheet rock should be great!
xo
m
Where did you find ceiling plate? The one I bought wouldn’t even fit one strand of the twisted wire. Very excited to get these great lights up! Thanks.