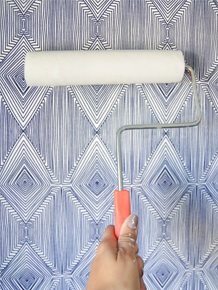
Everyone loves a good accent wall amiright? But here is the deal. Painters tape and stencils can only take you so far. They leave a huge margin for improvement. The tool of a lifetime? Sharpie Paint Pens. How excited would you be if you could have the look of custom designed wallpaper for less than $10? That is EXACTLY what this project is all about.
Here is a fun little video that we shot during the whirlwind makeover:
I first discovered this little nugget of love while I was decorating my living room. It was life changing. I have been itching to do another one ever since and Alicia’s office was the perfect spot. I needed something quick and easy that had an awesome impact. 3 cheers for paint pens!

If you are new to this project you will want to listen to this next sentence very carefully. DO NOT use a regular Sharpie. Like ever. You will curse my great great grandchildren if you do. You want an entirely different maker called a Paint Pen. Got it? Paint pens are your friends.
Doing this project again taught me a few new things that I am really excited to pass along!
In my first post I said that you should only use water based paint pens, and that was what I totally set out to buy…until I couldn’t find any black water based paint pens. So I thought “Self, lets just try it with the oil based pens…in an inconspicuous area of course.” Much to my joy it worked just as well as the water based pens AND you can totally paint over them (which I will show you in a minute!)

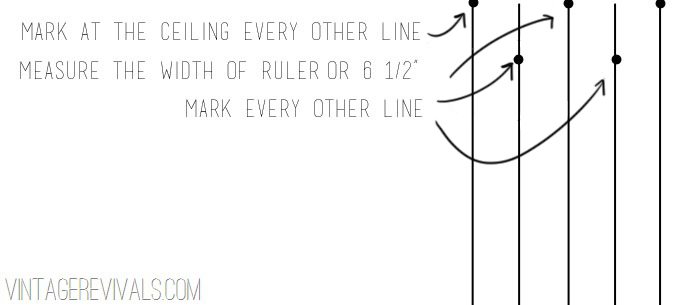
Start by finding the center of your wall, using a straight edge (I prefer a clear plastic cutting ruler, it wins every day of the week) draw a straight vertical line. Math and crunching numbers is my least favorite pastime. So I used a 6 1/2” fabric ruler for all of it. Pretty please use a level while you are doing this project!

Mark all of your vertical lines.

Once you have your vertical lines drawn comes the really fun part.
Mark every other line at the ceiling. This is going to be where the points of your pattern reach. Then place your ruler along the ceiling and on the opposite side of your ruler mark all of the lines that you skipped. That will leave you with a 6 1/2” space between marks.
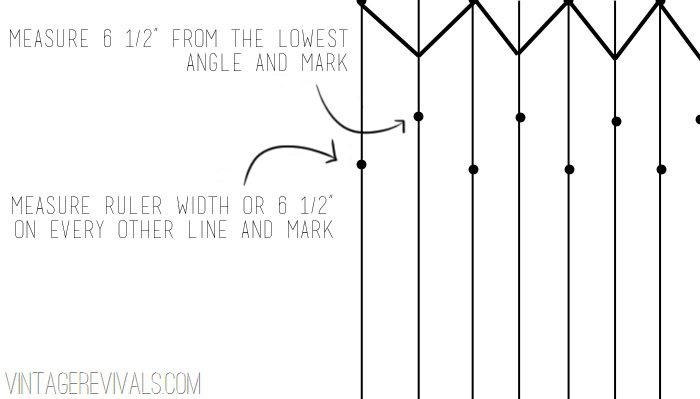
Connect your dots.

Once you have your entire row connected, line your ruler up at the lowest point and mark 6 1/2” down on the same line. If you do it on the other lines you will end up with chevrons. Then line your ruler up on those marks and mark on the opposite side of the ruler on the skipped lines.
Connect your dots!

Repeat repeat repeat!
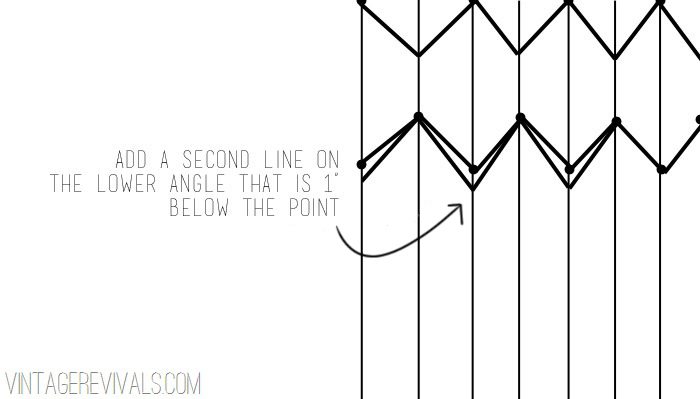
To add the second line, mark 1” down from the low point and connect it to the high points.
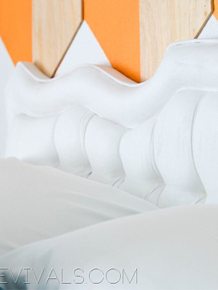
So easy, so cute!!
And because I never want you guys to think that it is always smooth sailing I thought it would be fun to share the entire process with you.
After I had drawn all of my vertical lines, I started making my points. Instead of spacing them 6 1/2” apart they were only 4”. I wasn’t loving it from the beginning, but sometimes you have to see how it is actually going to look before you give up on the idea.

Can you see how much more shallow the angles are? It just wasn’t my favorite. So I painted over them and started again.

When you DIY there is always trial and error. How sad would I have been if I had just continued with the first design knowing that every time I looked at it I didn’t love it? Its worth taking the time to make adjustments and fix it.


The look of custom wallpaper that is original, and removable and CHEAP! This project gets 5 stars in my book!
There are about a million other great ideas over at finditathomedepot.com, so head over there and check them out!


Oh I love this accent wall and love that you used a swifter to clean the walls! Great tip!
Looks amazing and easy! Were you doing all of this on a textured wall? I’m tempted to give it a try, but I live in an old house with textured walls and I’m not sure how that would work out.
Yep the wall has a light texture on it. Nothing huge.
Wow! amazing!! Love the chevrons.. the room looks just stunning!
I love this idea and am curious if there is a paint pen brand you endorse? I would love to find a metallic gold pen and create a fun pattern on a super dark wall.
Hi Kelly! There is a metallic gold paint pen Sharpie makes. Not sure how metallic you want it, but I have one that I use to put my signature on my art. So much easier to use than a paint brush. I purchased it at Hobby Lobby.
I love it! But you can’t just say Sharpie, I think you need to use the whole phrase Sharpie Paint Pen every time. The only thing people think of when they hear that word is the permanent marker. I craft a lot and I wouldn’t have known Sharpie Paint Pens existed if I hadn’t read your entire post from your first wall. It makes me think of those cute mugs all over Pinterest, people only used the word sharpie to describe how to decorate them and now there are whole blogs filled with sharpie mug fails. I’d hate for someone to accidentally use a permanent marker not knowing there was a difference.
You are very talented and creative. Thank you for all the great ideas.
I always love a good sharpie wall and this one is once again amazing
Bahahaha! I was having a complete meltdown reading this because. Guess who thought it would be fun to let her 12 yr old “decorate” her own bedroom walls with sharpies? Yup. Worst. idea. ever. Coat after coat of primer and now you ‘mostly’ can’t see the random drawings. Thanks for clarifying. PAINT PEN.
This is super innovative! It seems like it would be extremely time-consuming, but that’s the only downside! After moving into a house with floor-to-celing wallpaper in every room (in some rooms, they didn’t even prime the walls first. Just wallpaper straight on drywall…ugh), I love this alternative.
Being totally inspired by the design you did in your living room, I did this to a wall in my nephew’s room this weekend as the first part of a larger room makeover to see him into his pre-teen years. I say totally inspired, but really I blatantly copied your design, I loved it so much. I used an acrylic paint pen of a different variety as I couldn’t find the sharpie brand but it worked great. We also live in an old old rental with very textured walls and I love the effect on the lines, which aren’t perfect as a result. Thank you for sharing this great idea!!
Whoa… and whoa. This is awesome and shows your amazing patience, Mandi. Love love love it!
I was also totally inspired by your living room wall and just did an interlocking circle motif in white sharpie paint pen on my dark green wall in my master bedroom. It looks awesome and was so much easier than I expected! Those of you that think it looks like it takes a long time, it is actually faster than you’d think! Thanks Mandi for always sharing such amazing and original ideas!
Amazing as always, Mandi! My biggest hesitation with the Sharpie wall was whether or not I was dooming every homeowner to come [or my future self] with this pattern – I’m imagining a weird dark green seeping through their paint color as they try to paint over the Sharpie. But alas – no need to fear! Thanks for sharing your trials along with your tribulations! Oh – and cute vid!
You’re BAAACCCKKKK!!!!
Love it! I use Paint Pens for creating elements of my original art and signing my artwork. They work amazingly well. And the color holds up too! Love the Wall!!
LOVE LOVE LOVE!! I MUST do this to my spare bedroom or bathroom..Love your blog and ideas..
I wish I had your brain! Your creativity is nothing short of amazing!
Mr. Clean magic eraser will take regular sharpie off drywall and painted brick. It’ll take the paint off, too, but it does get the sharpie off. My 5-year old periodically “decorates” with sharpies he finds (no matter how well I hide them). And if you’re painting over oil based paint with latex, don’t forget to prime, otherwise latex paint won’t stick to oil.
I can’t wait to do this to my guest room!
I do not know why people with children even buy Sharpies. Sounds like a disaster waiting to happen. Or lock them up with the guns and the medicine.
I think sharpies should be used for everything. This is such an awesome idea!
Love outside the box ideas!
Hey Mandi, I had a question about the Cricut explore… Is the online software that accompanies it free? Or do you have to buy it? OR is it a subscription? Because the first 2 I’m kind of okay with, but if I’m thinking about purchasing a $300 machine, I don’t want a monthly bill to come with it too…
I love this project. I just got removable wallpaper since I’m a renter. I’m excited to make all sorts of patterns on my walls now. T
I featured this on my weekender! https://aweekfromthursday.com/2014/05/weekender-5232014/
JUST finished this on a wall in our mountain (vacation) home study. It came out fanta-bulous!! My hubby has a western watercolor painting that he loves…it’s done in neutrals – black, white, gray and a touch of copper-ish. It looks GORGEOUS on this wall, and I will try and send you a photo. This treatment marries my love of modern, fresh, and slightly boho with his “I wish I was a cowboy” soul. Thank you, thank you a million times, Mandy! I do have a couple of tips for those attempting this. First, I searched high and low at Joanne’s for the Sharpie paint pens, and they were nowhere to be found. Finally, as I was checking out (typical…go in for ONE or two things, and leave with an armful), I saw them behind the counter. Seems like these are a “controlled purchase”, so look for them behind the counter. Secondly, use BOTH sides of the ruler thingy to draw lines at the same time…this didn’t occur to me until I had done about six lines. You’ll have to start one side first, then continue using both sides. I purchased a ruler similar to yours at Joannes’ – mine was 6 1/2 x 24. And finally, buy TWO paint pens (I did a wall about 8 ft. high by 10 feet long), and shake them well when ink starts waning. For my base coat, I used White Dove by Benjamin Moore. Have fun!
This is an amazing project! It looks like it would take so much patience and attention to detail, and drawing all those straight lines so carefully. Ugh, I could never! But I do love the final look, for sure! I did an accent wall with regular old removable wallpaper because it was just easier. If I had the talent I could’ve done it with a sharpie!
Hi, so did you use the oil based paint pens for this wall? Wouldn’t you still need a primer, since it’s oil based?
Hi Mandy, Im in the middle of redecorating by bedroom, and saw this post and i LOVED IT…. BUT the thing is, I live in Guatemala, and I´ve only managed to find the regular sharpie, so i guess im gonna have to buy it online in amazon. So could you please send me a link of the exact Paint Pen that you used. Specially because Ive seen that there are different time of line weights.
PLEASE HELP 🙂
Hello Im a bit confused between water based oil based and metallic sharpies lol can you list pros and cons of each?
and why you dont recommend using just regular Shapies.
Im going to do this is my bathroom and want to use gold. Should I use the gold paint pen or is the metallic one OK?
thanks !
Hi Mandi –
I love all these sharpie walls you do! Just wondering, I recently did a wall in my sons room with the water based sharpie pen. I thought it would be wipe-able but after 24 hours I still can’t wipe it without smearing. Any recommendations? If I trace over it with the oil pen would it be washable?
Thanks!
JoAnne
Hi Mandy,
I am greatful for having rambled on your page. I have been looking for the suitable wallpaper for my dining room wall, with no success. Seeing your great sharpie wall was the answer to my prayers. I simply love it!
Could you please tell me the broadness of he pen you used for the project? And how far can each pen get you? I will have to order online so it would be helpful to know the approx quantity needed.
Thanks for a great inspirational page, I will be surfing here again 🙂
Hey Ida!
I use the Medium tip and for this project I think I used 5-7 pens. Hope this helps!
Hi, I am super excited about doing some paint pen projects, BUT I am also a little leary. I’m most curious about water based versus oil based. You said you can paint over the oil. I am wondering if using the oil paint pen creates a lift on the wall so when you paint over it you can no longer see the color but there is still a faint visual of the design because of the oil paint sitting “on top” of the wall color. Have you tried the pen and painted over it and not repened in that same spot? This is such a new concept I am having a hard time finding post reviews about it. I have to convince my hubby that there will be no residual effects once we decide to change the wall or move or whatever. Have any insight? Thanks
Hey Kelsey!
This project specifically has been painted over (you can see about 1/2 way down the post where I talk about it) the paint is so thing there isn’t any lines after (like you’d see if you used painters tape and regular wall paint) If you’re still concerned I would try it out inside a closet or somewhere that no one will really see before you do it on the wall! Send me pictures, I can’t wait to see it!!
xo
m
Hi. This is beautiful and I am planning on doing this in my nursery room very soon. Like in days! Lol. I know you said you went with the 6.5 for your measurements but I am wondering if you also went with that measurement between your verticals lines or if that distance is different? Thanks.
I wondered that too- if 6.5″ was for space between vertical.lines as well. Can’t wait to try it! Thanks for sharing!!
I just used this tutorial for my office wall and it turned out AMAZING!!! It was fun to do. I will post pictures soon.