So this tutorial is something that I wasn’t planning on posting until April (i know, its so far away.) It is a project that I did for my nieces bedroom and because the makeover is for National Painting Week, it has to stay under wraps until then. But this project is just so good, I had to share it with you guys right away. Court was super stoked about hauling it back to my house (for the 4th time since it’s conception) so that I could shoot it.
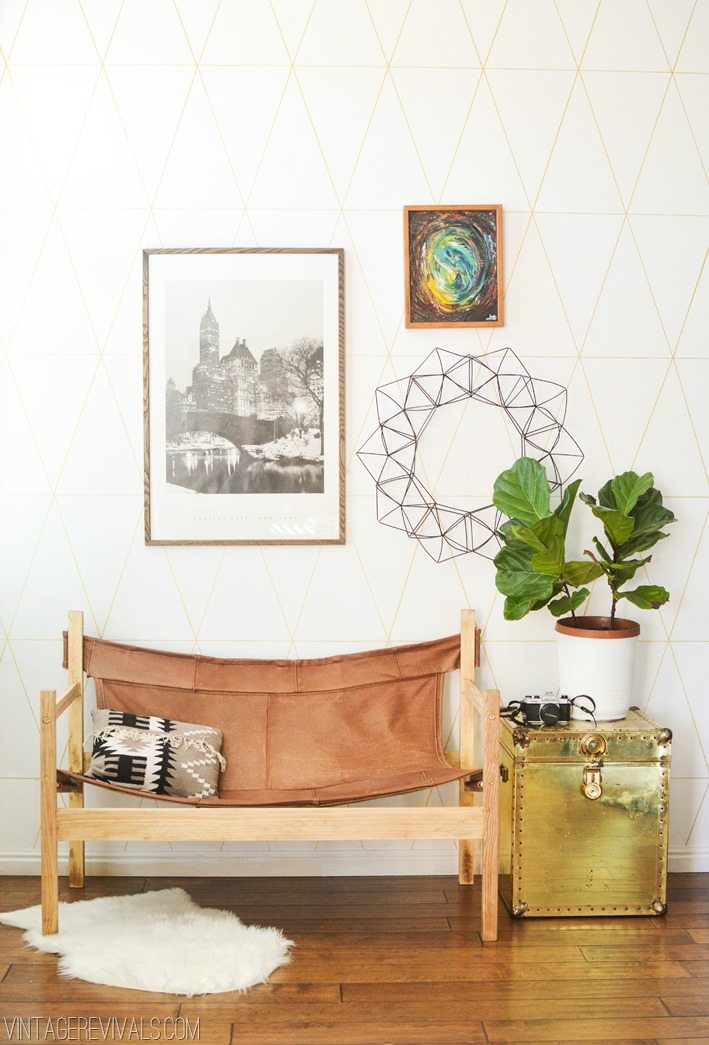
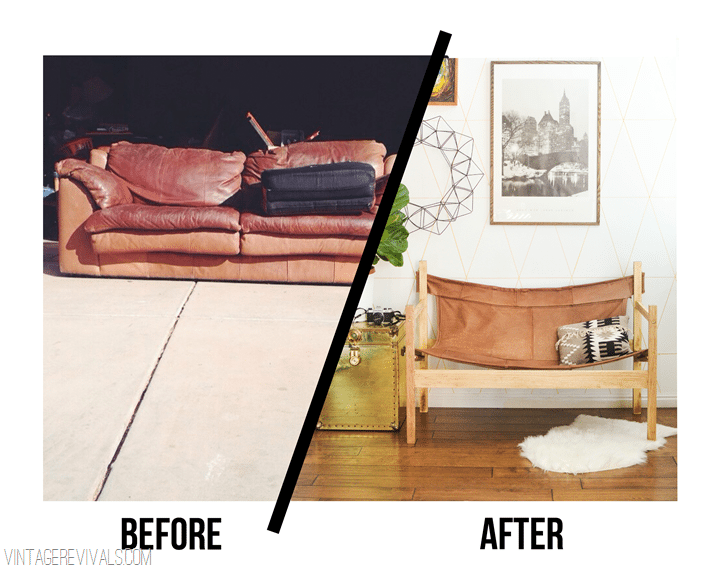
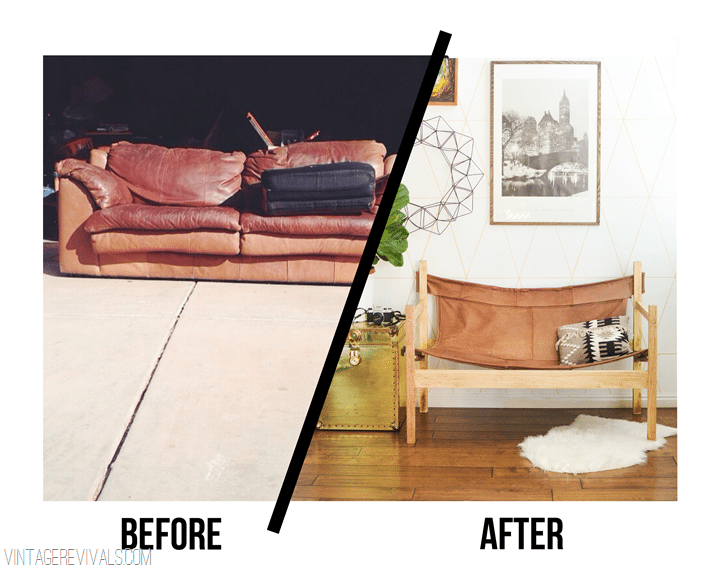
The world is full of horrifyingly puffy leather couches. You know that you agree with me. I mean, there is no saving grace for them, they are just offensively unaware. Poor things. Until now. I promise after seeing this project that you will never look at an ugly sofa the same again.
Last week I showed you an amazing Michael Arnoult chair that I scored on Craigslist. Studying the structure was completely awe inspiring. It was held together with a few screws and wooden dowels. That is it. The design was so basic, I knew that it could be a doable project. Luckily for you guys, I made all of the mistakes and now you get to benefit from my failures. What can I say, it’s what I do best.
Skinning a couch for a project is nothing new to me, remember when I made Leather Pillows? This is like that, but on steroids.
First things first you need a leather couch. The one that I used for this project was a sofa that I found at ReStore for $75. $75 may seem a bit steep for a couch that you only want for it’s skin, but have you ever priced leather? Hot dang that stuff is expensive. Make sure that the leather is in good condition, the thicker the better. This stuff was fantastic.
Start by skinning your couch. Keep the pieces in as large of chunks as possible. (i.e. the entire back section, the arms and sides etc.) Put them aside.
Now is the fun building part.
For this project you will need:
(2) 2×2’s @ 34” long
(2) 2×2’s @ 28” long
(2) 1×4’s @ 46” long
(2) 1×2’s @ 24” long
(2) 1×3’s @ 25” long
(2) 1/2” Wooden Dowels @ 16” long
(2) 1/2” Wooden Dowels @ 5” long
(16) Screws. I used bolts like these (because I love the way they look!)
7 Yards of Upholstery Webbing (this can be found at Joann’s for $.75/yd)
The tools that you will need are:
Miter Saw
Jig Saw
Drill
1/2” Drill Bit
1/4” Drill bit (depending on the size of the screws that you use you may need to adjust the size of this bit, it is used to drill pilot holes into the wood)
Stapler
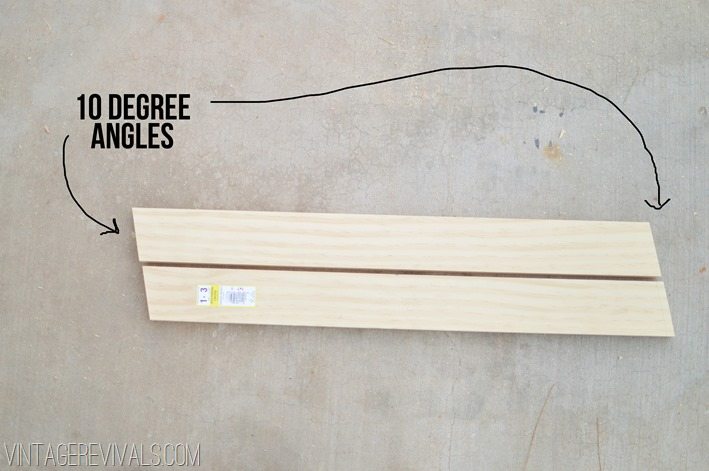
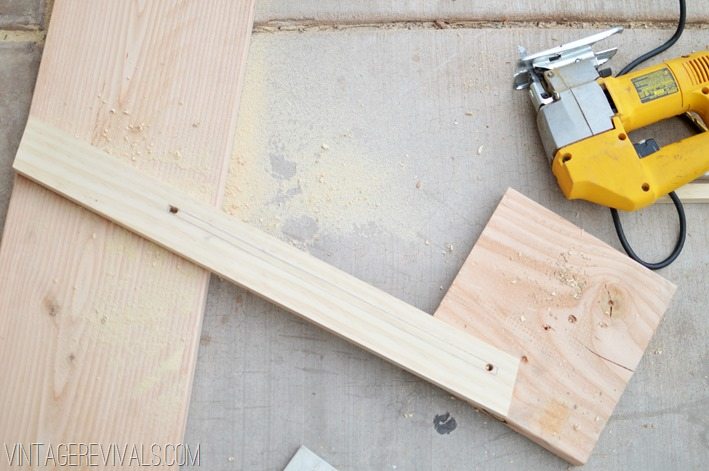
Start by cutting your 1×3’s down to 24” with a 10 degree angle cut at each end. (see picture below)
The next step is cutting out the grooves that will hold the leather and the dowel. Probably the easiest way to do this would be to use a router, but I don’t have one and I am sure the majority of you lovely folks don’t have one either, so we figured out a way that you can cut this channel with a drill and a jig saw. If you have a router, feel free to use it’s guts out.
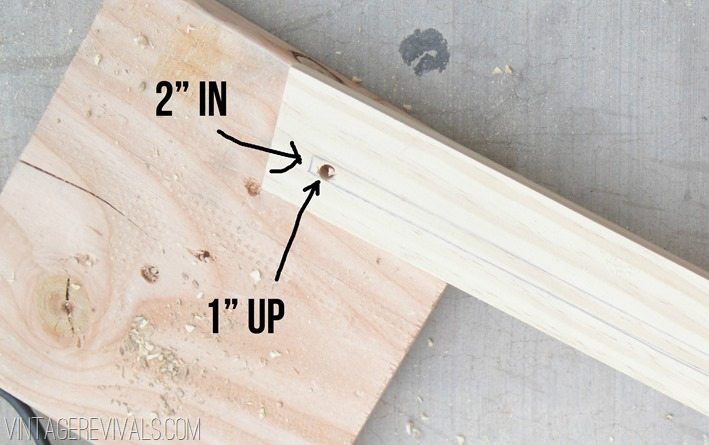
Measure 2” in from the end and 1” from the bottom and drill a hole with your 1/2” bit.
Using a straight edge measure 16” and drill another hole. Then mark 2 lines on the outsides of each hole.
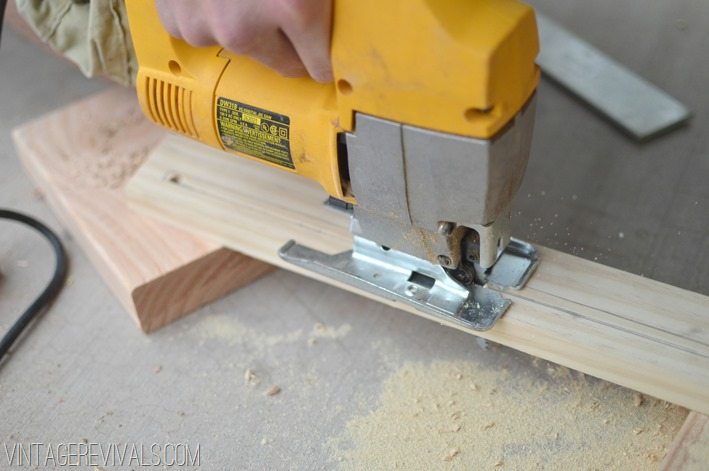
Now you are going to take your jig saw and cut along the lines that you just drew.
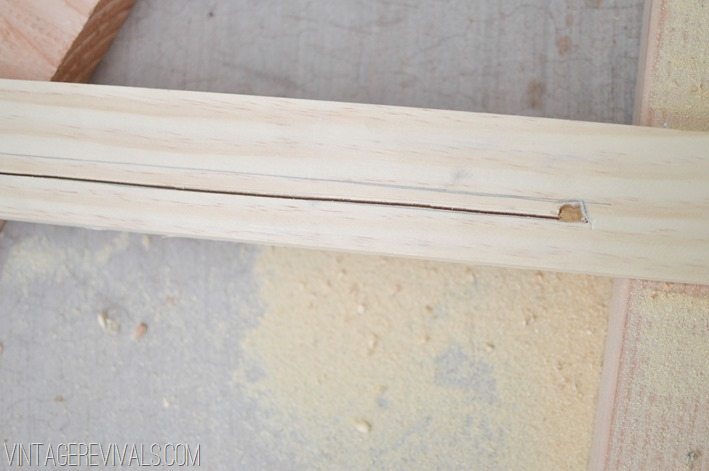
After you have cut up one side, you are going to cut down the other. And you will have the perfect sized gap for your leather.
You are also going to repeat this on the 2x2x34’s for the back of your sling. They will need to be thicker, because the leather you are passing through is 2x thicker than the leather that you are passing through the seat and 6” long.
Now it is time to assemble.
We are going to start by attaching the front cross piece (1) 1x4x46 to the front legs (2) 2x2x2. Measure 12” from the ground and mark it. This is where the bottom of your 1×4 is going to sit.
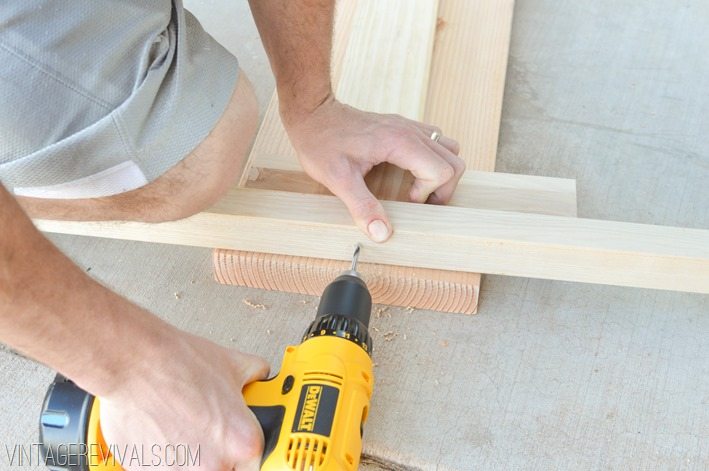
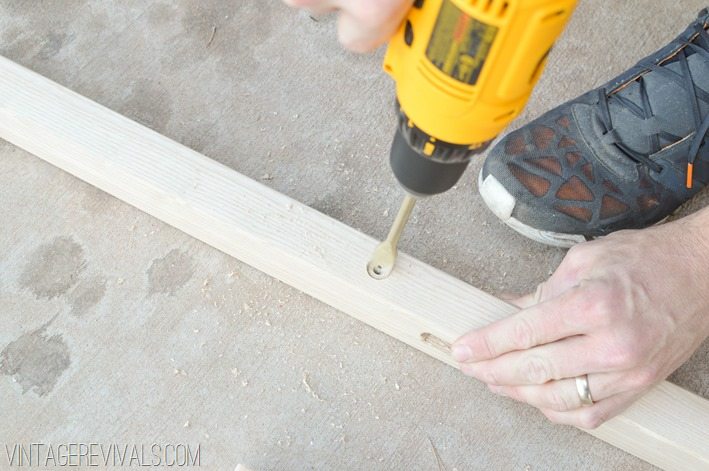
Drill a pilot hole through the side of the legs into the 1×4. (Notice that we used some scrap wood to prop it up so that it was centered on the legs. Your scraps need to be 1/2” thick for this.
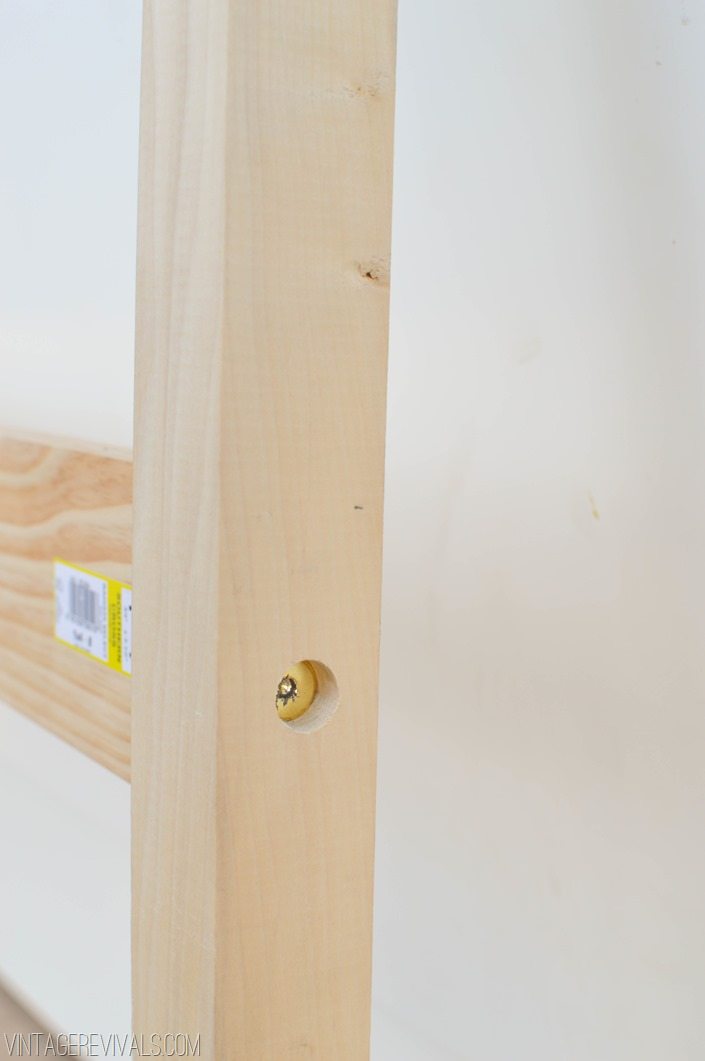
Then using a paddle bit, clear a spot for your screw to sit on the outside of the leg.
Then drive your screw into place.
Do this for both sides. Make sure that your board is level before screwing it in place.
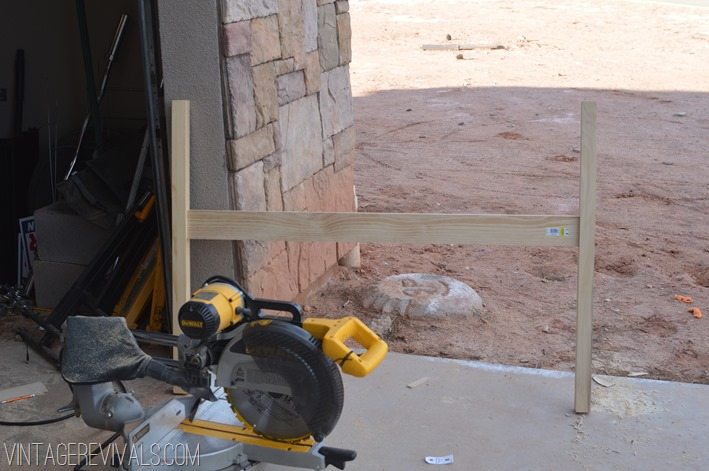
Now you are going to repeat it for the backside with the legs that are 2x2x34. Measure 13” from the ground and mark. This is where the bottom of your 1×4 is going to be. Because of the slouchy style of this chair, you don’t want to put the back piece too high because it would be super painful if you rammed your spine into it. So keep the bottom at 13” and you wont have that problem! Here is a picture of the back piece, if it looks a little wonk it is because it is upside down.
Next you are going to attach the seat cross pieces. These are the ones that you cut the channels into. Measure 16 1/2” up from the ground. The bottom of your 1×3 will stop there. The angle of the seat goes back and connects to the back piece lower than the front.
Drill your screw into the wood in the same manner that you did above.
Repeat for the other side.
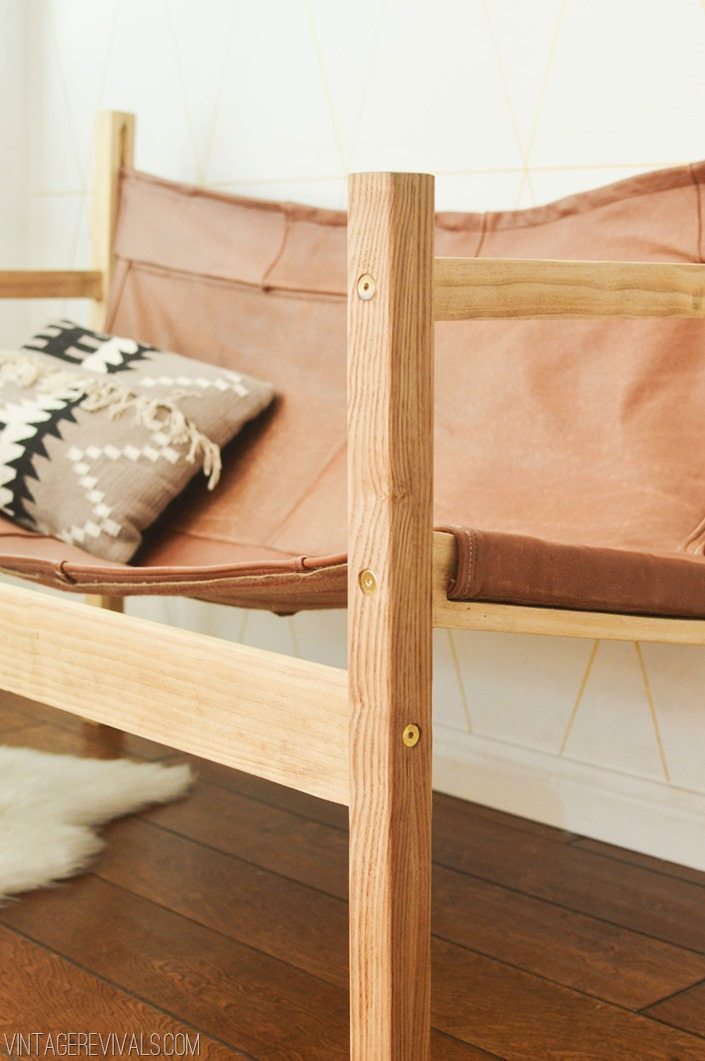
Because of the nature of this chair, you want to make sure that these cross pieces are completely secured or else they will turn under your weight when you sit on the bench. I wanted the front of the chair to look as clean as possible so we attached another screw on the back leg and put a few finishing nails in the front.
The arms attach 3” below the top of the leg. Make sure that you are using a level!
Give the whole thing a nice little rub down with 220 grit sand paper to soften the hard corners. I conditioned my wood with Danish Oil, to make it look nice and finished.
Now for the seat. Are you still with me?
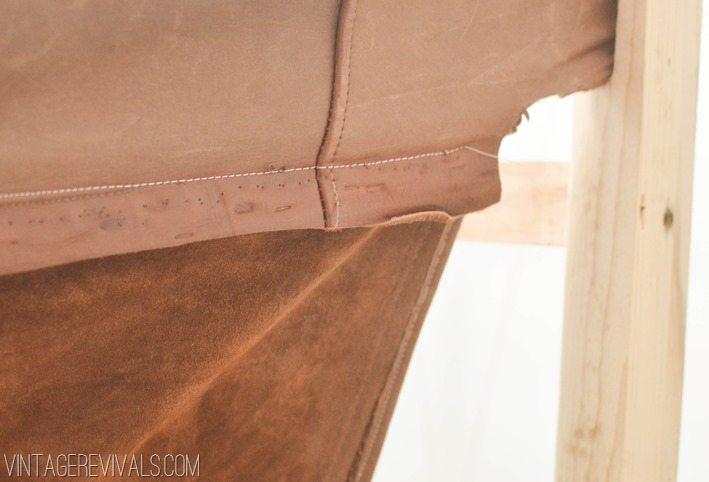
Sewing the leather was admittedly the most frustrating thing of this entire project. My sewing machine is not fantastic, but it worked okay (there are a few spots that are not my finest workmanship but it’s fine.) It did wonderfully well sewing 2 thicknesses’ of the leather, the part that I had trouble with was where the seams from the original couch were. Especially when it was doubled over (like the hem in the front) So just keep in mind that you have to go really slow over those parts.
To sew leather you NEED leather needles. Like don’t even try this without them. Stock up, I went through 3 packages. You also need upholstery thread that matches your leather (as close as you can find)
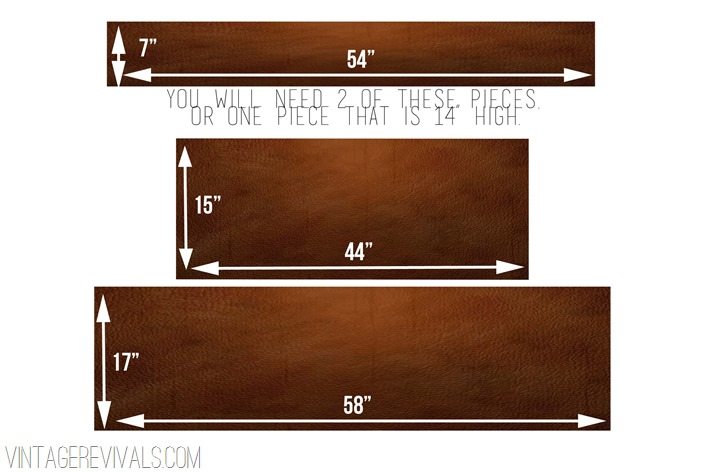
Here is the basic cut guide and pattern. 3 large rectangles, sewn together just like they are pictured below.
The base of your seat needs to be 58”x17”
Start by sewing a hem on the front. You have just over 1/2” seam allowance in the cuts.
The leather from this part of my seat came from the back of the couch, in case you were wondering!
The measurement for the back of your seat is 44”x15”. I had to piece 2 different sections together to get something big enough for the back (notice the seam running down the center)
Center the back piece on your seat base with the right sides together and sew it together. You will want to go over it a few times to make sure that it is reinforced, this seam is holding it all together.
Your top section will measure 54”x7” I was running low on thick pieces so I used a second piece that was also 54”x7” along the back to strengthen it. If you have a piece that is wide enough (like 14”) you can just fold it over and you wont need a second piece.
To sew this one in place, put the right sides of the top and middle piece together (make sure it is centered!) and stitch it in place.
Then take your back piece and put right sides together with the top section. After it is sewn together fold it down and stitch along the very top of the middle piece to hold it in place.
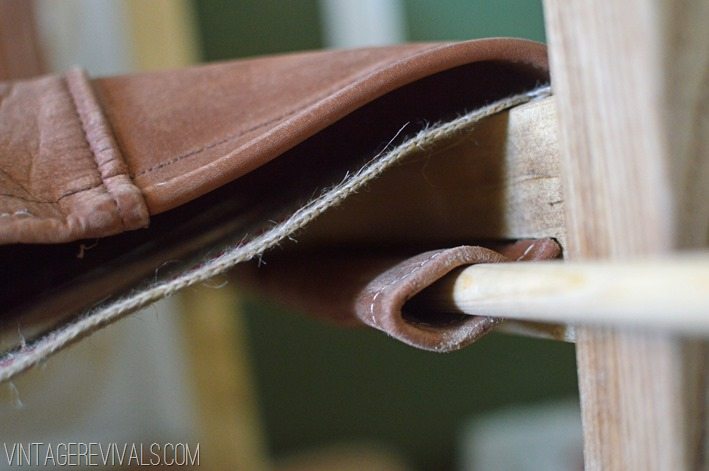
To make pockets for your dowels, just fold over the edge and sew it down.
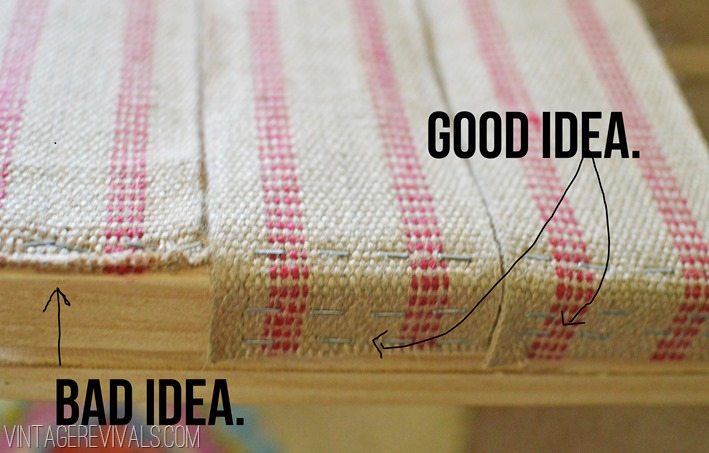
When we attached the leather I had a little bit of a complex about it over stretching. In order to sleep soundly at night and not have nightmares of teenagers ripping my amazing new bench, I stapled a few rows of Upholstery Webbing between the wood and the leather.
Make sure to staple it on the sides and on the top. (Learned the hard way that it can pull through the staples if you just staple it along the top.) I also doubled up the back row, because that is where most of the weight is.
Feed your leather through the grooves and slide the dowels into place. You my need help doing this if your leather is really tight.
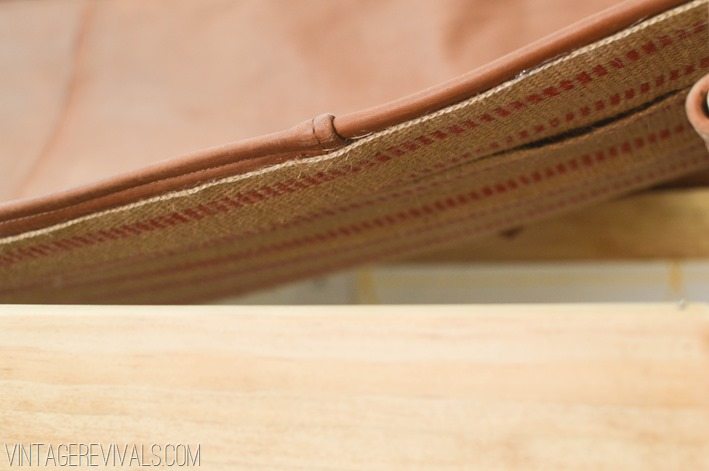
You might want to run a line of hot glue along the edge of the webbing and attach it to the underside of the leather just to make sure it doesn’t poke out of the front.
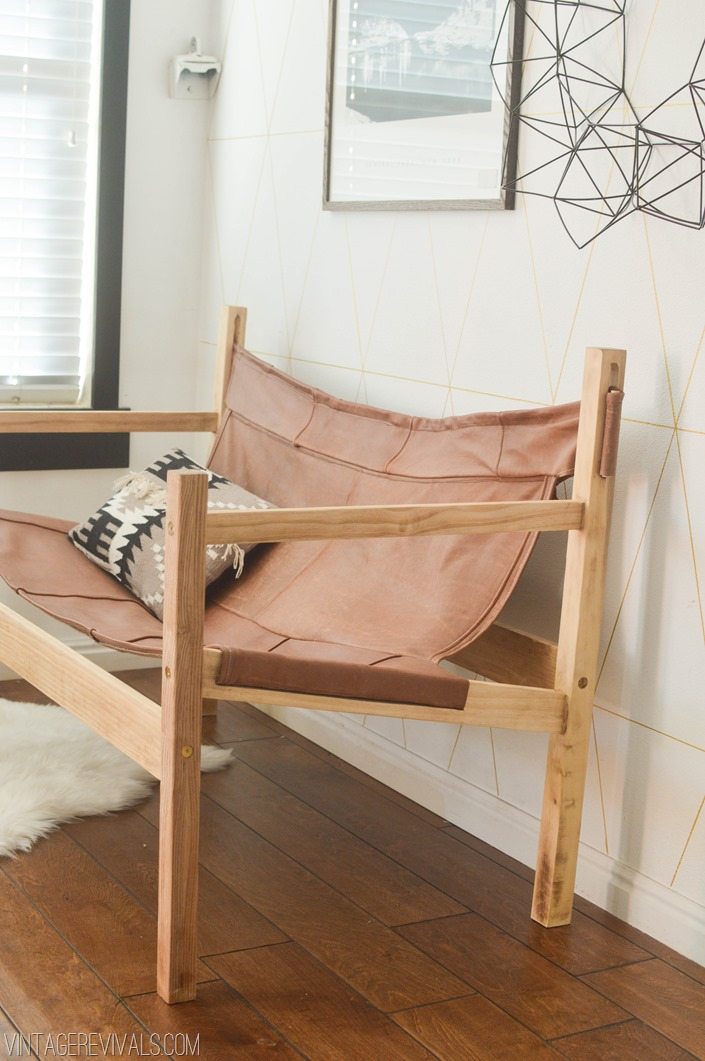
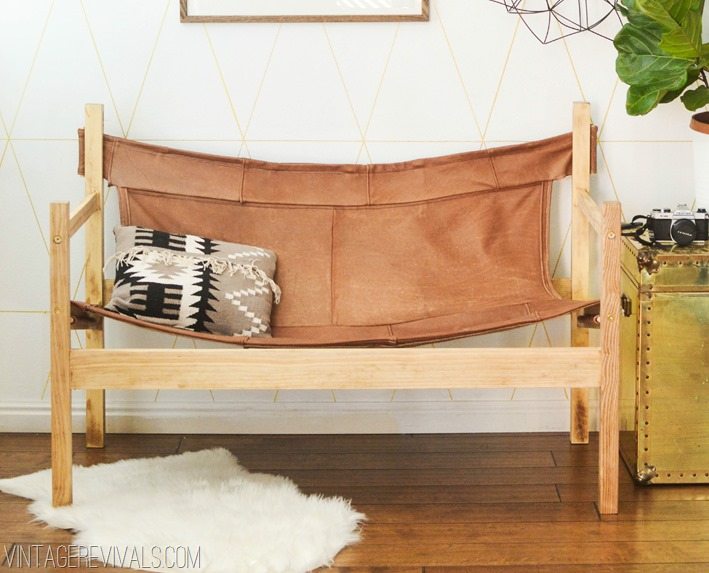
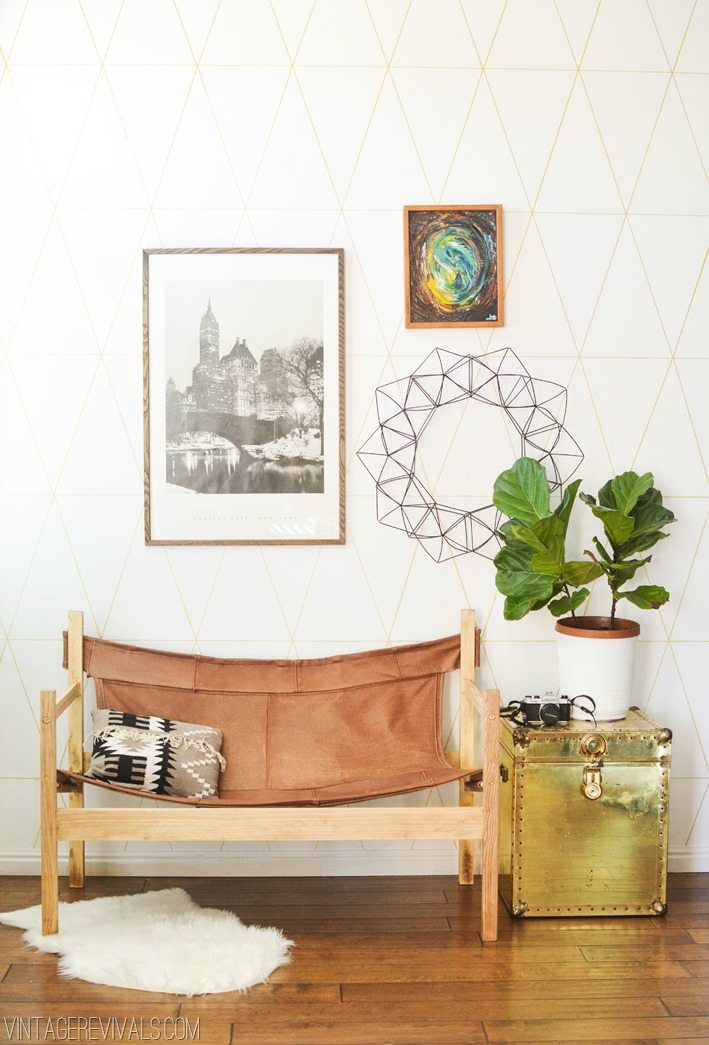
Now all that is left is to sit back and enjoy the fact that you just made, literally, the coolest bench known to man.
And just because the before and after is SO good…
I cant wait for you guys to see it in Macie’s room!
If you have any questions, leave them below!!
Also. If you loved this tutorial, I would be ever so grateful if you would please please pleeeeeeeeease hop over to the Homies Finals on Apartment Therapy and vote for Vintage Revivals for the Best DIY Blog. We are about 300 votes behind as of this morning and could use a boost!



Wow! Just wow! In love.
Freakin’ amazing!!!!!!!!
Whoa. Can I visit the inside of your head for a while? Maybe I’ll come out with something half as amazing as this. [And I would be pretty dang proud of it]
Jaw. Dropped.
Great Job! Love it! For the Jute webbing, you should fold it back over itself and staple it down a second time. I staple, then fold and staple again. This will keep it from fraying and ripping out.
You’ve got skills!! That is amazing!!!!!!!
You know the whole sharing your gifts or you’ll lose them? I don’t think you have to worry about that. Oh my goodness. I don’t think I’ll ever cease to be amazed by what you come up with. You definitely have a talent. My main thought about this couch is that it’s so much easier to move around than the original! It looks so light and summery. I love it.
Boooooshhhhhh! That is the sound of my mind being blown right now. High five.
My wife showed me this saying that we should do it. My question is how sturdy is it? Obviously, you can’t run and jump on it, but is it pretty strong overall?
Super good q! It is totally sturdy. That being said, I dont know if I would use it as the only seating in a living room, but it is perfect for secondary seating!
xo
m
So, for the umpteenth time now since I first discovered your blog, I am quite literally gobsmacked.
You seriously never cease to amaze.
I’ve got a pretty good size stack of vintage leather jackets & such, collected over the years for the sole purpose of scavenging it for some sort of project. I think this might actually be the one. It’s BEAUTIFUL.
Holy WOW! You’re like a freaking magician or something. Good for you, gf. Giant pat on the back for this amazing creation. Love it. -Misty
Fabulous yet again.
Simply stunning!!! Excellent job as usual… Love it!!!
LOVE this Mandi! Work it!
Oh my! This is crazy awesome. I wonder if that leather couch I saw sitting out for bulk trash pickup is still hanging out down the street — might have to go grab it!
Do it Bettijo!!!!
Awe-inspiring! Making something from nothing (or from “ugly”) is so gratifying and fun! Now I will be on the lookout for a leather couch…
listen, your instructions on actually making this are super helpful if i could understand any of that, but i seriously turn away and want to go numb on all the mathy buildy bits. to those that can actually reproduce this, hurrah for them. i just sit here amazed at your creativity and your audacity to try what appear to be super difficult things and that are your truly original ideas. i don’t comment much, but just so you know, you often blow me away. you are ridiculous in a good way, and this project is just one of the reasons why you deserve to win that homie.
Thank you so much!! And I am pretty sure that math buildy bits needs to be a regular phrase here.
xo
m
Awesomeness!!
And voted! Highkick! (And if you don’t watch Million Dollar Listing, ignore the highkick)
Love Million Dollar Listing!!! I still have nightmares about Chad’s hair.
xo
m
Mandi, you are so creative and talented! I love this tutorial but I have to admit there’s pretty no chance I will be ambitious enough to attempt this DIY even though I love what you did. I have to ask…how comfortable is it? Is it a bench you would hang out on for a while or is it mainly just a pretty accent? Either way, great job!
It is really comfortable! It is super loungy, I dont know if I would use it as the only couch in my living room, but it is perfect secondary seating!
xo
m
i am curious about the gold trunk?
did you just sparay paint it with super gold color or what?
i love evrything that is happening in this post.
always great things!
Breezie, I bought it like that. You can read all about it here
xo
m
This is AMAZING! You are so creative! I mean, who takes a leather sofa and turns it into a beautiful bench like that!!!!?!?! I want to make one now!
seriously amazing!!! you did an awesome job!! definite coolest aunt ever status!
This is literally the coolest project I’ve seen ever. Mandi you are a visionary. Hats off to you!
You should be designing for Ikea, or open up your own furniture shop. You have such unique and cool looking ideas.
You’re ridiculous. And by ridiculous I mean TOTALLY AWESOME!
This is so cool!! I was wondering if the wood “beam” (I don’t know all the fancy wood working terms….) that stretches horizontally across the front of the bench (right below the leather) cuts into the back of your knees at all. Not that it would take away from the awesomeness of this project…. just wondering about long term sitting comfort.:) Thanks!
Oh, and P.S., now I have to scrap the leather sling bench I was building as my submission to CWTS. 😉
Hands down, most awesome DIY on the web EVER!
MY.JAW.DROPPED when I saw this. Hooooly cow. I LOVE this style and its so cool you made it! I need my own Ty Pennington or Carter Oosterhouse to help me make this ASAP because alas math hurts my brain, oh well. Love it! Thanks for sharing this on this cold dreary February day and not making us wait to April. You’re awesome. LUuuurrve it!
You. Are. A. Rockstar.
This is completely AWESOME!! Mandi!!! Mind. Blown. xo Kristin
This is the coolest thing I have ever seen! I absolutely love it! You are so awesome Mandi! I have enjoyed looking through all of your posts, compiling a nice list of things I want to make for my own home. This is definitely one of them.
This is beyond awesome. I would love to be able to make this but am totally lacking in confidence for this project, so I love living vicariously through your projects. Thanks for sharing..this is totally, totally amazing.
This is so ridiculously cool that I am just overcome with project envy. Rock on.
Wow! This is amazing!!! **claps**
Wow! This is phenomenal! Bravo and well done 🙂
It turned out perfectly! I CAN NOT WAIT to see it in the room, which I know will be better than any mashup of buzzword combos I could conjure up! I’m still drooling over that chair score, though. I may never stop. I might have to seek medical attention. At least now I can try my hand at a knock off! (popping over to AT to vote now!)
Holy Cow Hide.
I will never, ever look at a puffy leather couch with disdain again.
I will, however, be looking FOR one… OMGSH. Probably my favorite project that you have ever done since the glorious day that I found your blog.
So so incredibly good!
Hey Girl!
Okay, I have a blogger question… I love your Sharpie wall-it’s the perfect backdrop for so many beauty shots… but you always switch up the art in each project shot etc… Are you using command strips or something or do you have 1.4 million small holes in your wall. I’d love to know your secret. Thanks Mandi!
-Mon
Hi Mandy,
Too cool to be true. You are amazing.
-mariella
I am in LOVE with this sling! It’s amazing to see what it came from and that you MADE this! Great job, Mandy. Keep up the fabulous work.
I just want to say: You are amazeballs. The end.
OMG lady – you are just so creative! I love all your tutorials but this couch is something else. I would never have had the guts to try this in the first place.
Thinking about giving it a go as a chair – since I don’t have the room in the house for another couch 😉
Or should I say, a couch my husband can’t nap on.
Love this bench! I love your entire blog! You are such a creative gal!
Wwwwooooowwwwww. What?! This is, like, super duper crazy impressive. I’m just amazed! And using the vintage leather (because yes—hides = $$$$$) is so smart. So good, so good! It kind of makes me feel stupid for obsessively searching Craigslist and Ebay for that perfect pair of safari chairs for the past 2 years (yeah, pipe dreams…) and just get my act together and build my own.
Damn.
This. Is. AMAZING.
So my parents totally have this giant leather sectional that’s in not great shape- totally just sent this over and asked them to save it for me!! Hopefully they haven’t already donated aghhhh!!!
Holy Moly! You are incredible. And since you probably never get tired of hearing it, you are seriously talented. You never cease to amaze me with your ideas and then not only that, you’re ability to execute them!
You are seriously freaking amazing!!! Mind blown!
You brought out the true beauty in that couch. What an amazing and inspiring upcyle project! Very innovative.
Done! Good luck to you. (Altho, I must confess, I don’t believe in luck.) Anyway, I enjoy your creativity and honesty. You’re a hard working woman and you should be proud of yourself, no matter what!
I admit, I’m one of those people that never vote. But I love your blog and you went the extra mile entertaining me with the dresses so I tried to vote. I was on my iphone and the dang buttons won’t work on their website. So I figured it was bc it was my phone or smthg. So I got on the computer and it still won’t let me select VR to place my vote. Annoying and not fair for you!! Hopefully it’s fixed soon…or maybe I’m the only one it’s not working for? I’ll keep trying. Good luck, I love your blog!!
Ummm and it’s only 8:13 p.m. ET Feb 26th, although the blog comment says 1:13 a.m. Feb 7th…
Can I just comment one more time, ha! Feb 27th is what I meant 🙂 Loooooove the sling bench. Amazing.
just voted :). aaand i checked the votes, it looks like you are in the lead!@!!!!!!@!!!!
Mandi, you are just too awesome. If you can evolve from a no-decor white wall home to this, so can- not anyone, but lots of people!
You need your own line.
Amazing!! Obsessed with this project!!!
i die. this is the coolest.
I can’t believe you made this. Incredibly gorgeous. My hubby is in love with huge couches that look like gloomy clouds. I love sleek and modern. We compromised on a fluffy grey courdoroy-ish fabric covered couch with straight lines. But I think he would be comfy in a more modern arm chair (since he likes ikea’s Poang). And I think this project could absolutely make a chair. Great Great Great job!
Totally pinning this since I have 2 couches that look exactly like the before one in my basement!
Wow…this is a cool and unique idea!! I’m in awe and inspired…however, not ready to tackle something requiring saws…LOL. I can’t be trusted.
Very nice work and thanks for sharing!!
Hi Mandi! I love your style and amazing projects! This one is by far your best. I have a question for ya. Where did you find the large frame hung above your couch. Was it thrifted with the picture? I’m looking for one similar.
Your bench is so creative and a great way to recycle leather. I think it would also be cool in the old 1980s blue/jade/turquoise hues which were the height of couch fashion back in the day. I see poufy sofas like that sometimes on CL. Now I know what they could actually become, thanks to you. Fab, fab, FAB project.
Amazing! This project is the most unique I have ever seen. You have such excellent vision.
Thank You, Thank You, Thank You!!!!
This is a keeper!! LOVE LOVE LOVE it.
Cindy
You are my hero. WOW. Just WOW.
Such a lovely transformation. I don’t work with furniture much but now I am inspired to.
Could upholstery fabric or indoor/outdoor fabric be used in leu of the leather?
I like this, the design goes well with a Danish sling chair I bought ruins ago.
I am so doing this! is that trunk hand painted? I am trying to find an amazing gold metallic paint?
First of, I´m not a “blog reader” and I often condemn my friends and others for considering themselfs as such. (This is partly because I´m a freak and fear “new” technology and social media)
But this! Oh my god, THANK YOU! I found you through Pintrest, and this post.
Usually it stops there, and I go back to pintrest searching for more mid century/Scandinavian/Organic, DIY, IKEA-Hacks and whatnot. But I promise you, I found your blog yesterday, and I have almost been through EVERY one of your posts! Well done you! I´m gonna steal quite a few of your ideas and apply in my own apartment. Not sure if I can pull this one off, but I´m certainly gonna give it a go! 😀
Keep doing what you´re doing! Truly inspiring!
Greatings and admiration from Norway