I.cant.stop. If you are turned off by my geometric Himmeli obsession, you might want to avert your eyes. Possibly for a few weeks, cause I have 3 or 4 good projects still left in me before I have to have a come to Jesus with myself about it.
Today is one of my favorite days of the year! It is Color Challenge!! (If you are scratching your head about it, it is where 6 bloggers from 6 different niches choose 1 color to inspire you in every aspect of your life! You can see our Fall Challenge here!) Our color this round is GOLD! (my fave!!)
So lets get on with the project!!
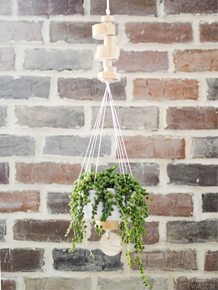
Today we are making a DIY Teardrop Hanging Planter, and seriously, I feel like I want to make 2 and wear them as earrings I love it SO much!

And guess how much it will cost you?
Right around $15.00.
I know. It is like the gift that just keeps on giving.
First things first. You will need:
7 Feet of 1/8″ Round Brass Tubing

Mini Tubing Cutter
($5.49)
30 Gauge Floral Wire ($1.00 at Joann’s)
1 Piece of Leather Lace. The length will depend on how low you are going to hang it. (Mine came from the Leather Scrap bag from this project)
1 Small Bowl (I found mine at Homegoods for $2.99)
I tracked down a few places to buy 1/8” Brass Tubing. The best price that I found is here on Amazon. You will get fifteen 12” pieces of 1/8” tubing. That is just enough to make 2 planters for $1.45.
UPDATE: The price on Amazon has changed and the seller is a total jerk and is ripping people off. Buy the tubing here. It is where I originally bought mine (but I posted the amazon link because it was a better price) it is $10.35 for (5) 3 foot pieces (so fifteen feet total). So sorry to everyone that has had to deal with this guy! xo

The not so fun part is that you have to cut the pipe down yourself. So there is that. But it is sort of mindless and you can totally get caught up on your favorite show, or help your kids do homework while you are doing this, or do it in the bathtub. You didn’t judge me when I told you the alternate title of this post, I wont judge you and your tube cutting situation.
You will need to cut:
(20) 1 1/2” pieces
(5) 9 1/2” pieces
The easiest way I found to measure them is to use a tape measure, or ruler, and a really fine tipped Sharpie to mark all the way down your tubes. It would be a smart move to cut the 9 1/2” pieces first and then use the scraps to cut some of the shorter pieces. Less waste. I talk more about using a pipe cutter in this post if you are unsure of how they actually work!

Start by measuring 2 arm lengths (arms length? Which is it!?) Thread 5 of the smaller pieces onto your wire. Connect the wire to make a pentagon shape.

Add 4 more pieces of tubing and connect to make a second pentagon.


Don’t worry if your shapes aren’t perfect, once the bowl is resting on them they will straighten out! Add 4 more pieces and form a 3rd pentagon.

Feed your wire through the top 2 tube pieces so that you can attach one more pentagon.

Attach 4 more pieces to form another pentagon. Make sure that it looks like the image below (see how all of the bottoms are lined up and the shapes are all facing the same way with the points on the top?). Add one more piece of tubing to the wire.

Connect the base of the pentagons at each end.

Thread the wire through one of the pentagon edges.

Attach it to the pentagon on the other side, forming the 5th and final pentagon. It should look sort of like a pretty little flower!

Feed your wire through one tube at the top so that it is coming out of one of the high points. Thread on 2 of the 9 1/2 “ tubes.

Connect it to one of the other pentagon points (it doesn’t matter which one!)

Thread your wire through 2 of the small pieces to come out at another tip. Attach one tube. Secure and twist your wire at the center point of the 2 long tubes. Add another piece and connect it to the top of a pentagon.

This will leave you with one side of open. Put your bowl in now to avoid having to bend your tubes to get it in.

Cut another piece of wire (12” long) and attach it to the point on the last pentagon. Thread your tube and secure your wire to the center of the other 4 tubes.

Lay your teardrop on its side and thread the end of your leather lace underneath the point. Hot glue it like the picture below.

Add a second smaller lace to the center of your loop. Secure it with hot glue.

Wrap it around the first lace, gluing as you go wherever necessary.

Trim your wires and plant your favorite succulents inside!


If you are itching to try more projects like this one, check out my Geometric Wreath Tutorial! (psst! its not as hard as it looks and I even have a video to help you through!)


love love love
I can feel a brass tubing addiction coming on.
So so freakin good!
this is so cool!
Very nicely done!!!!
LOVE this Mandi. You’re too talented.
your creativity amazes me! i just started reading your blog last week and am so inspired to do SO many projects! thanks so much! merry christmas! xo! jenna.
This is pure genius. I will totally be making this after the holiday madness dies down!
Thank you! I was wondering about making these from metal tubing. What do you think about trying aluminum tubing instead of brass? Would aluminum be too flexible?
I want to be just like you when I grow up! (even though I’m probably older than you) Thanks for continually inspiring me!
Love this so much! It totally looks like something you could buy at West Elm!
Love it Mandi! Especially with the copper tubing. But in regards to the wreaths and ornaments made out of cocktail straws – where on earth, and more specifically St George did you find them?! I am in Washington City. Thanks!
Black straws at Target, white ones at Harmon’s! They are by the paper plates!
I’ve been wanting to try making a planter like this but was dragging my feet because of the all the “figuring it out” I’d have to do…I much prefer following your directions. Thank you so much!!!
You are always so great at making something amazing from nothing. Seriously, I wish I could live in your head for a day.
xoxo!
Were you a geometry major? You freakin’ smart, yo.
Love it! Great tutorial.
xo
Coco
I love this and will try my own over the holiday break. Awesome!
This reminds me so much of macrame method that my mom and i think all of her friends, neighbors, grandmas and their friends had back in Ukraine in 1990s to hang the plants. There were macrame plant hangings on every balcony, in every corner of the kitchen (or a few per corner) and hallways.. It was in school entrances, school rooms and omg, EVERYWHERE. Oh yeah, when it got boring to just use thread, they started adding shells to the thread, to make it “prettier”, Even though I love your creative and modern approach to a new way of macrameing, I don’t think i’m ready to relive the plant hanging years of my life 🙂 LOL.
Nadia, I remember all those macrame hangings, too! I’ll go you one better…My Mom made hanging end tables with huge round pieces of glass that were placed inside the macrame hangers in place of the planters! They were beautiful. She would actually macrame a light inside a color coordinated planter bowl at the top, upside down, and the light could be turned on and off. It was so pretty shining down on a nice plant or a stack of books and a coffee cup. I loved them. We had one on each side of a bay window in the family room, beside our recliners in the living room, and even as side tables on either side of a bed! Those were the days! Thanks for reminding me of my innocent years! xo
What a lovely DIY! Can’t wait to make this!
I can barely deal with how awesome this is! PS – You are hilarious 🙂
I ordered the tubing from your link to Amazon and it appears that listing is only for ONE tube, not 15 of them. It’s very deceptive and I only realized it after I received my product this week. I requested a full refund and haven’t heard back yet. You may want to amend your recommendations above to reflect this as it significantly changes the cost of the project!
I will get the post updated! That is so lame, the listing was for 15 I am sure of it. Jerkheads. Thanks for the update Jessie!
I had the same problem. Amazon refunded my money completely and let me keep the product. I then placed the order for tubing from another distributor on eBay.
Oh it still shows 15 but they are only shipping one.
I love this post! I showed it to my BF and for a Christmas gift he went out and bought all the supplies to make 3 hanging planters (I know, total keeper). However, he neglected to buy the bowl/planters because he was unsure what size to buy. I’m dying to start this project ASAP!… Just need to purchase the bowls. What is the depth and diameters of the bowls you used, since they fit so perfectly in the basket. Thanks!!
The one that I have is sugar bowl size. (Maybe 4.5 inches across?) The awesome thing about this design is that it adjusts to fit the bowl (as long as its not HUGE.) I want to see pictures!! xo
I also ordered those brass tubes and only received one. I contacted the seller and they apologized for the misleading ad. Although now the price had jumped up quite a bit. I’m wondering if thats because they are now actually selling a quantity of 15 instead of one? Kinda lame (the seller, not you).
Love this! Such a simple statement piece 🙂
https://cafecraftea.blogspot.com
You are so amazing!! Thank you for updating this post with a link to the brass tubing. I absolutely love your blog and all that you do for us DIYers.
what an awesome idea! I’m loving the geo shaped things so keep em coming!
This is adorable, I have pinned it to make in my new apartment!
My god, you are seriously bloody amazing. I found your site a few months ago and am totally, 100% addicted. I so wish I lived where you live so we could be BFF’s *sad face*
Anyway, quick question. I’m totally itching to make this planter but was wondering if you happen to have a picture of your room with this in it. I’m basically trying to figure out how big or small this thing is in comparison to the room. At first, based on your pictures, I thought it was for a large bowl, but then I saw the dimensions of the tubes that I have to cut only being 1.5 inches each and then you said the bowl was a 4.5 inch sugar bowl, I’m now imagining this planter as being tiny. Can you help a girl (complete fan) out?
I’m new to your website, but am TOTALLY AND COMPLETELY IN LOVE! I AM ABSOLUTELY MAKING THIS WHENEVER I CAN GET SOME FREE TIME, AND WANT TO DO MY DAUGHTER’S ROOM WITH THE HEXIGON OMBRE WALL LIKE YOU DID…YOU ARE AWESOME!!! AND THANK YOU FOR THE AMAZING INSPIRATIONS!
This is so beautiful! I love all the brass tubing tutorials i’ve seen around lately, but this is by far my favorite.
So I made a larger scale version of this over the weekend. It turned out so great, thank you for the idea. Hers is a pic. https://instagram.com/p/pkCZMeRYUd/
I used the Altitude Bowl at C&B which was on sale for like $7. I cut the hex pieces at 2.5 inches each, and made the verticals 15 inches, total, keeping the bottom 3 inches a separate smaller piece. ( you need to be able to bend at the top of the bowl)
Lesson learned though, I got my tubing at Hobby Lobby and ended up buying 3/32 with instead of 1/8. This was a mistake though since all the pipe cutters have 1/8th as the smallest they go. I had to use a dremel tool to cut the tunes, which was a lot more work. Next time I’d use the thicker brass. Also I used a lower gauge wire so it would be a bit stronger since this is a lot heavier than the original version.
Ohhh, thank you for the DIY explanation. At first I thought: “oh vintage. I can’t find something like this” but if I can make it myself! Lovely!! I hope I can find the tube cutter too. Looks so stylish 🙂
Could you possibly provide dimensions of the bowl as well as the finished piece? Thanks, I can’t wait to make one!
Hi! I can’t wait to make this 🙂 thank you for sharing! Do you know where I could find copper tubing? I think Home Depot has it but is is coiled. If I straightend wire do you think that would work or is the coiled version too soft? Think tubing sure is hard to find! I called all my local Hoobby lobby’s and they are All sold out. I will go ahead and order brass one from the link you provided. Thanks again!!
Loved this diy sooo much I had to include it in my Modern Diy Projects to Try roundup! https://www.thebeautydojo.com/modern-diy-projects-to-try/
I LOOOOOVE this- but I have a bigger bowl. Do you have some math to help me figure out what dimensions to make it? Actually- if you give me the dimensions of the bowl I can probably figure it out.
Thanks!!!
Hi–This is a wonderful idea and tutorial. I purchased all of the materials and ready to go. Just one glitch: I have the pipe cutter and the 3/8 pipe–how did you manage to actually score and spin the cutter around the pipe without the pipe spinning too? It is just too thin for me to grab a hold of and keep it stationary while spinning the pipe to make the cut. Any tips would be much appreciated! Thanks!
Hi–I meant that I have 1/8″ tubing, not 3/8″. But the problem I am having is that using the pipe cutter on the tubing is very difficult because the tubing is so very thin, and the manual twisting, scoring and cutting of the tube requires that the tube be held stationary–which is extremely challenging because it is so thin. Do you have any tips at all? I’ve started the project using all of your materials suggested, and it has taken me hours to just cut the 5 long pieces and 8 short pieces. And my hands feel like they’re going to fall off. I must me missing something?
Thanks in advance!
For newest news you have to pay a quick visit the web and on the web I found this site as
a best website for most recent updates.
I blog quite often and I genuinely appreciate
your content. Your article has truly peaked my interest.
I am going to bookmark your site and keep checking for new details about once per week.
I subscribed to your RSS feed as well.