You know how when people get their first gray hairs they are usually named after their children? Not mine. Mine are going to be named Kitchen and Floors.
I shared a little bit of what was going on with the kitchen floors a few weeks ago in this post, but I wanted to give you guys the nitty gritty details(because those are totally my favorite kind.) and because I really do want to share the good the bad and the ugly. You might want to shield your eyes.
Ok, settle in, cause this story has it all…tears, disappointment, a hero, gnashing of teeth, a beautiful maiden, and finally after a really long struggle between good and evil, a happy ending.
When we moved into our house 4 years ago the one thing that I wanted was hardwood floors. That was all. I would have been content without a refrigerator as long as I had wood floors. After doing a fair amount of research we ended up with Aspen Birch Engineered Hardwood from Build Direct.
Blast from the past I found this picture on our old family blog of the installation. Hello infant Dylan!
")
When we ordered our flooring it was a great price, I want to say less than $2.25/sqft. The reason for the killer pricing is that it was being discontinued. We got the last of it and we have loved it. It is a great floor and I would not change anything about it.
Fast forward 4 years.
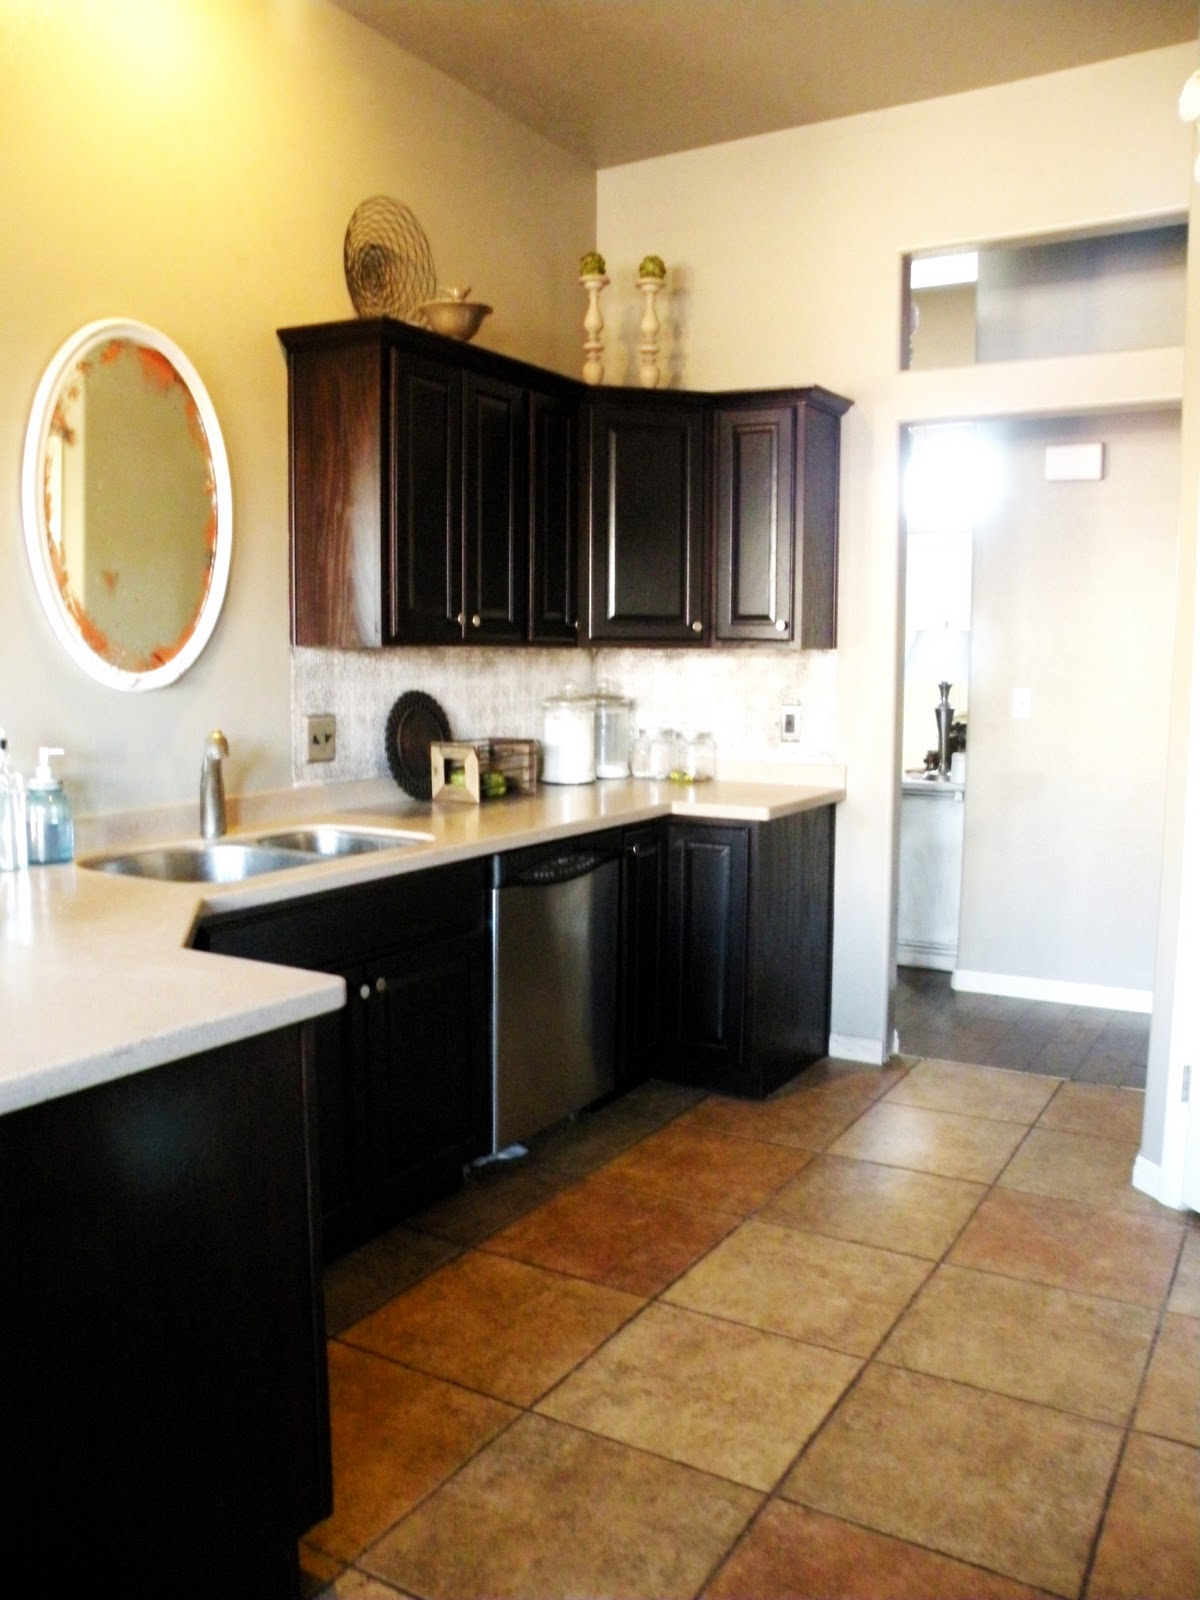
I have had the itch to update the kitchen. The St. George reddish beige cheap tile that is so builder basic it makes me weep openly, was just really grating on me. I could only cover it up so much. It made everything look redder…and crappier. A few of the tiles…(ok one of the tiles) was cracked and the grout always looked dirty. It was just not working.
Here is a rare picture from the early days of Vintage Revivals. Remind me one day to tell you the tale of the most embarrassing DIY I have EVER done.
My itch was scratched away when I happened to go on Build Direct and saw that our discontinued flooring was back in stock. The heavens opened, angels sang, yada yada yada.

I immediately requested a few samples from Build Direct to make sure that it was going to work out. But I really felt like this was a great option to continue the flooring all the way through the kitchen. It would flow so well with the wood from the living room.
This is the best picture I can find of where the wood ends and the tile begins.

The sample wood arrived really quickly and looked great. So I immediately ordered enough for the kitchen. The customer service rep was great and I was so excited about elevating the design and value of our house.
While we were waiting for the wood to arrive the demo on the tile began.
It was a sucky sucky job.
Made a little bit less sucky by an air chisel and this man’s muscles.

Insert fair maiden stage left with her trusty power chisel:
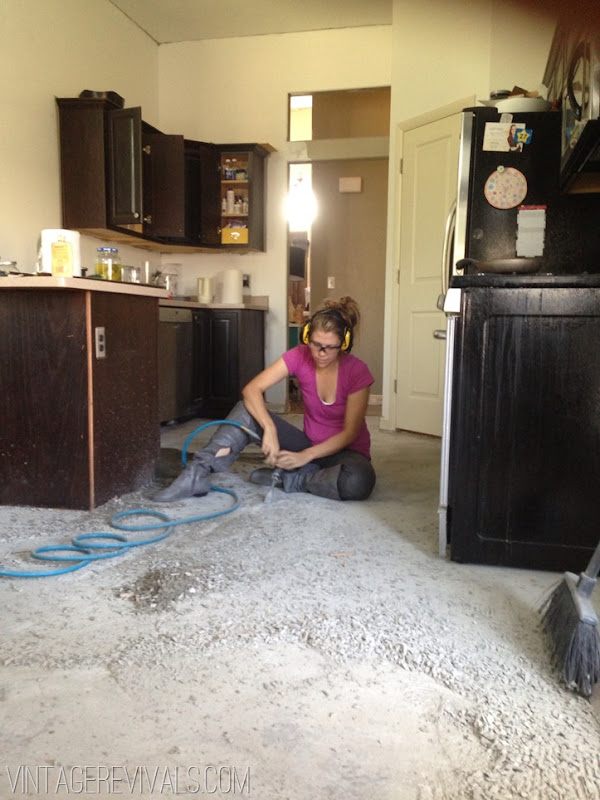
At this point all of the thinset was cleaned up and we pulled the wood out of the boxes.
There was a slight problem.

I mean, if its not immediately clear, that problem was the the new didnt match. In some lighting it did, but in others it didn’t.
It didn’t have as much color variation as the old wood. If you look at the picture above you can see that in the top left of the picture there is a plank of the installed wood that is the same darkness as the new wood. But the color spectrum was not there.
I was so bummed.

Insert wailing and gnashing of teeth stage right AND stage left…and audience participation is also encouraged at this point.
I immediately jumped on the phone with Build Direct and told them what the problem was. They have a great return policy and after I sent them the above picture they agreed that the wood was not an accurate representation of the image and agreed to fully refund my order.
This is where it gets a little hairy.
I had 4 weeks to get the floor put in before a huge deadline. 1 month. Seems like a long time doesn’t it? Heh. Heh heh heh. That is my maniacal laugh.
So what is a fair young maiden to do?
Hardwood was out of the question. There was no way that I would find anything that matched, and I didn’t want to install something completely different. So that left me with 2 options. 1. Tile. or 2. Give up on life completely and live in a construction zone for all of eternity.
Tile won.
I hate to end the post here because that is SO annoying, I know. But it is getting really long and there is still so much more to share. I will be back tomorrow to finish the story (and show you the happy ending!)


That stinks! Can’t wait to read how the story ends! laura
Oh man how frustrating!
Mandi, we just bought a house with equally ugly kitchen tile. I’d love a tutorial on how to demo the old tile and prep the floor for new tile. One item we’ve been debating: removal of the lower cabinets. Do we need to put new tile under them or should we just leave the old?
No you dont need to remove them. They are usually designed so that the tile goes under them about 1/2″. But that being said, if you can take them out easily then you totally should because it will make the tile job much easier!
xo
m
Can’t wait to see how it turned out! <3
oh you stinker! haha! Can’t wait to see what happened! how crummy crummy crummy that it didn’t match! but i’m sure you came through like a charm.. see you tomorrow.
I can’t wait to see the finished product!
I have been searching and searching, did you ever show us a full bedroom reveal – the project you were doing in real time? I can’t find it anywhere!
I am still working/not working on it. It sort of died with the craziness of the last month and I am just waiting for inspiration to strike!
xo
m
We had a similar problem when doing our floors, and decided to lay darker wood in a completely different pattern to solve the problem (dark herringbone pattern.)
I even wrote a similarly titled blog entry about it! https://artisandesarts.blogspot.ca/2013/03/kitchen-floors-beginning-of-saga.html
Here’s where you can see how they turned out:
https://artisandesarts.blogspot.ca/2013/04/the-big-kitchen-reveal-our-2300-entire.html
Excited to see yours!!
How frustrating that it didn’t match! Can’t wait to see how everything turns out! I know it will be fantastic! 🙂
chelseaandcamille.blogspot.com
i love your blog SO MUCH because i share your maniacal enthusiasm for DIY, inexpensive, completely awesome home projects. I’m tackling getting linoleum off my bedroom floors now with a hot iron and a wet towel. The linoleum was under the ugly carpet and over the hardwoods I’m wanting to paint. Anyway, can’t wait to see your new kitchen floors! Also loved yesterday’s furniture post 🙂
Your enthusiasm is contagious. You write like I talk when I am excited about home projects. My husband just laughs at me:) We laid hardwood floors this time last year. We scored them through a lumber mill dealer that also sells to the public. $1.74 sq ft for solid pre-finished distressed 3/4″ oak floors, I LOVE THEM! You can see them in this older post.
https://thedomesticlady.com/2013/04/17/home-improvement-stenciling-the-great-wall-before-and-after/
https://www.ampro-online.com/default.aspx?Page=Home Here is their website. I cannot brag on them enough. Incredible prices and great high quality products.
I will lose sleep tonight thinking about the end of this story. I hate tile, but I can feel this is gonna be good.
Wow…what a headache! Hopefully you like your new tile way more than you liked your previous.-Jessica @ joyouseclecticism.blogspot.com
Ripping out tile and thinset is the one thing my husband refuses to ever do in the future again. UGH. Have you managed to find all the hidden dust in every nook and cranny of your home?? I am so sorry you weren’t able to get the perfect match, I would have been a basket case.
that desk. in your living room. i die! where is it from?