These leather pillows are one of my favorite projects to date. There is just something so satisfying about taking an unwanted item that was destined for the thrift store and/or dump, and turning it into that perfect something that you were unable to find.

)
If you remember a couple of weeks ago I shared this post (that has the best title of my life. I mean, I know I will never top So…I Skinned A Couch. It is one for the ages.) For those unfamiliar with this tale, I bought a couch off of Craigslist with the sole purpose of cutting it apart to make pillows. Strange? Yes. Welcome to Vintage Revivals.

)
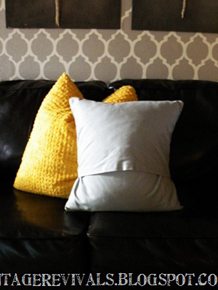
Did you know that if you make a pillow with leather on both sides it is the equivalent of laying down on a floatie? You know floaties like the orange things you put on kids arms while they are swimming? It will take an hour for all of the air to drain out of your pillow…and 2 days to fill back up.
I wanted my pillows to be really slouchy and a little saggy and really used looking. A floatation device was not a good look for this project.
This simple fact left me at a crossroads. I could try and match the fabric to the leather and fake it. Or I could embrace the change of plans… what do you think I did?

This is so much more than embracing. This is a full contact body hug, the kind that lasts 15 seconds too long… with a bit of uncomfortable breathing.
I was a little concerned with the whole sewing through leather thing. But with the right needles it was like buttah. They make needles just for this type of job. They are called Leather Needles. Mind Blown.
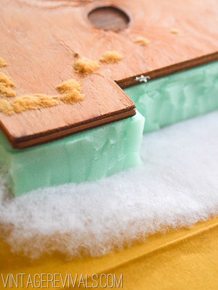
Start by literally skinning a couch. Leave the leather as intact as possible.
Cut roughly the size of your pillow out of the leather (you may have to piece it together, which makes it all the more awesome. FYI.

Fine tune your cut so that it is a perfect square. My pillow insert is euro size (26×26) AND I wanted it to be shluppy so I made it 29” square and allowed for a 1/2” seam.

Cut the contrasting fabric to the same dimensions. I LOVE using Duck Cloth for throw pillows. It is a really thick canvas that comes in about a billion colors at Joann’s. It usually runs $10.99 /yd, so use a 40% of coupon to save a bit of cash! You are also going to want to snag a coordinating zipper. Don’t be scared. Zippers are easy.

)

Place right sides together.

Turn your machine to the longest stitch length.

Sew your 2 pieces together with 1/2” seam allowance.

Press your seam open and for goodness sake, the leather has already been tanned, take care to not tan it more.

Pin your zipper facedown in place. Now, I am a rule breaker at heart and sometimes just cant bring myself to do things the right way. Feel free to pin your zipper the whole way down, or if you are a rebel looking for a cause you can pin it at the top like me.

Sew and backstitch over the upper part of your zipper a few times to tack in in place.

Now with your sides still separated sew down one side of the zipper and then the other. Make sure your zipper stays lined up with the center seam.

When both sides of your zipper are sewn in sew a horizontal stitch at the bottom of your zipper, just like you did at the top.

Now unpick the stitch between the leather and the canvas and TADA! There is your zipper! This is the best kind of magical surprises.

Line up the right sides together again, and stitch the remaining 3 sides. Unzip the zipper a little to get it started and the finish unzipping it when everything is in place.
For really sharp corners cut off the excess before you turn it right sides out.

Turn it right side out, clip your threads, stuff, and enjoy!


 Pillow from Homegoods, Antique Kilim Rug
I actually made 3 of these cute guys for my bed, but couldn’t wait until my wicker headboard was done to show you how great they turned out.
So what do you think? Was it worth a couch dying?
LOVE the contrasting pink 🙂 Can you please source the other pillow & awesome rug!!?? 🙂
It was definitely worth a couch dying!
Looks awesome, also with the pink!
And I'll be forever thankful that you showed how to sew a zipper the easy way – that's just a great idea. Thanks!
Love, Midsommarflicka
Zipper mind blown. A million thank you's!!
Kill that couch! This is awesome, especially with the pink!
Gorgeous! Love them. Fabulous as always!
Leslie
House on the Way
But I'm dying to know…what did you do with the rest of the couch?
Looks great! Where did you get that other pillow?
yes i love this!! although every time you wrote 'skinned a couch' i kept having awful flashbacks of silence of the lambs. (creepy) but i love the rough leather with bold happy color- it makes a good contrast!!!
I love this! Definitely glad you paired the leather with the pink canvas! 🙂
That is so so pretty! I may have to give it a shot… my couch needs new pillows bad!
Great tut! I might actually try this! Where did you get the tribal pattern pillow in front of the leather pillow? I've always loved tribal prints but always have a hard time finding them.
Christine
Um, I totally love this! That pillow is amazing, but the pink really makes it!
freaking. phenomenal.
This turned out awesome! I love that you did bright pink on the back side of the pillow.
-Becca
Ladyface Blog
Oh dear, I've been sewing for so long and had no idea that was a way to install a zipper. that is SO FREAKIN' AWESOME!!!
All I can say is BRILLIANT!!!
Sewing on leather and putting in a zipper, you rock! Totally worth the couch sacrifice 🙂
xo, Tanya
twelveOeight
Perfection!
Champagne Lifestyle on a Beer Budget
love it – totally worth the couch dying ;o)
I'll admit, leather isn't normally one of my favorites. But I love how this pillow turned out! Definitely worth skinning an old couch to get this!
It was totally worth it! Those came out great, and I love your coordinating color choice. Awesome job Mandi! …and I love the rest of what's going on in the pic. Love the MCM sofa, Aztec design pillow, Vintage Kilm Rug, and Potted Fig Tree!!!
Oh, honey. That couch was already dead. You didn't hurt it a bit! It looks like it might have good bones though…any chance of a nice reupholstery job in the hands of the right person?
Love that last photo…so simple and pretty.
Love your blog.
I love that you paired with a neon-ish pink. So unexpected and fun.
Omg, your genius knows no bounds! What a clever upcycling idea! Can't wait to see the finished room!
the leather and pink is SO GOOD! pillowcases can be so easy to make and they make such a difference, don't they?! It's my favorite thing to switch up a space and save some money by doing it myself!
UMM THANK YOU THANK YOU THANK YOU! for this tutorial…a sewing tutorial that ACTUALLY shows the steps clearly and with photos. No giant leaps in the process. 🙂 These turned out great, you are great at what you do.
Xx
Lauren M.
https://www.makeitadoubleplease.com
okay, WOW! i think this is probably one of the coolest ideas ever! love it!
Totally worth the couch's sacrifice. They look amazing. Thanks for the tutorial. I stay away from zippers because I always mess them up. I thought it was because I don't like to carefully pin everything either but maybe this will help!
What a FAB-U-LOUS post! Wonderful photo tutorial, completely out-of-the-box project, and it looks like a million bucks!!
Not only do I absolutely love how this pillow turned out, but how you write your blog posts always make me laugh the entire time I read them. Your blog is great!
https://cantbuymelovvve.blogspot.com/
Looks sooo good!
love how it contrasts with the pink!
SO in love with this! I think the pop of pink might be my favorite part:) Such a great contrast to the leather!
xo, amy | http://www.theblissfulbee.com
I know the Welfare Square DI has a big bin of leather cushion cover rejects for rather cheap!! FYI.
AmAzInG!!! This rules and now I want a purse like that!!!! I really do and with the awesome pink!
Awesome. love it. Also love the couch..can you source it please?
This is so fun and creative! Loved the sewing zipper tip too.
Unrelated question since you’re a spraypaint and leather whiz…. Ever spray painted leather? I’d love to update a couple ottomans on the cheap until we move and wondered if any brands are particularly flexible and adhesive. Many thx!
Couldn’t you have used a leather jacket or a bag? To waste a couch like that is a false economy for 3 cushions. It only makes sense if you think about the money you spent and not about what happens when you just throw the rest of the couch away. This kind of recycling isn’t environmental it’s just selfish.
Do you know how many couches end up at the dump anyway? Most people who thrift couches – myself included, more than once – have another couch at home that goes straight to the land fill.
I love this project. In my mind I’m singing some made-up song now – “I did it all for the leather, for the leather, for the leather…” It’s late, I don’t even know.
Seriously impressed with this. Perfect contrast.
Love the pillow! What kind of sewing machine are you using?
Pinned this for reference recently as I’m reupholstering a lounge (for the very first time) and knew I’d have to sew zippers (for the very first time!). I’ve just finished a zipper using your very clever technique and it worked beautifully, nowhere near as daunting as I thought it was going to be. I was so excited that I jumped straight on here to share my success! Thank you for sharing 😀
What kind of sewing machine do you use for your projects? I am on the hunt for a sewing machine, and wanted to know if you had any recommendations.
Hey Anna!
I have a singer industrial. They are the gray ones. I bought it at Joann’s and like it!!
xo
m
i love this!!! and skinning a couch…genius! love your blog, you are hilarious! and i am so jealous of your homegoods, the one in orem, ut just isn’t the same!
Mandi,
Will you please please please tell me what you used for filling and where you found it?
Hey Erin!
I usually search Homegoods first for clearance pillows with down inserts! That is what I did with these guys!
xo
m
Well the couch was dead. So that’s not even an issue 😉 Love this project. Must skin me a couch now!
I love the couch the pillows are on!!!
Needing new couch for living room.
Where did you get it??
Thanks!!
love love love this idea. Stylish leather and a comfy cushion combined – hello perfection.
Love reading your blog and seeing what things you’re creating next!
Alyss
http://www.girlonaladder.blogspot.co.uk
I’ve heard it isn’t good to backstitch when sewing leather. (Those holes are permanent — they don’t “self heal” like woven fabric — and too many stitches can effectively “cut” the leather.) The pillow looks great — myself, I would’ve chosen a fabric closely resembling the leather, so it didn’t draw the eye, but hey — I’m a big fan of pink, so it’s all good. 😉 Also, I routinely find leather skirts for a few bucks at my nearby thrift store, so I’m thinking I’ll do that before I’d buy/skin a couch. (Fewer left-over parts to worry about disposing.) If you can save a couch from the landfill, though — do it! Thanks for the tutorial — enjoyed it! 🙂