Thanks to everyone who has voted for Vintage Revivals for the Best Home Project/ DIY Blog over at Apartment Therapy! Today is the last day to vote and while we are in 2nd place, we are about 300 votes down. We need a Hail Mary to pull this off. So if you are the praying type now is the time to start, and if you haven’t voted yet (yes, I am looking at YOU!) We need you!! You can be our miracle maker! Vote here!
Do you find yourself saying the same things to your kids over and over and over again? The top 3 most used words at the Gubler’s (not including the ones that are mumbled under my breath) are “Be Nice.” “Leave Your Sister Alone.” and “Be A Happy Girl!” As a parent all I want is for my girls to be happy. Not the kind of immediate fleeing happiness that we seem to chase after but happiness in your core. This was my inspiration for this sign for Ivie’s room.

You guys know how I preach finding inspiration and running with it in your own direction? That is exactly what happened with this project. I saw this twinkle light headboard on Apartment Therapy and thought it was SO fun. So I stashed it in my brain. Then a few weeks ago over on Young House Love John framed some really cool deconstructed bike pictures by building the most simple frame ever. Noted John, noted.
So those ideas, married mine (I guess that would make them polygamous) and the Happy Girl sign was born.

So sorry its not lit up in this pic, I snapped it while I was staging and for some reason didn’t get a full shot once it was plugged in, but I wanted you to see the size of it!!
To make this sign you will need:
1- 30×36’” sheet of Plexiglas
16’ of 1×4” wood
16’ of 1×2” wood
Frosted Spray Paint
Spray Paint Color of your choice
Letter Stencils (you can use vinyl, painters tape, etc.)
1 Strand of White Christmas Lights
1 Extension Cord
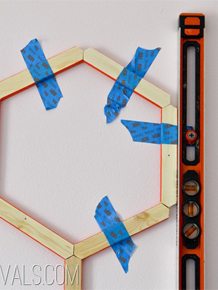
Start by making a frame out of the 1×2 that is the same size or a tich smaller than your plexi. This frame is simply for support, it will not be seen. The outer edges of your frame should line up with the outer edges of the plexi. Make sense? Same size.

Notice that I made the inside pieces are shorter so they would fit inside the top and bottom pieces without having to cut a 45 degree angle and have mitered corners. We are going to simple folks…just the way (uh-huh uh-huh) I like it.
Nail your pieces together with a nail gun (or if you don’t have one available you can wood glue, or screw it together)
 .
.
Once this one is finished you are going to make one exactly the same way but with your 1×4’s keeping in mind that this frame and your plexi need to fit INSIDE it.

To make an even outer lip on the sign use your scrap wood to raise the inner frame and nail it in place.

Make sure that your plexi glass fits and then give yourself a HUGE slap on the butt for a job well done. ps I totally recommend doing that in your garage where all your neighbors can see you.

For the signage I mocked it up in Photoshop to see size-wise what I was looking at. My letters ended up being just over 14” tall.
FYI that alternate title for this project was Frankensign. I only had a teeny bit of vinyl and I was NOT about to put this project on hold to wait for some, so I got creative and used my scrappy vinyl, transfer tape, and painter tape. They don’t call me The DIY MacGyver for nothin.
Remember when you are making your letters that you mirror them so that the front is sticky, otherwise you will end up with backwards letters and that is not awesome.

Ok now one thing that you need to remember when you are doing this project is that plexi glass is a very smooth non porous surface, and there isn’t really anything you can do to make it more spray paint friendly. If you are not careful this will scratch. That is why we are doing the painting on the inside and not the outside.
After you have your letters sealed off throw down 2 coats of frosted spray paint. This is the best kind of “primer” you can use on a glass surface. It will also seal the edges of your letters and prevent against bleeding.

Once your 2 coats are dry, spray on a minimum of 3 coats of your color. MAKE SURE YOU SHAKE YOUR CAN. I am an impatient sprayer and normally its fine, but the color that I used (Rustoleum’s Blue Slate) is one that has a light and a dark color inside (I have only seen this with Krylon’s Classic Gray before) you have to shake it for a solid 3 minutes to get it to spray in an even color. Because I jumped the gun my sign has a little color variation in it that isn’t ideal, but not a huge enough deal to start all over.
Gently peel off your letters and then spray a few coats of the frosted spray paint over the letters (otherwise they will be totally clear, this is just fogging them up a little)

Once everything is dry, place it in your frame (also if you are staining your wood you will want to do it before you do this, I used Restore a Finish in Walnut on mine for a really light color. You can read more about that here.)
Use a low heat glue gun along the corners of your plexi and wooden frame to secure it in place.

While your glue gun is still hot attach your Christmas lights to the wooden frame. I took mine all around the perimeter and then zig zagged across the back of the picture.

Use a dab of hot glue to hold the wire in place. Make sure its low temp glue, just to be safe.

Plug it into a simple extension cord and hang it on the wall.


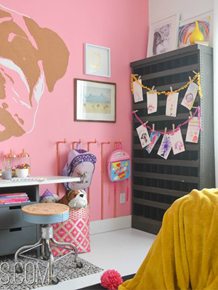
Total cost for this baby was $45 and it is so huge it takes up a giant white wall that was KILLING me. Love that! To see what the other side of Ivie’s room looks like check out this post!
Don’t forget to vote! I will love your guts even more than I already do!!

Love this! So adorable!
adorable! also, i am just a tad jealous of you for that cuckoo clock! LOVE IT.
I am in love with this project. Definitely keeping it in my TO MAKE file. Awesome!!
This is BRILLIANT! You have such great ideas!
It’s totally whimsical and amazing, Mandi! Love it.
Love it. I have three happy girls!
This is awesome! good idea !
Pinning.
Bliss
Is that bed frame a DIY? I love it! The sign looks amazing too.
i love the floor. Amazing
This is wonderful!
Very very fun! And I love the phrase, I need to implement it for my kids! I voted, wish I could again!
Awesome! I’ve been loving all the lighted signs, but they seemed a little tedious. This one looks do-able! Thanks for your genius (as always), Mandi. 😉
Aloha,
Charlie
Love it 🙂
Voted and LOVE this sign!!
I voted you know again! And I’m on a real “Hey Girl” kick so maybe that would be a nice addition to my office….thanks for the idea!
Christine
Love the sign, Mandi! The perfect quote for the perfect little girl’s room! That headboard and footboard are killer! xo
I love the cute little bed and all the colors and patterns! .. Goes together very well 🙂
Sign is adorbs, too!
Jordann @ J House Tawk {www.jhousetawk.blogspot.com}
Love this idea.. I might have to try my hand at it if I’m not too scared to completely ruin it. My projects aren’t going so well over here lol. And Ivie’s room is adorable, I’m loooving her bed!
LOVE IT!!! I’m totally going to try this and make a sign one day! Thanks always for the awesome inspiration!
oooh- love this- would be great around the holidays
That is super cool!! Such a great idea for a kid’s room. I know my boys would love it!!
So, I finally got around to voting! Looks like you’re in the lead! Woohoo!
Mandi, you’re killing me! Seriously…this is the idea I had for the Creating with the Stars! After I had this idea, I looked all over online and didn’t find anything like it, so I thought…I am so gonna win, ’cause it’s so unique. Now I have to come up something new pronto. In any case, you did a better job than I ever would. Looks awesome!
Where do you buy plexiglass?
Fan-freakin-tastic! I’m also loving the bold mix of patterns on her bed.
xoxo
You’re a freaking genius!!! I love it. And yes where did you buyg the plexiglass?
totally awesome Mandi!
Love. Love. LOVE! i say the same thing to my girl all the time. off to pin.:)
Great tutorial, Mandi! I always thought this wouldn’t be too hard to make myself. Thanks for breaking it down.
Great project Mands. I love it! xoxo
This is the cutest thing ever, and great easy to follow tutorial!!
Ok…first things first….Ahhhdorable!!!!! You are one of the most freaking creative people ever!!! Seriously adore your projects. I’m a long time blog lurker but first time commenter….this project will be made for my daughters room STAT! Thanks so much for inspiring so many! You are awesome!
Ack! Love does not describe this. But I would marry it if I could! You are a genius. Blog puberty is soooooooooooo over!
It looks awesome! Great job as usual!!!!
I need power tools!!! : )
wow.WOW! all I can say.
Just darling! Although when I saw the title of the post I was hoping for the “merry” christmas decor tutorial!!! I’ve been waiting with bated breath for that one! 😀
omg, did I miss something or did you score/make the most amazing bed of my life and HIDE it from me?! 🙂 i LOVE it, mandi. your taste is flawless.
You are so talented it’s ridiculous!!! Annnnnnnnddddd now I have to run out to Home Depot and buy all the supplies to make this right now!!!
GREAT project!!! LOVE the sign, Mandi!
xo,
Shannon
Great idea, I love your DIY projects! I am very much in to it as well at my blog, furniture’s, posters, sawing etc 🙂
Than you for sharing!
I LOVE this room! What a great project. I’m sure she loves it!
I see you got featured on Apartment Therapy! Kudos to you!
The sign is so fantastic, it could have so many uses. ON a side not, I owned a green blanket like the one on her bed for 24hrs. Loved it, but it did not look right on my chair. Love it on the bed. My BFF bought an orange one. Love reading the blog.
Found this room on Pinterest and therefore your blog. I love the whole room and that sign is amazing! I am linking up to your blog with this picture in a post on my blog today. Please let me know if that’s an issue. Thanks so much for the how to and the lovely inspiration!
This is so amazing!! Just found your blog and I must have spent over 2 hours already going through it (shhh, don’t tell hubby!!). Could I ask what font you used in this please? Thanks and can’t wait to get through the rest of your blog. Dinner can wait…. 😉
You have to talk about the bed!! Is it DIY?? I have been on a massive bed hunt for the past year and can’t find anything affordable and cute – so please share!!
What a great idea! I love this entire room pulled together and the sheer window treatments really keep it feeling open and light.
How is the plexiglass not falling out the front of the frame? Is the hot glue strong enough to hold in in there over a long period of time?
Did you make the headboard/footboard or was it thrifted? This room is amazing!!
LOVE this!! I am making it. Like, asap! My daughters are going to start sharing a room soon and I want to make a slightly smaller version of this to put in their room. Question… when you say “after you have your letters sealed off….”….. what am I doing to seal them off? It doesn’t say and I don’t want to have them slide when I start spray painting.
Thanks!!
Sealed the tape/vinyl off. So it doesn’t bleed underneath!
xo
m