Planking walls is nothing new to the DIY world. In fact there are a bunch of great tutorials out there on how to do it with a million different materials, techniques, and results. Sometimes all of the chatter around the blogosphere can make so much noise that you don’t know what the best way to do something actually is.
That’s what I am here for my friends, I will be the guinea to your pig, I will be the trial to your error, I will be the crash to your dummy, (ok you get where I am going with this….)
I think that everyone. EVERYONE. has their own inner design voice (whether its Vern Yip or Emily Henderson or Honey Boo Boo’s mama) and you need to take the things that inspire you and make them your own. That is what I did with this project.

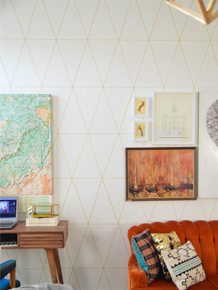
I started with the black and white striped hallway (if you are loving it you can see how to perfectly paint stripes here) which I still loved a lot. The problem I was facing was that when I painted it I used an off white (it was the color we painted all the doors and baseboard in the entire house…shoot me now) and I wanted WHITE (my favorite is Sherwin Williams Pure White Base) I wasn’t married to it enough to paint over the off white stripes and keep the black. And we all know the fastest way to get rid of something is to hide it, just ask my 8 year old self (thats how I cleaned my room.)
When it comes to the actual planking you have a handful of options. At your local hardware store you can find individual tongue and groove planks in packs (like Amy used on her ceiling) you can use sheets of paneling (like you would find in a basement in a house built in 1971), you can have sheets of ply cut down like Sausha did.
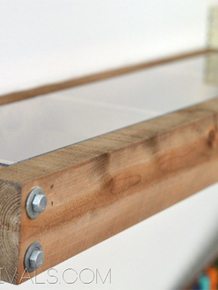
I did none of those. The thriftiest option was to use 1/8” Masonite. It is that dark particle board that is rough on one side and shiny smooth on the other that you usually see on the back side of dressers. You with me still? It is something like $8.00 for an 4×8 sheet. Have it rip cut at Lowes or Home Depot into the width that you want your planks to be. (They have a giant saw that they will do this on and its really fast.)
Decide what angle and direction you want your planking to go. Mine are at 45 degrees because its simple to remember and awesome!

Everywhere an end of your board hits (on a corner, door frame, floor etc.) you will need a 45 degree angle. Get a few pieces measured and cut. (For those that dont know, you can cut a precise angle by rotating the base on your miter saw to 45 degrees).
It is crucial to have a nail gun to do a project like this. It will save you so much time and give you a professional finish.
Nail a few boards up, step back and make sure that you are in love. (notice that were the pieces meet end to end they are not 45 degree angles, don’t do that, it will look stupid. Also notice that mine don’t perfectly touch end to end. I wanted it to look more rustic and imperfect so I did that on purpose.

I used a few of the triangles that I had left over from cutting the end of the boards so I brought them inside and used them to space each row. Sometimes you gotta rock what you got.

Once you get going it is extremely simple. Measure, cut, space, nail, over and over and over.

Just remember that everywhere a plank ends it needs to be at a 45 degree angle.

I wasn’t sure the best way to go about painting when I started, to paint the wall and the edges and then install and paint the fronts? Paint everything before hand and then go back and touch up the nail holes?

I decided to paint nothing, fill the nail holes, and then do it all in one fail swoop. It was sort of crappy having to paint in the cracks, but I don’t know if it was any more time consuming than if I would have done it the other way. I am planning on doing it a few other places in my house, so I will let you know!

All in all I love it. Cant wait to show you the other places it is going to live!!
I am heading to Salt Lake as we speak for Studio 5, we are doing a really fun segment called “What Would Mandi Do?” with viewer submitted furniture dilemmas. I am super excited about it so if you are Utah local make sure you tune in, and if you are not I will share the link on FB after it airs!! And because you guys are wonderful and have put up with my sporadic posting this week, here is a sneak peek of the room I overhauled this weekend for one lucky viewer….(the full reveal will be tomorrow!!)


Love it! How was it cutting around your light socket? It’s that part of the project (or similar other obstacles) that gives me the willies. Yours looks awesome!
Love! And you didn’t use real wood. Gasp…why haven’t I thought of that??? (smacks head)
I love love love how this looks. I think with a few, very simple modifications, this could work really well in our rental!!
I love planked walls – yours looks amazing. I liked the vertical stripes too, but I like the dimension of the planks more.
I really like this! The angle takes something classic and makes it less so – which I love. Man, you have me itching for my own home again!
yay! I have been waiting for this since the first pic you posted. how much did this end up costing? I want to do this on one wall in my living room! love it so much! thanks for the tips!!
AWESOME! We just did this on our dining room ceiling – using the same material. Cheaper than the other options is why we went with it. We aren’t as cool as you, though, we put it on straight. :o) Yours looks so amazing. Love, love, love it.
did you paint it on the shiny side or the rough side. if the shiny side, how did you keep the paint from chipping off?
This looks amazing! I might I have to try this one!
I am so happy you posted this! I looks amazing AND I love that it is so cheap…Masonite-Brilliant! You rock Mandi!
lol.My husband just asked me this weekend if he could diagonally plank a wall in our house. I told him heck no. 🙂 Maybe I will change my mind now 🙂
https://thedomesticlady.com/2013/02/28/home-improvement-wall-stencils-i-need-your-opinion/
This comment has been removed by the author.
Ok seriously, will you stop putting out such amazing work- youre making the rest of us look bad;) You are the best!
Dream Book Design
The first time I saw this on your blog I swooned. So fabulous! Thanks for the tutorial!
It looks amazing! I wish we could do this in so many rooms in our house.
I am loving how the angled wood doesn’t look so cottagey(a word?) to me like it does when it’s parralel. I want it!
This is a very time consuming “hide-up”…. 🙂
It looks awesome!
I absolutely love it! How ingenious!
Leslie
House on the Way
Howdy and happy Friday, Mandi. Just giving you a heads up that I have given you a shout out on my blog as part of the Spread the Love campaign from Clear and Simple Stamps. I really do love your guts.
Have a looksee:
https://rieslingmama.blogspot.de/2013/03/love-your-guts-css-spread-love-sss-lim.html
Awesome, as always! 🙂
I so love the look of planked walls, and now I am obsessed with having diagonal planked walls. If only our houses weren’t all brick I would be all over it (as it is now it isn’t quite as easy as nailing the planks to the wall).
Love this project!
LOVE IT! my HD refuses to cut ANYTHING!
Just a neat look Mandi ! Love it. I tell ya what really caught my eye though was that faux bois pillow at the bottom. Faux bois and me ….OBSESSED.
You mentioned that your baseboards and doors used to be off white and then you painted them all white. DUDE. I searched your blog to see if you had a post about that process, but I didn’t see anything — can you link me to it, if so? Every room in my 2-story home has off-white baseboards, doors, crown molding, window trim AND plantation shutters on EVERY window that I want to paint a bright white. Not only that — they were originally painted with oil paint — so I have to prime everything first too. I kind of want to jump off a bridge just thinking about it. How painful was your experience? Should I learn to love the off-white to save my sanity?
Love this look!!! so very cool! You somehow out-do your self with each project!!
Love! my first apartment had a diagonal planked wall in the living room and I absolutely adored it. My husband did not.
Love this SOOO much!!! Wanted to let ya know I linked it in my “Pin It Faves” post yesterday!!! Thanks!
astitchofkate.blogspot.com
This is so frickin awesome! When I finally buy my house finally. Finally. I’m going to do planks on one wall in the master bedroom. I was planning on doing horizontal, but now I think you’ve pretty much convinced me to do them diagonal. Did you keep each plank 4 ft long?
So…I think we should be BFF’s. The crafty, designy part of me is somehow missing; I think that’s you. We’re kindred spirits fo sho. Anyway, I’m totally doing this. In my entryway. This weekend. I love the thrifty option you used and am wondering how many sheets of masonite you used for that wall? Thanks a bunch?
p.s. why don’t you like in AZ?
Hi!
I love the clean look of your white wood wall. You added visual interest, character, and kept it simple by installing it diagonally… I love it! We recently installed a wood wall in our baby girl’s nursery but stained it instead. It turned out great… you can check it out here: https://purposefulproductions.blogspot.com/2014/04/diy-wood-accent-wall.html
Kassy 🙂
Love this! Any suggestions of how to incorporate the diagonal at the end of a hall way? Would you do a “v”? Or just do another diagonal wall? Does that even make sense?!
ok, did you paint in the rough side of the Masonite or on the shiny smooth side? I feel like the rough side would look funky, but would the paint stick and not scrap off on the shiny side? also did you prime?
My parents home was built in the late 1940’s with the solid, underneath, walls in the diagonal pattern because a triangle is the strongest of shapes. I have always wondered what it would look like to unearth those walls and repaint as is. Thank you for the visual.