** Check out THIS POST for an updated (and more detailed) lightweight version of this tutorial! Including how to make your own door!
How to make a Sliding Barn door was hands down the most requested tutorial from The Epic Room Makeover 2012, which I was SUPER excited about, cause it is one of my favorite projects too….
DIY Sliding Doors are fantastic. They can also be very not thrifty depending on the hardware that you use to hang them. But guess what? They don’t need to be expensive. Kelsey’s was done for under $75 my friends. How do you feel about that?

 "Pin It")
There are a few measurements you need to get right off the bat. You need the length of the pipe for the door to slide on (make sure you give it enough room to open!) and you need the width of your door opening.
Now that you have your measurements, you need a door. Measure the space you need to fill and add at least a 2” overhang to each side. We ended up at Restore and played Let’s Make A Deal with Randy, the Restore employee. I wish I could say he loved us like everyone else we had video taped that weekend, but notsomuch. Which is weird. Cause we are PRETTY dang loveable.

This is the door I fell in love with. It was solid wood and it may or may not have been covered in bird poop and feathers. We got it for $40.
Here is the problem. Though we THOUROUGHLY measured the door opening when we found this great door we were so excited that we accidentally forgot to measure the door. Whoopsie. But we totally fixed it, so its fine. (I know I had you worried for a second.)
The first item of business was to cut the length of the door down 6”. (The door was 8’ and so was the opening, we needed to make room for the casters and eyehooks.) You can determine the amount you may or may not need to cut the door down by adding the height of the casters, eyehooks, and where on the wall it will be mounted.
Did you know that if you have something huge like this door to cut that you can take it over to Lowes and they will cut it for you? Even if you didn’t buy it from them! Originally I was all for jigging it out, but to get a perfect line in about 2 minutes is a MUCH better option.
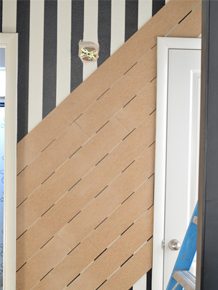
Once the door arrived back at Kelsey’s we needed to expand the width (remember the whole not measuring at the store thing? We used 2×2 premium pine slats to do this. (Premium means that they are not as warped. They are a little bit more expensive than the cheap pine but totally necessary in this type of project.)
Start by drilling your pilot holes through the 2x2s and into the door. If you don’t there is a great chance that the solid door will stop your screw in its tracks, and/or strip it. Strip it good. You will need screws that are long enough to get a good grip in your door. We used 2 1/2” wood screws.


When its time to attach your casters and eyehooks the biggest thing that you need to remember is that they need to be PERFECTLY centered/even especially the eyehooks.
I would recommend getting stationary casters that don’t swivel, we did not get them and its fine but when I do this project in Ivie’s room I will for sure be doing that. You will pre-drill your pilot holes and screw them on! We used metal casters from Lowes. If I remember right they were around $4 each.

We used the largest eyehook that Lowes had for the guides on the top of the door. If I were to do it over again, I would use larger hooks (you can probably find them at a specialty store) or a thinner piece of pipe. Though it will slide there is room for play, so if you eye hooks arent perfectly centered on each other then it will rub.
This is where we took a sleeping break.
And now its morning! Oh the power of the internet.
Use wood filler to fill your gaps. I would not use regular wall spackle especially if your door has a clear coat on it. It wont adhere the way that it needs to and will probably crack. So wood filler. Got it?

When its completely dry its time to sand.
Make sure that you are wearing a mask when you are sanding wood putty, because it is a lot harder than spackle you will be sanding a lot longer. Therefore breathing it in longer. And no one wants a black lung from wood putty. Just to be safe, next time you are at Lowes grab a pack of 3M masks for $5. They are SO important to have on hand.

Isnt Jilly cute?
Once your surface is smooth and gap free (hooray!!) its time to paint! Don’t forget to put your ScotchBlue down to get perfect edges and protect the parts you don’t want painted!

To get our bright blue edge I bought a sample pot from Lowes in a great cobalt color and used this technique.
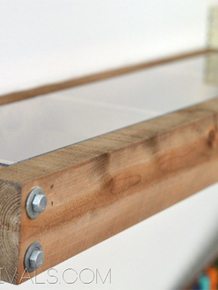
Now lets get into the pipe aspect of the door. There are 2 types of conduit pipe that they sell at Lowes. They have electrical conduit and pluming conduit. You want the electrical. Its cheaper. Go into the store with the measurements that you need for the handle and for the length of the sliding rod. They will cut and thread the pipe for you for free, then all you have to do is screw it together!
To make your handle and your sliding rod you will need (4) floor flanges, (2) Connecting Nipples, (2) 1” Connecting Nipples, (4) 90 degree elbows, and the pieces of electrical conduit pipe in your preferred length. The pipe we used was 3/4”.

To make the rod that the door slides on you use the exact same set up and the handle pictured above. The only difference is that you use a 1” connector nipple between the flange and the elbow (it will give you a little more length from the wall.)
When you are mounting your flanges to the wall, do everything you can to get it into a stud. It will make it MUCH more secure. This door is heavy and you need to be safe.
Put the door on the pipe and determine where it needs to attach to the wall. (You obviously determined this before you had the door cut down but do a dry run before you start screwing things to the wall.)

Attach your first flange to your studs with the pipe on it. The put your door on.

Screw your other elbow flange combo on and mount it to the studs on the other end. You need to remember that the door is not hanging from the rod/eyehooks. They are simply a guide. All of the weight of the door should be on the casters at the bottom. If you have hardwood/tile it will glide MUCH easier than if you have carpet like Kels.
Pretty simple right?!
You may notice in the picture above the gaping hole in the door from its previous function as an actual door. Stupid previous function. When we were attaching the handle we had one of those “Shoot me now. No really, just do it.” moments. The plan was to cover the hole that was made for the door knob with our handle (the floor flange fits perfectly!) so that’s just what we did. Then we realized because we used the best side of the door for the front, we made it so that the handle was on the wrong side. Balls. This is where ingenuity and the DIY spirit comes in. We moved the handle to the other side and covered that entire center piece with a few scrap pieces of wood. Bam. Problem solved, character added, happy Mandi.


Can you believe what an easy project this is?
HUGE thank you to Lowes for sponsoring this project!

Make sure you check out the other posts in the Epic Room Makeover Giveaway 2012 series:
Love Your Guts, Mandi


So cool!
DOODS! That is wow. Now where is my tape measure………….
thank you for this– I think I may try something similar for my closet door (where there is currently no door at all, and a clear view of my shoe mess.
Aw. I love easy and cheap. Everything I am.
Thanks for the tute.
Love it… I need one somewhere in my house
Great job on the door, it looks fabulous. The most important part you wrote is “You need to remember that the door is not hanging from the rod/eyehooks. They are simply a guide. All of the weight of the door should be on the casters at the bottom.”
Hey, Yes, I thought that was SUPER important as I am about to try this door in the next 2 months. Another important thing to remember is… The castors should be stationary not swivel…. I am so excited to try this project because it seems fairly easy.. the hardest part for me is deciding that color to paint the door! Lol
Thanks for sharing this tutorial. I totally want a door just like it in my future home 🙂
–Anna
So cool! I wonder if you could do a post on how you come up with these ideas. Is it collaborative with the owner or do you just think of it once you see the space? Basically, I want you to let us inside your head, if that’s possible and get your thought process. 🙂
I love the door!! Totally would like to do this in my house. I have one question for you. How loud is it when the door is opened and closed? How much do the eyehooks rub against the electrical pipe rod? I understand that a majority of the weight is on the wheels/casters, but the eyehooks and pipe will hit from time to time. Did you do anything to lessen the noise/rubbing of metal?
WE just did the door in our house with this method and LOVE it!!! They DO make some noise here and there with the rubbing but not too badly…an “industrial” sound…but all okay…haven’t figured out how to quiet it but the doors work great! 🙂
You can apply a thin coat of axle grease or white lithium grease to the rod. It will require more cleaning as dirt builds up, but it will prevent the squeaking. One bonus from this is it will also prevent rust build up as it’s providing protection from moisture.
Love it! We have a small, awkward bedroom and a barn door would be less in the way. This tutorial makes me feel like I could maybe manage to make it!
i really want one of these doors!! it looks so cool and unexpected! i love it! and all the bloopers, you handled them so well, i probably would have wanted to give up! cant wait to see all the awesome other details to this diy room!!!
Amazing! Thank you so much for sharing this tutorial! Can’t wait to try and make a door of my own 🙂
This is awesome! Sliding barn doors always look so cool – never even thought about being able to do one myself. Need to find a place for this now. Thanks so much for the inspiration!
THANK YOU! My hubby is going to be so super happy that you posted this (wink, wink!) You said you went to Restore in Phoenix for the door? Where is that?? (since I live here, I thought I’d go to the same place)
Thanks for the tutorial. Where did you guys get the foot stools
I so need to do this in my bedroom!
I implemented these on two doors in my house..I’m in LOVE!!! They were super easy to do (at least that’s what my contractor reported LOL!) I painted and put the hardware on but let him do the “heavy lifting” – two doors took less than 1 hour to put up. I am so happy with them and thankful for your creativity!
Loves it! In the future could photograph close ups of the hardware u use in your projects? Such as casters,hooks etc. …great job ladies! Love your site, found it thru Pinterest-a CDN DIY queen
Is the metal on metal loud when opening and closing the door? I want to do this but don’t want it to be too loud.
Thank you thank you so very much for posting this. You have made me a very happy person. I have been wanting to hang a door (barn style) in front of my laundry room and another in my bedroom, and after finding 2 awesome pocket doors at Habitat for Humanity, I could only find expensive ways to do it. Way out of my $ range. Now I can finally hang them. THANK YOU AGAIN
Love this tutorial! Thank you so much, Just wondering, I have a 3 year old, will this door swing? If it is not hooked on from the top and is supported by the castors will it flap? Thanks so much!!!!!
Hey Lucy!
Yes the door does swing out! xo
good to know, thanks!!! And thanks for replying!!
This is the best idea I’ve found after doing hours on the net searching for DIY “barn doors.” Do you think the pipe, eye hooks and casters would work with the pipe suspended from the ceiling? I want to use this in a space that does not have a door frame. Love it!
It absolutely will work! Just make sure that you are attaching it to studs! xo
Hi, I was wondering how you got Lowe’s to sponsor your project? Also, do you think that the door would swing with stationary casters (versus swivel casters)? Great job & thank you so much for sharing!
Nope, it doesn’t swing out at the bottom at all. I’ve had mine for a year now and the casters are in almost exactly the same path on the floor that they’ve always been.
Ours swing out eerribly. Hvae to find a track t or guide to stop them from doing it
Thanks so much for the information. My husband and I have been trying to figure out how to make something like this for a very long time. Instead of a pre-made door, my husband built a 2×4 frame covered in plywood and then followed your instructions for hanging the door. It works great Thanks again.
We love this idea for a closet that we’ve created in one of our rooms. We actually have a small nook in the room with 3 walls and will use this door to create a closet for the room. I will let you know how it comes along. We are actually going to be creating a barndoor style door using 1×12’s and 4″ rubber casters but making a slight modification. We’re putting a horizontal board at the bottom and the top (and the middle for that matter) for characters and will be hiding the casters behind the horizontal piece on the bottom so it’s virtually unnoticeable when you look at the door from the outside of the closet. Just an idea!
We tried this in a pass through opening from our master bedroom to bath. Even though it was a 5 ft opening it worked GREAT! Super happy with it and so, so much less than the $400 dollars I thought we were going to have to spend.
Hi! Do you have handles on both sides of the door? I’m going to do this in my basement and am trying to figure out all the logistics! Thanks!
Did you get an answer or try the handles on both sides? I need to do that as well.
Love this! Will this work for a door opening that still has the molding around the door opening? If not, how could I make it work without removing the molding? Thank you!
I was thinking of doing this door in my master bathroom but I was wondering if it made noise with the metal rings rubbing against the metal pipes?
I haven’t done this particular project but something similar – to lessen the rubbing noise of the eyehooks on the pipe, and to smooth the friction, oil the pipe with a generous amount of WD-40 – this also works great on “sticky” shower curtain rods.
I’d just like to thank you for posting this, and encourage anyone on the fence to give it a go! Like everyone else, I wanted a barn door but the cheapest hardware I found was $150 (I’m cheap, okay? I’m building a door, after all.) I used giant eye-bolts instead of the strap hinge things, and greased the pipe rail with motorcycle engine grease (because that’s what I had around. But um, anything greasy will work). I’ve had my door up for a year now, and it works great and looks great and the hardware cost like $50 total! Thanks ladies, for saving me a bunch of money!
Oh, and as far as the noise…you don’t really hear the hooks rubbing on the rail much. Mostly what you hear is the wheels on the floor, and that noise depends on the hardness of your floor and the weight of the door. I have a 4×8-foot solid-core door on a cement floor so…it rumbles. If you have carpet, hardwood, or your door doesn’t weigh 100 pounds like mine does (I’m not kidding), you’ll be fine.
Great!We’re building our dream home and we need to save a lot of money. I’m going to make my own.
Thanks.
Frenchy
This is awesome! One question: Is the door stabilized without a track at the bottom? Does it not roll away from the wall?
I just got done with this project. Have to admit, not as easy as I thought it was going to be. Our biggest problem was using a 3/4″ pipe. Once we had it up, the noise from the pipe/eye bolts when sliding was unbearable. We ended up going back to the hardware store and getting a 1/2″ pipe (we had to get different elbows too that went from 3/4″ to 1/2″). We just finished putting it up and it is now working great. A couple of things that we found out 1) Electrical conduit cannot be threaded…we checked at both Lowe’s and Home Depot – neither would do it. They said that it isn’t designed to be threaded. In addition, there is a size difference between plumbing pipe and the electrical conduit – they may say they are 1/2″, but side by side – totally different. Anyway, the plumbing pipe was still only 13.00, so not a big deal. But, just an awareness. All in all we spent 15.00 on flange, 5.00 on elbows, 5.00 on nipple connectors, 8.00 on eye bolts (GO TO LOWE’S, THEY ARE SO MUCH CHEAPER THERE THAN HOME DEPOT), 12.00 on castors (we had 2 doors), 7.00 on 1×2’s, and 13.00 on the pipe (also, we spent 17.00 on the first 3/4″ pipe that was a fail…but, hey, live and learn…I’m not counting that in our total). The doors we found were 10.00 at Restore. Overall, cost of the project was 75.00, 65.00 was spent on hardware.
One other thing to add, we still haven’t added the door pulls, painted, or trimmed out the doors. So, this is definitely more expensive than I thought it was going to be, but still much less expensive than buying the sliding barn door hardware.
Hi, made the barn door and have run into a HUGE problem. It looks like your eye bolts drag on your pipe, too, how is not SOOO loud like ours? If it is, what did you do to remedy that problem? Thanks!!
Hey Amanda! You can see an updated post about this type of project here! https://vintagerevivals.com/2014/06/how-to-build-a-lightweight-sliding-barn-door.html
xo
m
How do you get the other end of the pipe connected ? once you screw on one side seems like you couldn’t screw on the other end ?
Love it tho
Thanks.
wow!!!! wanted to do a shabby chic bedroom and put in a barn door( saves room in a mobile home!!) and looked at prices of hardware! But….You SAVED me unnecessary expenses! THANK YOU SOOOOOOO MUCH!!! Your tutorial was awesome!!!
How much bigger does the door have to be than the opening & can you use a hollow core door or does it have to be solid?
I did something similar, but without the pipe. Not trying to advertise, but got the below items at HD.
1-5/8 in. x 10 ft. Metal Framing Channel $20
3/4 in. Steel Ball Bearing Wheel Cupples Screen Door Roller Assembly $9/ea.
(Solid door, use 3/Hollow use 2)
Richelieu Hardware 1-9/16 in. 20 kg General-Duty Rubber Rigid Casters $2 ea. (bottom casters)
Find where the studs are in the wall. Measure the strut channel and drill holes straight through both sides with the mounting screw diameter. After you have all your holes drilled, drill a bigger hole on the other side to allow for the head of the screw to fit along with the tool you will use to drive the screw in. I used 5/16″ X 2″ galvanized bolts. Mount the strut open side up.
Mount the door rollers and set the rollers on the outer lip of the strut channel. With these rollers as guides and the casters as additional support, everything will roll smooth and quiet. I used rigid casters for the bottom. The swivel ones let the door sway in and out. Rigid ones roll like it was on a guide channel.
If you want a rustic look, you can paint all the metal with satin black paint. I wanted patina, so I used metal etching on the metal. Rinse thoroughly with water, dry, and spray clear coat to prevent additional rusting.
Well done, girls!
Thanks for posting such detailed tutorial! Sliding barn doors are gorgeous and original to my home.
Thanks AGAIN!