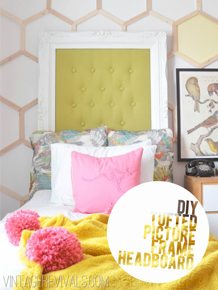
A tutorial for a tufted headboard is not something that is hard to find, there are a ton and for all different styles of beds. This tutorial is special though, its more of a teaching you to fish type tutorial because you can use this basic concept and design your own headboard!


Start with a 4×8 sheet of particle board. I got mine at Lowe’s for $14.00. While you are there have them rip cut it to the size you need (mine was 62”x 48”) and then have them cut it into quarters. One perk about doing a headboard like this is that you are able to fit it in your car, you wont need a truck/SUV to haul it home!! While you are at Lowe’s pick up your screws and washers too. The screws you need are 2” wood screws and one medium and one large washer for each screw. You will know how many screws you need based on the number of tufts you are going to create. You will also need at least 6 metal mending straps for a queen size bed. But there is nothing wrong with using more!
The main component to a tufted headboard is foam. Foam is SO expensive if you buy it from somewhere like Joann’s (even with a 40% off coupon) so here is a top secret tip. If you go to Home Depot right now they are selling camping pads for $19.99!! They are usually located by the customer service desk. I needed 2.
And last but not least you will need fabric. My go to fabric for pretty much everything is Duck Cloth. It’s a heavy duty canvas that is made out of cotton. It comes in bunches of colors and you can buy it at Joann’s. I needed 2 yards. The typical price is 10.99 a yard but I had a 60% off coupon so for 2 yards I spent just under $9.00 total!!
Start by cutting your foam to size. The easiest way that I did this was just by laying my piece of wood on the top of it and using a long serrated knife to cut it.

Then you are going to wrap your fabric around the foam and board pulling it as tight as possible. Staple one side and then move to the opposite side (do this on all 4 sides of your wood.)

When you have all 4 pieces upholstered its time to join them together. This is where your mending straps come in. Make sure that they are all straight and pushed together as tight as possible.

Then just drive wood screws into the back. I used screws that were 1.5” (you wont need to worry about them going through the front of the wood because the foam will hide everything.)


This is what your headboard should look like at this point:

Now to tuft.
If you want your tufting to be super deep and pleated I would recommend this tutorial from Brooke. I want my tufting to be more modern (obvs to go with the vibe of the room). There are a million ways under the sun to tuft, this is just one of them.
You need to find the center of each panel. I did this with a measuring tape and a pencil. I SUPER LIGHTLY marked where the center was on my first panel. This is where it gets fun. You are going to drill your screw directly through the front of your fabric. I recommending making a small hole first or else it will make a really loud POP when you start drilling.
The washers are to make sure that the fabric doesn’t just move around the screw. Cause then you would be left with a hole in your fabric, a screw in your backboard, and zero tufting.

To make things easier on myself I used a laser level to line up the next tuft. That way I only had to measure one side, and I knew it was straight.

Then I glued the buttons on the top of the screw.

Also, depending on how deep you tuft your screws may poke out of the back of the wood. If this is the case you will probably need to dremel/hacksaw them to get a flush mounting on your wall.
Now for the mounting.
The original plan was to use this guy to hang it on the wall (like a giant picture of sorts) It is a Hangman from Lowe’s. They are just over $10 and can hold up to 200 lbs.
The problem with that is that this wall is concrete…so ya. We couldn’t find the studs. So the Hangman had to go back. THe solution ended up being mounting 1x4s on the back and then screwing them into the bedframe. Just like we did on this old door turned headboard.
Pretty amazing if you ask me!!


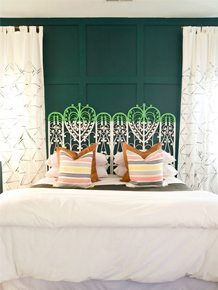
Don’t forget to check out the other amazing tutorials in the $150 room makeover:


And don’t forget that round 1 of voting for the Epic Room Makeover Giveaway ends tomorrow night at midnight!
Love Your Guts, Mandi

LOVE IT! What a great looking headboard for such a great price. I love that you used a screw to do the tufting – so much easier than the way I tufted my DIY ottoman a while back.
Sarah
Tutorial from Brooke? Where @? Linky please!
Great idea! I love the use of screws for tufting – much easier than traditional tufting!
Exactly what I need! Also love the y
Throw pillowsade put if Ikea fabric that I just boight and made a curtain with.
Thanks!
One word to describe the tufting…Duh. What a simple & genius way to do it! Love:)
About the mending straps, I understand the foam would hide them visually, but would you still be able to feel them through the foam? My fear would be that one of my four crazy boys would jump into it & get hurt…??
Hey Lady!!
That is a great question! The board is 1″ thick so at THE MOST it would be poking out 1/2″ into the foam which is 4″ thick. I tried to feel them and couldnt find them. If you were to use thinner foam and longer screws that might be a problem though!!
Love your guts
mandi
Mandi…you inspire me!
thrifty, cute, and clever!
Cool…I’m waiting for the denim throw tut!
Love the headboard! So easy!
https://restorationredoux.blogspot.com
maybe I missed it but you never talked about the buttons. I imagine they’re a covered button from a button kit from Joann’s. Super easy and thanks for the tut.
Mandi,
What white buttons did you use? None of the ones I have found are working for this project.