Don’t hate me when I tell you this…I have had this project done since January. BUT I couldn’t show it to you because I had to redo Dylan’s room to do it justice! We’ve all seen the cute kitchen play sets from repurposed crap (I super love this one from YHL)
We arent really a kitchen type family, BUT we are a dress up type family.
Dun dun dun dun!

So cute right!?!


So do you want to know how to bust it out?
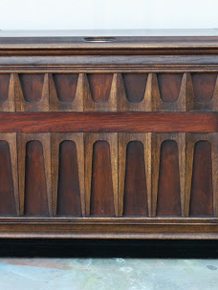
Start with an ugly entertainment center (I found this one on Craigslist for $20)

After removing the unneseccary elements (doors, shelves etc.) it looked like this:

Also for those that are new, we have a rule at Vintage Revivals call Don’t Judge My Hoard. So please abide by it. Thankyousomuch.
The first step was to get the closet door attached. Bought a piece of ply and had it cut to the right size at the store. We originally used MDF but were concerned with the durability and switched to 3/4 plywood. A few of the pictures below show the MDF before we decided to switch.
We attached it with hinges (by we I mean Court)

Then I trimmed it out. (ALL BY MYSELF!) I used preprimed chair rail moulding. Just make sure before you head to Home Depot or Lowes that you measure EVERY SINGLE THING. Got it?
I used my trusty nail gun to attach it.

Notice the gaps in the moulding at the hinges. I needed a small cut out of it to accommodate them. This could be SUPER complicate if you want it to be. Or you could do it the easy Mandilicious way. Cut a piece that is the right height and then cut it skinnier so that it still lines up. Hold on let me just show you.

Then you just putty the seams! Awesome right?!
The paneling was pretty easy to install. You can have your home improvement store cut it the right size but you will most likely have to notch out some corners. Then just slide it in through the back.

Because we were installing lighting in it we needed a sturdy back piece. This we had cut to exact measurements to fit in that space. If you are doing this take this thickness into account when you are measuring for your inside panel pieces or else you will have to trim them.


Now its time to putty, caulk and paint! Make sure you clean it REALLY well before. Rough it up with 150 grit sandpaper and use Kilz to prime. I needed 2 cans of Kilz and 3 cans of Krylon White Gloss.
Oh and you need to make sure that your elements all fit in the space.

For lighting I used super cute Jelly Jar lights from Home Depot (they are like $8-$10 each). And because you are not hardwiring it you will need a cord with an outlet plug at the end (these are like $5-$8)
PICTURE
Drill a hole for your wire and screw in your crossbars.


You will just use wire nuts to connect the cord wire to the light wires

and after you screw the light in place you are done!

*If you are not familiar with electrical work you can always contact an electrician to help you! Also we used a SUPER low wattage bulb so that it doesn’t get too hot and have made my daughters aware that under no circumstances are they allowed to touch the lights.
I will be posting a tutorial later this week on how to paint the wood grain ply.

Once they were painted we attached them to the sides with short finishing nails.
The door was trimmed out once it was attached also.

We super lucked out with the mirror, there were small spots all along the edges that we could put screws. If you are using a mirror that doesn’t have this you could glue it on with Gorilla Glue and I think it would be fine.


I will be posting a tutorial for how to make 3D play makeup too!


You can see the other elements in Dylan’s Room Makeover Here. If you have any questions leave a comment and I will do my best to answer it there!!
If you liked this project I would love for you to vote Vintage Revivals for the Best DIY Blog over at Apartment Therapy. The top 6 become finalists and I am currently #7….And I am FREAKING out! You have to register with Apartment Therapy to be able to vote but it’s the easy 30 second FB kind! You guys are AMAZING!

Love Your Guts, Mandi

This comment has been removed by the author.
Ummm……are you aware of how awesome that orange framed mirror is? Of course you are. It wants to come live here. So….just say your goodbyes quickly. 🙂
OMIGOODNESS. That is beyond adorable. Beyond perfect. Your projects just keep getting better and better.
All this diy blogging stuff makes me wish I had a computer and digital cameras when I was a new mommy, new home-owner. I was always stopping at peoples’ garbage days, clearing out yard sales and stocking up on spray paint. Five kids and four homes later, it’s much more rare to indulge in a project like this. But I am gonna be posting about a mini-facelift we did in our Master BR soon. You’ve inspired me 🙂
Mandi, This is great! I have seen these done as little kitchens but not as a dress up station. Dang. I just put mine (that had been in my garage for 6 years) on the curb a few weeks ago. DARN DARN DARN
This is awesome! I wouldn’t have been able to look at the original entertainment center and see the after product. I love it!
oh em gee! how freaking cute is this!!!
This is adorable and looks great to! I bet she loves it 🙂 I like how you did the light inside. Nice extra added touch!
ADORABLE!! Love your brain!
Hi! fab project…and yes, when you’ve got little girls IT’S ALL ABOUT DRESS-UP I am also in love with the red-orange-tangarine mirror…would you have a tutorial for that in the archives? from this project I can tell that the mirror was like applying fingernail polish to the rest of us mortals…I would lovve to try making my own mirror…thank you
this makes me sick it is THAT good! you are so flipping talented! I hope you are going to be teaching something at Snap conference because I cant wait to learn more!
Bridget
http://www.bridgeywidgey.com
AHH! This is soo cute! What a great idea for those oversized and ugly entertainment cabinets!
Oh my GOODNESS, this is so cute! I want an adult-sized one!!
Mandi my daughter is coveting this and she hasn’t even seen it (or maybe it is my 5 year old self coveting it). Whatever the case my be, this rocks! You’re simply AWESOME!!!
I LOVE this! You guys did such a good job!
VOTED! Good luck. 🙂
Looks great! VOTED!
SO cute!! I love this idea.
This comment has been removed by the author.
I love, love, LOVE this! Your ideas always amaze me.
perfect for your little beauty – how fun would that be!!!
p.s. you all ready know from my deleted comment, but I VOTED! 🙂
First, saw you on Nate Monday. You were really relaxed and great. Second, what little girl would not want one of these? Too cool and sweet.
I happened upon your blog the same day I saw you on Nate Berkus..you are amazing!
I am obsessed with orange right now. Could you tell me what color you used for the mirror inside the dress up station?
Will vote for you!
SERIOUSLY! I knew it was going to be amazing! I LOVE your chunky gold mirror! So cute… now if only I had a little girl 😉
wow, that is awesome! my girls would love this…
love your blog and all you work!!
I think this is my most FAVORITE thing I’ve seen you do!!! I have 3 little girls and a very handy hubby and am now DYING to make something like this for them! You = genius. Fo. Sho.
Love, LOve, LOVe, LOVE!!!
Mandi, that turned out so awesome!! What a lucky little girl!! I so wish I had seen your moulding-around-the-door-hinge trick a few days ago. I trimmed out an ugly door, and I used a jigsaw, hammer, and flat head screwdriver as a chisel to get the moulding around the hinges. Let’s just say the finished cutout was a bit rough looking…LOL. Now that I’ve seen your trick, I just might go back and redo mine.
That is stinkin’ amazing!!!!! Love the huge gilt mirror. Any little girl would kill for a dress up wardrobe like that!
Can I have your brain? I want to be able to come up with awesome stuff like this!
Love it! I’ve seen a few of these done but this is by far the best!!
I have the same frame as your orange frame! I painted mine white and turned it into a dry erase board – it even had the same ugly picture inside.
https://athomewithh.blogspot.com/2010/05/memo-wall.html
This is AwEsOmE!!! My daughter totally needs this. As soon as she’s old enough to know what it is. lol Seriously, that is the coolest upcycle ever!
great job i love it awesome idea
Freaking sweet!!!!!
What color did you use for the tangerine mirror??
Voted for your cute face!!!
Actually you’re #6 now. Wahoo!! Love all your DIY’s. There’s another really cute dress up cabinet at http://www.ramblingrenovators.blogspot.com. She’s Canadian and has some amazing ideas and fab style. She was on Nate too in the fall I think. You have to check out her house tour before and afters. So great!
This is too cute and so creative!
https://shelbit.blogspot.com/
Wow this is amazing, I voted for you! I don’t have a daughter yet and I want this already. Insanely cute
I voted for you! My fav blogger as U are the first DIY blogger I ever found…..such a brilliant idea that turned out fabulous! High-five!
You are frekin awesome!!!!!!!!!!!!! That is the best dress up station ever. MOM OF THE YEAR for sure.
Do tell…what paint and color did you use for the orange frame?
Omg Mandy!! That is the COOLEST thing for a little girl that I have ever seen…Im sure you could do the same for a little boy but make it a builder station!! I love the idea that your taking junk and making it something FREAKIN’ FANTASTIC! Im going to do this…my daughters 28 but hmmm lol! Your the only blog that I actually follow…
Omg Mandy!! That is the COOLEST thing for a little girl that I have ever seen…Im sure you could do the same for a little boy but make it a builder station!! I love the idea that your taking junk and making it something FREAKIN’ FANTASTIC! Im going to do this…my daughters 28 but hmmm lol! Your the only blog that I actually follow…
SO RIDICULOUS IT’S UNREAL AWESOME!
Trish
http://www.mash-upchic.blogspot.com
thought this might make you smile…
I pinned one of the pics from this post… 28 minutes later it had 17 repins!
you go girl!
I love your work. You are adorable on the Nate show. I refinish furniture and {heart} the DI. I just love perfection. So, DO NOT POST THIS on your “haters” blog BUT~~see that gap at the top of the little mirror/vanity section. Grab some all purpose white caulk and finish off all the edges. It will BE Amazingly Perfect after that. Just an FYI. Love your purple Octopus light fixture the BESTEST. Owe and the redneck pics! Keep it up. Delete this comment but do the caulk. {A}
This is totally amazing! I wish I would of thought of this when my girls were young enough to use it!! Great memories will be made here!
Maggie
http://www.thehellonheelshousewife.blogspot.com
You’re just consistently amazing. That’s all.
Hi mandi-
My little Grandma was in town visiting when your episode aired. I was wondering if you’ve had any luck tracking down the rest of your segment for the Nate show? I scoured his site and youtube without any luck. Are you planning a blog post about whatever else you did on the show?
xo,becca
What I would like to know is WHERE the heck do you find those mirrors? I’ve been looking and looking all over thrift stores & garage sales & can’t find one ANYWHERE. Do I need to come to Utah just for a mirror? You seem to have plenty of them around there lol
Where do you get all of those amazing mirrors? I want a grown up version of this!!!
I just found your blog this week after seeing you on the Nate Show. I love your style and it’s very much like what I want in my home. I love your step by step tutorials! I am so addicted to your blog. You have even inspired me to go inside the DI (not just drop my stuff off outside LOL)! Thanks for all your great ideas. You have such a gift!
Fantabulous project!!! What a great repurpose of an ugly entertainment center!
Love it!! You are wonderfully creative! What color did you use on the orange mirror?
This isn’t great. It’s in the next level!! Is incredible that you had been able to turn something simple and kind of odd in the top of awesomwness!!!
This is spectacular! I have an older daughter who would have loved this, but lucky for me, I now have a 3 month old daughter that will one day have something just like this!! I’m so excited. Thanks for the ideas!!
I love this!! I have an older daughter who would have loved something like this, but now is too big. Fortunately for me, I have a 3 month old daughter who I’m sure will eventually love this too. Thanks for the inspiration!
Wow, I happened upon this purely by accident, and I am in LOVE with this project. I wish I had seen this before I convinced my daughters they were too old for the dress-up cabinet. I even have an old tv cabinet down in the basement (holding sports gear)that I could’ve used.
Great blog….great ideas!
This is SO cool! I totally want to make one of these for my daughters’ playroom now! Great job.
How did you get the back board to stay? It looks like it is fitted inside the spot and not hammered into the back
Seriously amazing!!!! Good job guys!! I wish I had someone to teach me to do these things (like the wiring of lights, but I’ll figure it out!) And those sides are to die for!!!!