This was the first project in Hailee’s Living Room Makeover. Open windows in a wall are HARD. Visually they take up SO much space and leave you unable to do anything to them. I mean really what are your options?
Stack junk at the bottom?
Um…..that’s about all that I could come up with.
So while I was “soaking in the essence” of Hailee’s room I knew that I wanted bookshelves somewhere….but where? It took me about 2.3 seconds to decide.
BOOYAH! In the totally waste of space window! Hot dang, you know you didn’t see that coming. (unless you saw the reveal post…then you knew this tutorial was coming…so um yup, this is awkward.) Moving on.

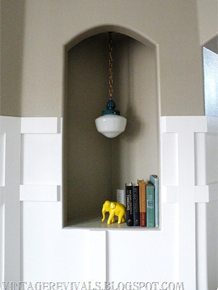
This is what it looked like before:
![]()
The first thing that you want to do is evenly divide your space. I knew that this needed to be broken into a 3×3 grid.
Measure out your spacing and secure brace pieces to hold your horizontal shelves. These pieces measured approximately 1x2x8. They were secured to the wall using small nails. If you are not using vertical pieces you will probably need something stronger but because our horizontal shelves were also braced vertically we didn’t worry about it.
![]()
Once you have both horizontal pieces in place you can measure and cut your vertical pieces. Makes sure you measure for each piece before you cut it. Then using wood glue and finishing nails to secure each piece.
![]()
If you have an arch like this don’t worry about the gaping between your wood and the arch, you can easily fill it in with wood filler. (Just make sure that it is stainable!)

Then once everything is installed it is time to lightly sand the corners to finish them.
![]()
And here it is, all prettied up and ready to stain!

Love it!

Such an easy project right!?! Total spent was around $30.00. It looks amazing and best of all made this gaping hole functional!


I will be posting in the next week or so the Anatomy of a Perfect Bookcase and talk about staging and arranging your new shelves!
You can see the rest of the tutorials for Hailee’s room makeover here
Hailees’ Living Room Before and After
Custom Built-ins For Less Than $30.00
Houndstooth Stenciled Sisal Rug
![]()
I love that it closes the room, but equally opens it, making the room appear so much bigger than it is. Wonderful job!
it is gorgeous! Just gorgeous!
That looks fantastic! Now I have to think of a wall in my house I can start making a hole in. I am going to go walk around now to figure that out. Thanks for the inspiration.:)
brilliant. love the new look. love your blog too. will be back! new follower here.
bye for now.
Oh man – I totally could have used this about 3 houses ago! I will definitely file this away for later, it looks awesome.
Very Awesome!!! I will store this in the back of my mind for a future project!! The best part is how CHEAP it is! Thanks for sharing.
thanks for this tutorial. I have a big hole too, a little differently shaped though. I just wish you could come to my house and help me out, or just tell me what to do and I will do it! I have one of those open rooms with kitchen, living, dining, and a big landing area for stairs all combined, but the room is not that big, being a townhome. How do I divide and unify? If you ever feel like taking on a combined type of room challenge, I am your girl!
I was wondering what stain you used? Love the color! Is it Minwax Walnut by any chance?
Thanks!
THIS PROJECT ROCKS! (Yes, I’m shouting…lol)
You have a great eye to take something that looks “normal” (like a pass through kinda area) to make into stunning DISPLAY area!
Your Follower in NW Illinois,
Suzanne
Looooove it! Your brain comes up with some amazing things!!
That looks ah-mazing! It adds so much to the room and updates the room beautifully! And I love the accent colors, so fun!
Love it. This is just perfect and definitely adds such an interesting aspect to the room. Hugs, Marty
I think this is the BEST improvement in the room. You’ve not only given a visual oomph to the space, Hailee and her family will be able to change the decor easily by just swapping out the knick knacks in this open shelving.
I will SO do this too!!! Thank you for generously sharing your work. I eagerly follow your blog.
Mandi – you may have saved me $500. Seriously, I’ve been looking at closing in a wall. This may make my husband propose to you. Love YOUR guts, Peanut!!
They are such an important part of the makeover…good call!
I just can’t get over how talented and creative you are. The room is GORGEOUS! Love the bookshelves.
This was my favorite addition to the room!! Such an amazing transformation for nearly nothing!! LOVE IT!!!!
that was such an awkward window! i’ve never understood what function architects have in mind when putting those in.
but i love the built ins. it looks a million times better, and for so cheap!
You are amazeballs. Yup… amazeballs.
I wish all my gaping wall holes weren’t from rowdy teenage boys. LOL
This was such a great idea! I love how it turned out and i’m definitely saving this for future homes, FL houses are overflowing with awkward cutouts like this!
I’m loving Hailees roommaeover BUT, I would LOVE LOVE LOVE to see the dining room now. Did you do anything in there? you can see teh old space in your tutorials but did you leave it like that? when can you come do my house. pleeeeaaaaassssse.
marianne
[email protected]
You are seriously Amazing!! I wish you were my friend and could come over and whip my house into shape. Please?
Wow! What a difference! It looks so much better with the shelves! Great thinking 🙂
This is totally my favorite part of this room. Very creative solution!
Such a talent you have my one and only famous friend;)
I love that they are stained rather than using the same color paint as the wall – it looks awesome!
Love this idea! I need bookshelves in my LR in a BAD way!
I’ve been stalking your blog for months, and this is my first comment because I have to say YEA! I can’t WAIT for the post about staging bookshelves. Mine always look so cluttered, even when I love everything that is on them!
I keep looking at pictures of this room and can’t believe how talented you are. Really amazing. If you ever want to decorate with the challenges of a SMALL space, let me know and you can come to California and help me with my house! 🙂 LOVE your blog. Keep up the fun posts!
Hey Mandi,
Ordinarily, I’m a shameless lurker who never comments – but I just wanted to tell you that you are amazing. You have been inspiring me for quite some time – like a year ago, I happened upon your blog and just thought – I want to do that!
In February of this year, my husband and I bought a 3017 sq. foot home. In March, he lost his job when he had open heart surgery at the ripe age of 30 years old. (YAAY. GRRRR!!!) and now, I have a 3017 sq. foot home that I’m paying a ridiculous mortgage on all by myself, which means that all those awesome plans I had for decorating it all professional like are straight out the window…or ARE they?
They are not. Instead, you have inspired me to create my own blog and do some of the awesome ideas that you and the other gals you have linked to have done, and to see what I can create on my own.
I just wanted to say thank you. You’ve turned what could’ve been an awful, horrible blow to my life into a challenge.
Just yesterday, I scored 4 chairs free on CL.
I’ll let you know when I get my blog up. I’ve already got like 10 projects I can put up that I’ve done.
You rock. Thank you so much for sharing your story, and just being you.
Shannon
Love the shelves Mandi, I love the way you repeated the color of the furniture. Kudos to you!
this room transformation is j’amazin’! but i’m curious how you secured the vertical pieces. wood glue? dying to know.
h.
Wonderful idea, Thanks for sharing!
~Mrs. Delightful
Ourdelightfulhome.blogspot.com
Oh I am SO going to do this!! I have this ugly recessed space in my entry that just kind of serves no purpose at all (created by previous owners after reorganizing the basement stairs – long story!)
And now I have a technical question – how did you secure the vertical boards at the bottom? Did you hammer in nails on an angle? Did you leave them just free? I have an overwhelming need to know haha!! Love your guts:)
I love ever element of that room, but this part of it I my fave. It just takes it to another level.
Wow!!! Love this!!!
um, very creative! love it. 😉
Impressed! I love this…it gives a little more seperation to the rooms without totally closing them off. And I am obsessed with the paneling white squares you put in, it adds sooo much. Great work!
Beautiful room and such a great idea which I will be using for an area in my own home!! 🙂
Wow, what an improvement. The room looks so put together. Great job!
What a great idea!! I love this idea. What a great use of that empty space.
Ruth
Wonderful idea and execution!! LOVE the whole room, btw.
🙂
shaunna
I LOVE this! I would love if you would share this at the Crazy Cute link party happening at Between U & Me right now! I’ve got a totally awesome giveaway this week, too!
OOH! AND, I’m your newest follower! 😉
http://www.betweenuandme.com
Amazing! We have a similar hole that I would love to do this to. Unfortunately, we’re renting and the land loard hasn’t been open to any of your improvement (at our expense) desires.
I love the rug! may I know where you got it?
You’re a rockstar. What can I say. Screamin’ one at that! This looks fabulous!
Donna
Really great idea and use for the window. I’m loving it all!
That is so amazing…you are one smart cookie! We have a similar hole, it’s a ‘pass thru’ for the wet bar. It’s 1985 is what it is. I thought about doing shelving too, but the hole was in such an awkward place. Surprisingly, my contractor was easily able to just patch it for not much $$$. I posted the final today…LOVE it! But the way you handled this opening is genius!!
This is beyond lovely, Mandi! you are a genius!!
What a really wonderful idea! I love that you can still see into the other room but this still clearly divides them (and provides display space).
LOVE, LOVE, LOVE The Epic Room Makeover! What does it take to get you to come to my house!
Wholesale Gucci Shoes Will be blogengine as good as wordpress blogs somehow? Is required to be because it is turning out to be popluar currently. [Reply]
I like this post, enjoyed this one thanks for posting.
My personal sis advised me personally about your internet site and exactly how excellent it truly is. She’s proper, I’m genuinely amazed using the composing and clever style. Seems like to me you’re merely itching the surface in terms of that which you might accomplish, nevertheless you’re off to a terrific start!
What?s Taking place i am new to this, I stumbled upon this I have discovered It absolutely useful and it has aided me out loads. I’m hoping to contribute & help other customers like its aided me. Good job.