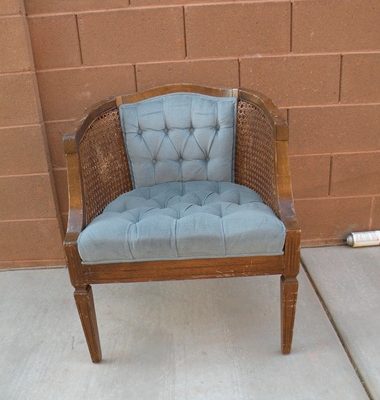
So broken cane chairs are super easy to find while thrifting right? Do you want to learn how to take an old broken chair and update it into something modern and amazing?

Lots of times I will see a pair that has one that is in perfect condition and the other one will look like it lived at Freddy Kruger’s house. So frustrating.
I have been on the hunt for one that was shredded for months and of course I could only find perfectly fine ones…
Anyways when I finally found this one I was SOOOO excited!

")
I mean how do these things happen?
Moving on.
First what you need to do is take off all of your upholstery. If the cushion is not immediately removable don’t worry there are screws underneath the back fabric under the chair.

This welting was stapled to the chair which makes for less sewing which I love!
Next its time to take all of the caning off. There is a long skinny piece that finishes it off and covers the staples that you will need to take off first.
Then you will need to pull out the staples that hold the caning in.
This is a very messy removal so I was glad that I did it outside.
Also somehow I don’t have a pic of the chair after the caning removal…not quite sure how that happened!
If you are going to paint this is the time to do so! On the Epic Room Makeover chair I painted it Krylon’s Emerald Green. It turned out the perfect shade of bright green.

Now for the really fun part.
I used black stripe upholstery webbing for the sides. You can get red stripe anywhere from Joann’s to Walmart but to get the black stripe you will need to get it from an upholstery supplier.
Start out by stapling strips of it vertically on your chair. Secure the top of it well but only put one staple in the bottom. (I tried it with the ends loose and it was easier to weave when the bottom is secure)

When you are stapling on the top make sure that it is as close to the groove as possible. I did mine right below it.

Don’t judge my fingernails.
Then you are going to start weaving pieces horizontally. Start on the BACK of the chair. Secure with 3-4 staples.

Tack the end with ONE staple below the groove.
On my second row I had to work in another vertical piece but it had to be woven and stapled one row at a time. See how I had to staple it under row 2 and staple it over row 3?

Once all of your rows are woven take you stapler and secure all of your webbing. Make sure you do this neatly and as close to your groove as possible because if the staples are too low they wont be covered by the nail head trim. Then I took a rotary cutter and rolled it inside the groove to trim all the excess.

Up next is the upholstery. Take your cushions apart.


Use your cushion fabric as a template so you know where to cut. I ALWAYS cut it extra big cause you can trim it off. And when you are tufting you need extra fabric.

Then I took my cushion and marked where the tufting buttons are supposed to go.

I had buttons covered at an upholstery shop (cause it is right down the street from my parents house and it was WAYYYY easier than doing it myself.) Most shops will charge you around $.40 a button. The buttons I used are like giant brads. You insert them through your fabric and cushion and then spread apart the metal prongs.

As you are doing it make sure its lining up right and tufting it with the same pressure.


Then you are going to put the wooden frame under your cushion and staple the fabric to it.
When you take the top cushion apart you will notice that there are 2 parts. The actual cushion and then a back piece that makes it so you cant see the back of the cushion.
Start with this part first. When you are stapling make sure your fabric is extra tight and smooth. When you have it stapled trim the extra.

When you are stapling your cushion on make sure that you shape the fabric around it before you staple. See how the sides have the fabric wrapped around it a little?

Trim it as close as you can, it will give you a much cleaner finished piece.

One of the cutest thing about this chair is the nailhead trim. I used the cheater version…don’t hate me. It is a long continuous piece. I bought it from DIY upholstery supply.

See the one with the hole? You put an actual nailhead in there… so instead of nailing every single nailhead in you are only nailing in every 5!! Saves SOO much time and its always straight!

Can you tell which ones are the “fakes”?
When you get to a corner cut your strip down so that the one with the hole is at the beginning and start again. If you have to fill a few spots with the real nailheads go right ahead!!


Almost done!!
To trim out the white cushions I used welting. Super easy to make and covers all your staples!
I used 1/2 inch welting. I cut my fabric into 2.5 inch strip.

Then using your zipper foot on your sewing machine sew in your cording.

Trim off the extra and bust out your glue gun! Glue your trim along the edge of your cushion

Put you bottom cushion on and you are DONEZO!


So what do you think? Will you try it?
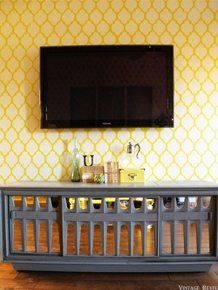
Click over to see the rest of the Room Makeover if you havent already!
![]()

The after looks great. I love the webbing and the crisp white on the cushion.
You post such neat ideas. What a cool idea for a cane chair. But my fave is the tin foil night stand. Can’t wait to try some of these. Keep up the awesome posts!!
I think it looks fantastic!
Great tutorial. I love all the details.
Connie
Amazing. Thanks for posting. Looks so fantastic. That green is perfect!
LOVE it girl!! You freaken rock! I LOVE everything about it..especially that you cheated. haha!
holy freakin’ crap, you are amazing. i love this tutorial and your energy in presenting it! i think you are wonder woman–except with a tool belt instead of that regular old gold belt and that is wayyyy better!
This is freakin amazing!!! I will be copying you for sure.
Fabulous tutorial. 🙂
Incredible! 🙂
This is amazing!! Like my fave part of the entire room! You rock!!
Love the chair and love your nails!
WOW! Great tutorial! I’m kind of a refinishing newbie so not sure I am ready for this, but your end result is SPECTACULAR!
VERY cool 🙂 Love the weaving.. the color choice, and the crisp white..
KUDOS to you!
XOXO
moo
So does it look hideous to leave the caning off? I am thinking that’s what I’d do but I also thought to reupholster the sides just like the back…think it would work?
Saw this on Apartment Therapy yesterday and was hoping you would do this! I love the little string of beads along the top and down the front. I wish I could do this kind of stuff but I feel like it would probably turn out a mess! I love going step by step of how someone else did it though!
Alyssa
coolproducts.com
Mandi- I {LOVE} how this chair turned out! Thank you for the tutorial. It is very informative. Your majorly fabulosa!
Thank you so much!!!! GREAT tutorial!
Awesomesauce. I love the woven burlap. If you ever want to actually replace the caning, I have a good tutorial on that, but with such a fun alternative, I’m not sure I’d go to the trouble.
I again bow to your greatness, Mandi.
Love it!
Did you bias cut your strips for the welting? If not, try it next time – mine always lays so much nicer that way.
the cheater nailhead trim is a new one for me – love it, need it!!
Love this tutorial! I was totally stoked when you told us this sneak peak at the GNO…and since then, I haven’t found a single chair out thrifting…it’s on my list though! I foresee this in my future! Thanks for sharing your genius as always!
🙂 Nat
doodlecraft.blogspot
It looks great! I love the weaving.
I love this! Do you think it would work for caning on the back of a chair too??
We have three of those chairs, in the “before” condition. I can’t wait to someday make them over!! Inspiring! Thanks!!
i LOVE it!!! I adore that green. It’s moving pretty high on my favorite colors list right now. And the tufted white? So freakin’ awesome!!! I have a tufted rocking chair at my house that wants you to come visit….just sayin’! 🙂 You’re incredible!
Mandi, thanks so much! This is what I’ve been waiting for! Can’t wait to try it because I love it!
I’m in the middle of this process with the same chair only it has a high back and my seat is a cushion not tufted as well. Instead of webbing I pulled all the paneling off and filled the holes, this would have had much more character! Very Cute product!
OH MY HEAVENS!!!! You are so talented!!! Sadly, this is the first time I have been on your blog and just saw your Nate Berkus video….WHAT!! SO glad that I got to meet you at EVO, and I will so be here frequently :).
xo,
kirsten
thecraftingchicks.com
You’re so talented! I want to try this now, thanks for showing your amazing decor skills with us!
Amazing!!! Such a great transformation!
THANK YOU THANK YOU THANK YOU!! I now can do mine!! i love it so much! now to pick a chair color!! (ps where did you get the mirror?)
Wow great job on this! I am doing some of my first chair redos on my blog soon and it’s always great to see good tutorials!
http://www.creationsbybonnybee.blogspot.com
Very cool! But what I really want to know is WHERE DID YOU GET THAT WALLPAPER??! I’ve been looking for that very pattern for almost two years. So glad to spot it. (it exists!) thanks
So I have a fashion blog and have recently become obsessed with recovering old furniture and pieces. I am not totally hooked on your blog! you are fabulous! Just mentioned you in my post 🙂
xox
Devon
https://www.devonrachel.blogspot.com
Cute chair but the nail polish…Killer!!
Holy smokes — that’s a serious makeover!!! Well done, you are so talented!!
Nice seeing you on CasaSugar this morning!
Could you also use seat belt material for the webbing? I feel like you might be able to get that in other colors.
The chair is absolutely wonderful. The green color and how you fixed the caning. You did an amazing job with this space. I can only imagine walking into that room and seeing how fluid the design is.
Wow! I never would have thought to replace the caning with that. Now I’m brainstorming other things that could be used, too! Thanks for sharing! 🙂
Hi Mandi,
I love this chair and the room makeover! You’re amazing. I wanted to thank you GNO in SLC. I had so much fun and your were so warm and welcoming. I’ve been in the process of opening a new store called “The Old Flamingo in Millcreek, UT. It’s a co-op of local furniture artists. Could you please contact me privately? I couldn’t find your email. Again thank you so much for GNO. I watched a rerun of NATE and you were on. You have a great TV presence. Debbi
HEY! Your chair is totally featured on Apartment Therapy right now! Super excited to see it pop up over there. I saw it first here, of course, because I was stalking your site for the big reveal. 😉 Just thought you should know in case they didn’t tell you. They have a habit of doing that…
would love to try it!!
p.s. love your nails and that you also make me laugh out loud…
I’m always amazed at your abilities 🙂 and I love the way you do things because I feel like it’s something I could tackle too. Thanks for the tut. and the epic room makeover is fab. LOVE IT!
HELP!!!! First of all, I’m new to your site, and I have spent the last 2 days doing nothing but clicking around here.
Second of all, you inspired me to finally get off the couch and try this stuff! I went to Home Depot to get the Ralph Lauren glaze, and THEY NO LONGER SELL RALPH LAUREN! Have you found a substitute that you like?
Thanks again for sharing all your great ideas. You’re awesome!
I’m your newest follower! Awesome job on the chair redo! Looking forward to reading your future posts:)
~Cindy
LOOOOVE IT! Cant wait to see the rest of your projects…
New follower! I am in LOVE with your blog, found you after seeing you on the Nate Berkus show!
I need some creative advice, don’t know if you have enough time to offer to people…lol. We’re a military family and move ALL the time so it’s difficult to make a home our own. Anywho, I just bought these two awesome barstools and am looking for a creative way to use them until we’re in our next home with a bar. Hah… yes, I buy things I can’t use now in case I can use them in the future!
~Sabrina
that’s the exact kind of chair i’m on the hunt for! i’m so glad you were able to give it new life – it looks great!
[email protected]
What a great tutorial! I don’t know if I ever could do that work, pretty amazing:)!
Beth
THAT is some serious genious! Seriously, when can you come to my house?
Incredible! I’m so impressed and thanks so much for the tutorial:)
Mandi,
Super Cute! I love this chair!
I wanted to know what does the back of the chair look like? Does it show the webbing on the back or the fabric? I need to find a chair like this. I still haven’t started on my other antique chair. I hope too in two weeks.
Thank you for this tutorial. You keep inspiring me to get on the ball with my chair.
Blessings,
Vanessa
I just finished redoing a chair and tonight just saw this one you did, it’s great. Love your blog BTW, you have great ideas.
I found a chair just like the before and I was so excited to redo it! And it full on got stolen right out of the store, behind an employee’s back! Anyway. I blogged about it and would love for you to check out my blog.
http://www.thepeacockprojects.blogspot.com
Love Faith.
I just bought two cane chairs in perfect condition for $20 total! Thank you so much for your tutorial. About how much fabric do you need per chair? I will probably be using fabric with a 54 inch width. Love your blog.
mandi,
the webbing on the chair took my breath away. it.is.so.industrial.awesome!
i found you while i was googling ‘cane chair before & afters’ to get some creative juices flowing for a chair i found on freecycle. i somehow want to incorporate the webbing into my reupholstery even though the caning is in decent shape. i also need to find the black webbing..LOVE it!
thanks for the tute on it too.
judi
I like what you ‘ve done, but did you know you can replace caning? If a piece doesnt have all the holes where its been woven in, and this would be obvious, you can buy new caning and just staple it in. Would work perfect for this chair because it isn`t load bearing, by which I mean, you aren`t sitting on it. Anyway just thought Id throw in my two cents, I do like what youve done its an excellent alternative. 🙂 love your blog !
Mandi – I live near you. Which upholstery supplier do you use? Thanks, and I love your blog!! [email protected]
Love how the chair turned out! I have a friend that found a very similar chair at a thrift store…and she wants me to redo it for her. I was a little worried if I could do it AND do a good job. BUT your tutorial of how you did the chair has given me the confidence I needed! Thanks for the great posts and ideas, you rock!
Keep thjis going please, great job!
Once again your specifics MAKE this blog the bestest evva!!