Hooray I finally got my stencil done! (almost) I am SOOO excited to show you guys how awesome it looks.
I have a couple of other projects going on in my bedroom so I am going to wait until I can show the whole room for the final final shot. But I couldn’t wait to show you how freakin AWESOME my stencil turned out, even though I still have touch ups to do.

I am not really a stencil novice. This is the the third time that I have stenciled a room (click here to see the first and second times) The first was a stencil that I made myself and the second was one that I won from Cutting Edge for winning Crafting With The Stars. If you read the posts leading up to my living room wall reveal I was super frustrated with the way that I couldn’t get it to line up, there were bleeding issues, etc. I am really glad that I did it but man it was not easy.
When I contacted Melanie Royals from Royal Design Studio about being a sponsor in the Epic Room Makeover Giveaway they sent me a stencil to try myself. You guys know that I am all about 100% honest opinions and so this is my true blue through and through experience.
I couldn’t decide which one to get! Seriously. It took me DAYS of thinking about it 24/7 to choose. The one that I chose is called Hollywood Squares (like the TV show!) But these were my other top 3 (click the pic for more info)


I flippin couldn’t believe how much easier it was. The differences between the way the stencils are made makes all the difference in the world. Royal Design Studio’s stencil is on a different type of plastic. It’s the kind that when you shake it it makes noise (you know what I mean right?) It stuck to the wall by itself. I didn’t need to use spray adhesive.
On all of the stencils that are meant to be used as allover patterns they have registration marks so that your stencil will line up perfectly. Seriously who would have thought that a few teeny marks would make the difference in my sanity?


And then you just go to town! The stencil bends really easily for corners, but you will need to do a little hand painting to get it right against the corner.
On the first tutorial (and what is recommended by RDS) I used a small foam roller. I was at Home Depot picking some more up and noticed that Purdy has small rollers too but they aren’t foam they are called White Dove. I asked the paint guy what the difference was and he said for my wall the Purdy roller would be better. I already had a white dove roller at my house and so I bought the foam roller just incase.
The foam roller needed 2 coats and got a raised buildup along the edges of the pattern.

(Close up so you can see the amount of bleeding)

Using the White Dove Roller I only had to do one coat (sorry didn’t get a pic while the stencil was on the wall)
And here is a shot of a random spot on the wall.

There was still some bleeding but that was more my fault for getting lazy than anything.
When you load your roller you want to have enough paint that you will have coverage but not so much that it seeps below the stencil. The best way to describe it is to roll enough off that its not shiny with paint.


When you start on a wall start in the upper center

That way you can work to the right, left, and down and there will be less down time waiting for your paint to dry!
When you are done get small pieces of tape to mark where you need to touch up. If you are standing right next to the wall you can drive yourself mad with imperfections. Stand a ways back and see where the issues are and mark there. I mean if you want to hand touch up a bajillion little bleeds be my guest but I have more to do in life.
Clearly my roller had too much paint on it when I was doing this section…

Just a reminder of the before:


p.s. I stenciled 2 walls in the bedroom that’s why the doors seem weird. And sorry about the wonky angles I am trying to not show my other projects that are in the works….
ALSO!! If you are thinking about buying a stencil from Royal Design Studio save yourself some mulah!! You can use the discount code VINTAGE10 at checkout and save 10%!
Do you guys have any more stencil questions?
Also cute Cassie @ Hi Sugarplum is featuring my coral dresser! Hop over and say Hi!!
![]()


unREAL…there is no no way I could EVER have the patience to do this…KUDOS!!!
LOVE LOVE LOVE!!!!! can I say that enough!!! I was just looking for this exact pattern!!!! I’m headed right over there to check them out!!
ohh by the way great job!!
I LOVE it and it turned out great! Will you do my house? I stenciled one wall and had to paint over it because it turned out so badly!
so I get to try out their stencils too, and I had a hard time narrowing it down between the one you used, the circles one, and that last one (green wall) you showed – -fun to know we loved the same ones!
Oh yea! High Impact for sure!!
Rashon aka Mr. Goodwill Hunting
Looks amazing! Can’t wait to see the whole room!
awesome!!! i got the one listed second in your line-up and need to get some balls and just go do it already!! thanks for the tips though.. will make my job easier.
as for the discount code.. bleh.
Seriously, I have stencil envy! I really really wanted a stencil wall and it turned into a major craft fail 🙁 Maybe I will try again. I love their stencils! There is a damask one I have been coveting.
Wow Mandi! Awesome job with the stencil!! I SO appreciate you nice comments about the quality of our stencils and ALSO the tip on the dove roller covers for a textured wall surface. It’s the little things that mean so much 🙂 -Melanie
Oh my goodness! That’s a huge wall of tiny stenciling! You are committed. And all those stencils look amazing! If we end up doing a concrete patio, I am so going to buy one to paint on there
Wow, that gives it so much character! I love it! It looks great. I can’t wait for the rest of the reveal!
Hey Mandi, That is freaking awesome. I am so jealous of your wall. You never stop with your cool ideas. I emailed you did you get it?
I’m learning how to stencil and my grandmother sent me a video (that’s right, VHS) she bought 20 years ago on the “How Tos” and it said use acrylic craft paint. I can’t image doing an entire room or even a wall with that stuff. You just used regular wall paint right?
i seen this in one of your last posts and im plainning on doing that same stencil in my living room since were in the process of buying a home and mandi you are AMAZING wish i had the brain you do to think up of some amazing things like you do.
Holy stencil, batman!! That looks awesome, and I bet it took waaaay more patience than most people have! 🙂
Fabulous!! I love the finished project.
xo,
Sherry
Your stenciling looks amazing. My husband and I tried to stencil a small section of our kitchen and it did not turn out well. There was some bleeding and since both of us are perfectionists we couldn’t handle how it looked even after touch ups. We vowed to never stencil again…. I think it looks awesome in your house though!
Rocking! I love it – perfect design. I appreciate the helpful tips on stenciling – I’m planning on stenciling half of my crazy, ginormous living room wall, so this is great!
You stinker!! I am going to re-do my laundry room. And I was SERIOUSLY considering trying out a stencil to do it. Guess what was at the top of my “brainstorm” list? THAT stencil in THAT color. I’m NOT kidding! Freak. I guess I’m a genius. (and now I’ll have to change my mind) It’s okay, that grey one with the circles and stars was pretty high up there too. I’m glad to hear that their stencils work well. Now I’ll probably pick one of theirs for SURE!.
You’re a genius. 🙂
Lara
Love this wall!
how long did it take you to do it? I did a large mirror and it took me HOURS! LOL A stenciler, I am NOT
gail
Holy Wow!
You are pretty freaking amazing. I would have lasted 5 min on this project 🙂
Got it bad
Got it bad
Got it bad…
I’m hot for stencils. I’m feeling the need to fan myself and restraining my vocal “oohs” and “ahs”.
Beautiful. You’ve done it beautifully.
This looks fan freakin tastic! Love it. Maybe i need to brave the stencil world!
AMAZING! Love, Me
http://www.youaretalkingtoomuch.com
So I am looking for someone who sells vinyl silloett . I don’t have one but I want some words made. If anyone knows or you know Mandi please email me!!! [email protected]. Thanks y’all
WOW, so dramatic!
I love stenciling. I stenciled my bedroom wall. = )
Also, I just wanted to know that you are now on my blog roll…I’ve been an avid reader/follower of yours for a while now, and it was time to update the daily reads list. = ) Just wanted to let you know!
Oh my gosh, oh my gosh, I LOVE this!! I am dying to see this room- the stenciling is awesome!!!
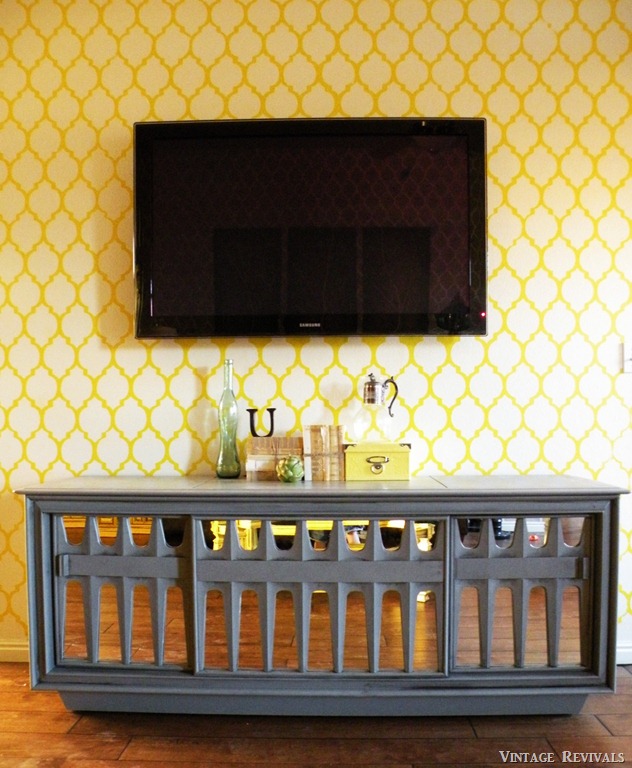
I used your picture of your mirrored stereo cabinet and linked to you in my post today- I wrote about mirrored furniture and I remembered reading about that project on your blog and loving it, so I just had to include it in my post!
https://inside-outdesign.blogspot.com/2011/06/mirror-mirror-on-desk.html
AMAZING! I LOVE LOVE LOVE IT! I’m working on my bedroom right now and after I saw your other stenciled walls I was set on doing it in there and seeing this makes me even more excited to do it! Thanks for sharing all that you do!
Mandi!! Can’t wait for you to reveal your bedroom. Your wall looks awesome. You have amazing taste with color and stencils!
Hey! I LOVE that color! Mind sharing what it is?
And the fact that the wall is awesome goes without saying but I’ll say it anyway – AWESOME!
Jamie
AMAZING! Can’t find any other words to describe the beautiful job of stenciling and what an impact it makes! WOW!
Looks awesome! I’m getting ready to start a stenciling project myself..did you use acrylic paint?
Looks awesome! I’m getting ready to start a stenciling project myself..did you use acrylic paint?
As if your other walls were not inspiration enough- I think I’m finally going to stencil a wall. SO amazing! LOve, love, love.
Love it. I just did my first one of Rockin Roses Damask. I’m waiting for it to dry for a few minutes so I can move the stencil. Can’t wait.
Hi there! Im the new kid on the block and just discovered you, but let me just saw how amazeballs you are! I originally stumbled on your blog during my search for DIY mirrored dresser inspiration, by the way yours is FAB and bonus points for painting it my current color obsession right now! Anyhoo before I knew it I was feasting my eyes on all the loveliness your blog has to offer. Im definitely adding you to my fav blogs list. Ok, so the ACTUAL question I have a bout stenciling is this: Is it possible to stencil on fairly textured walls? I live in Cali and out here, unless your house is older, textured walls are standard. I’ve shyed away from painting stripes and attempting other painting projects because textured walls are a major pain in the neck to deal with. Any advice you could share is much appreciated. Thanks for your time!
That looks so amazing I want to start stencilling all the walls in my house!!!
I love this! I know this is an old post but I was searching for painting concrete floors and I came across your post. Do you think it would work to stencil this pattern on a bedroom floor?