So ya’ll know that sometimes I get these ideas. And these ideas kind of grow until they have a life of their own. And once they grow to that size there is just no stopping them.
Such was the case with the rug in my living room.
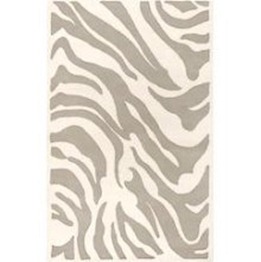
This was my perfect rug. Zebra, Gray, Not to jaggedy, Big stripes, 5×8 and only $600.00 Son-of-a. Good bye perfect rug.
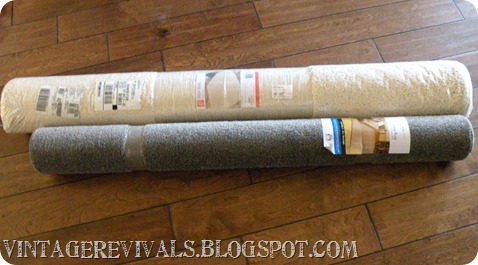
So I decided to make my own. I got 2 rugs. The 5×8 white one is from Home Depot ($77.00) the 4×7 gray one is from Walmart ($19.00) *Note: If you use 2 that are the same size you can technically make 2 rugs.
Oh and you will see my house progressively get messier as the pics go on…nice.
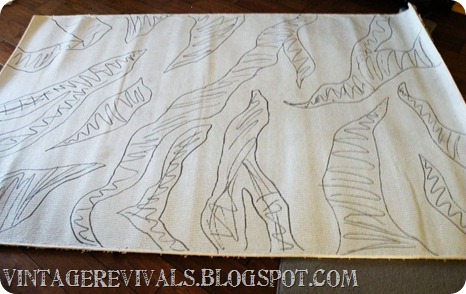
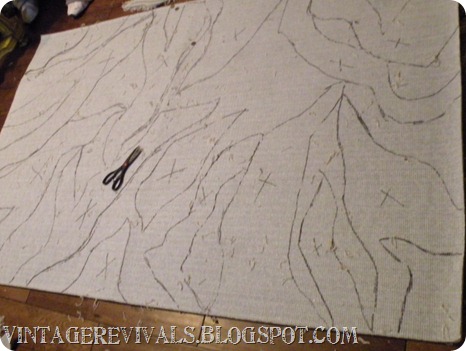
I unrolled the white one face down and drew on the back where I wanted my stripes.
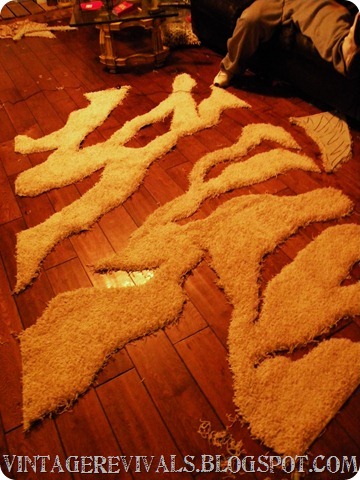
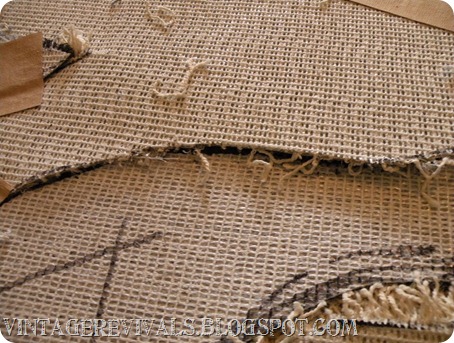
The I used a box cutter with a new blade (it has to be sharp…it makes it SOOOO much easier) and cut out my pieces. I actually did this with the second rug underneath and the razor on the shortest settings so I didn’t ruin my wood floors.
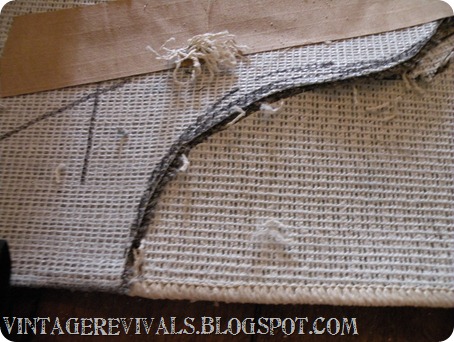
Then I laid my “patterns” on the second rug
And traced them out.
Then using my box cutter I cut them out. This time I did it in my daughters room on her carpet…you know, cause of my floors.
Then you start piecing it together.
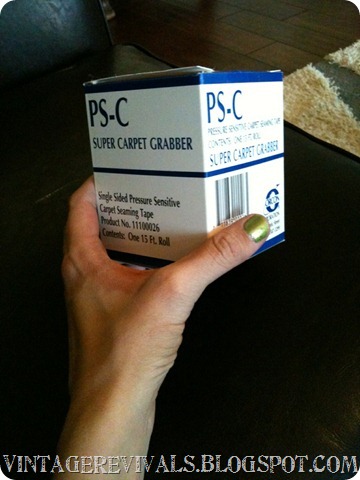
The tape that I used is pressure sensitive seaming tape. If you are using the same pile height of carpet you *may* be able to use normal carpet tape that you melt the glue with a seaming iron BUT I would recommend this so much. It is soooo sticky and lets face it. I am not an exact person so even though my lines weren’t perfect everywhere it still worked. You can only buy it at specialty carpet supply stores, the one I bought mine at in St. George is GS Distributing. The brand is Orcon, it was about $6.00 a box and I used 5.
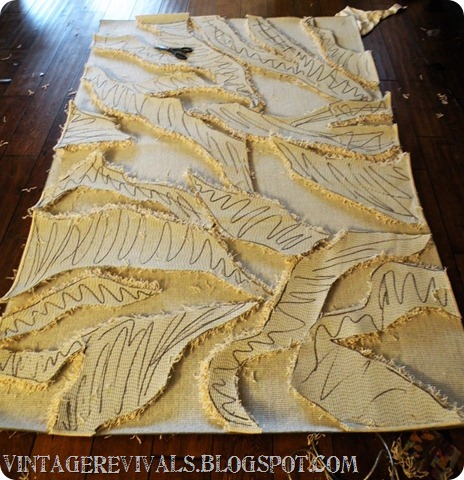
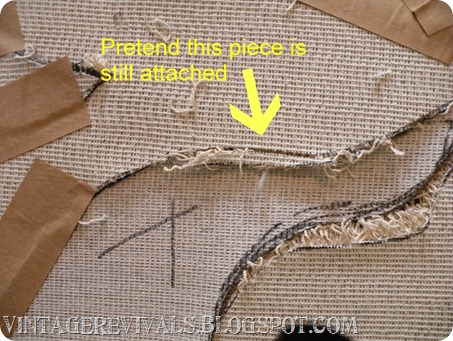
I actually found about 1/2 way through that it was easier to tape it from the back so that is what I am going to show you. That way you can trim where it overlaps. Like the pic below.
Then you tape over it.
I am sure you are wondering about binding it. I just made sure that each of the pieces that touched an edge had binding on them, ( I didn’t cut them out of the middle of the rug) and it lined up pretty great.
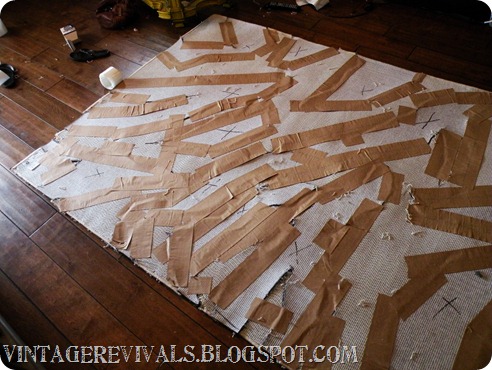
Oh and this is what the back looked like when it was all done:
Not so cute. But no one is going to see that….
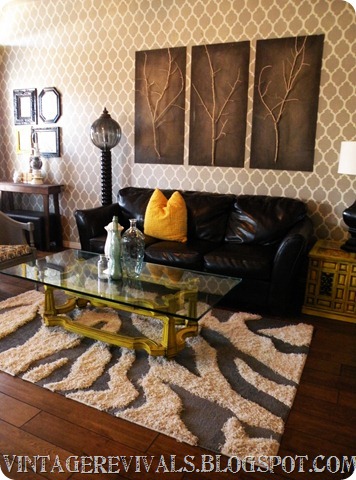
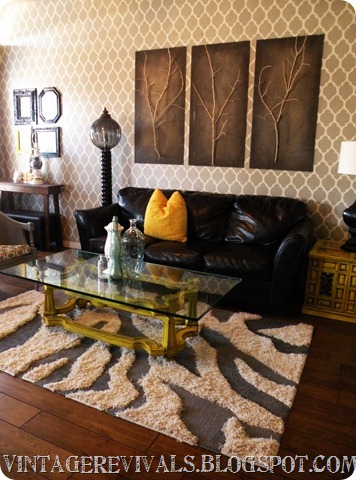
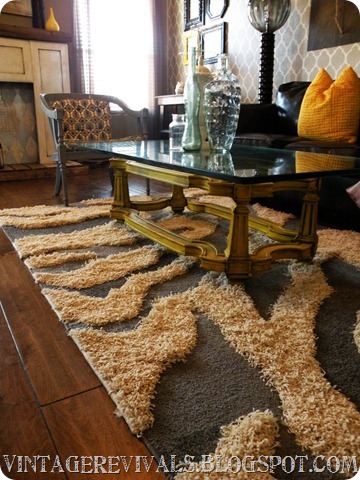
I love it. The total cost was $119.00 and about 4 hours.
Let me know if you have any questions!!
UPDATE 2/19/11
Just to answer a few questions! The finished rug size is 5×8.
If I had 2 rugs that were the same size to begin with then I would have 2 rugs. I couldn’t find the right gray in a 5×8 so that is why I bought a 4×7. BUT if you can find what you want in the same size totally do it! Its like 2 rugs for the price of 1! Or you and a girlfriend could each buy a rug and do them together….
As far as durability, I am sure that there will be some shedding since it isn’t seamed *perfectly* everywhere. But my plan is if it starts to fray really bad, to put a line of hot glue along the edge to seal it. (after I trim all of the threads etc.)
There was also a wonderful suggestion to glue the back of it to a drop cloth. On Monday I am going to find out what the best adhesive to do that would be and I will let you guys know how it goes!





Awesome job! Looks fantastic 🙂
OMG! that is awesome. I was honestly really scared at first, but it looks so good!
Amazing! I have always had a special place in my heart and home for zebra print, really fantastic! I may have to try!
That is incredible!! You amaze me.
Um…..I LOVE your living room. Everything about it!!!! You are seriously talented!
{ OMG! Amazing! LOVE!! }
Makes me want to go out and do it now!
Normally I can think outside the box very well…however would have never thought of this one! 🙂
Great Job!
You are brilliant. Seriously. Holy crap. Brilliant.
Wow – that is so awesome. It looks great. Very creative!!
xoxo
Jen
Wow. Can you stop being so amazing?! (Not really, because I love it) And can you look at how amazing your living room turned out? I LOOOOOOOOVE it!!
No one would have ever known it wasn’t the real thing! It’s super awesome! Love your go get em attitude!
Fantastic is right! That is awesome. Such vision!
Incredible! How inspiring! I really love it 🙂
OH MY GOSH !!!
This is so amazing that I’m in a kind of horrified state of happy shock. This is CRAZY good, I love it!!!!
That’s really awesome! LOVE IT!
what the!??!?! huh? you made that? the room is spinning…i can’t breathe. That is AMAZING! Seriously, I never would have thought of that and even if I did…I don’t think I could pull it off like that! oh and i might copy your wall art…if I do…I’ll let you know!
Awesome! love it.
OMG that is SO FREAKING AWESOME!!!! WAY TO GO!!!
That is awesome — I’m just loving it! Love your creativity!
~Amanda
You are one creative chic! I am loving your rug. Seems like something I would never think of doing, but you made it look so easy. Awesome!
I bow down to your superior awesomeness!!!! That is way beyond WOW!
What a super creative solution – and it looks fantastic! Great job!
Where do you come up with this stuff! That is amazing! Love the rug and that stencil wall.
Lovely!! I wonder if you couldn’t just glue the white fuzzy part on top of the gray rug as a base…
Keep up the great work!
xo,
Margaret
http://www.sugarandspackle.com
You are just amazing. I agree with Kelli, how do you come up with these things. Amazing.
Dear Mandi,
Holy crap.
That is amazing. And also ridiculous. And I love it.
Hugs and Kisses,
Emily
This is AMAZING. I love your living room also. totally jealous.
your house is so freaking fun to look at. amazing rug. i love it.:)
horrified state of happy shock – YUP those are my exact words! Can you come to Boise , Idaho and visit for the weekend – we have alot to do girl and I might need you into next week as well! Let me know right away! OHH and Roy well he is darlin!!! Love you big –
wow!! that looks fab-u-lous!!!
Freaking awesome! So Creative and I love it! Very talented, good job.
Are you FREAKING kidding me?? That looks amazing! I honestly stared at your first picture. For 5 minutes. I was all, “that is NOT her living room! No it ISN’T!”. I am amazed. The rug is amazing. The walls– holy crap. I’m also jealous of your floor.
I . am . in . awe. That is freakin’ amazing.
Props, girl. Props.
Oh my Gosh you are so smart. Lol. This is amazing. Youre whole living room is pretty amazing too.
Nicely done! I like the way you think!
WOW – no questions yet, but love the idea – it seriously looks like that is how you bought it! I was fooled from the get go when I saw the first picture of your zebra rug! Love your living room. It looks amazing!
Mandi, I so want to be like you when I get some motivation & get my creative juices goin’ on!
Amazing! Great job!
Wow! That look fabulous!!
Dude, it looks awesome.
Knuckle bump.
xo
Well done that girl!!!!That really is a wonderful rug! BUT – did you make a second one with the reverse pieces? Cos you could probably sell that to anyone on here and cover your costs (at least!).
And why not glue some canvas or even hessian on the back to make sure it doesn’t shed any more and holds together? You use rubber cement for the glueing.
Again, awesome and amazing.I stumbled upon your blog this week, love it! Hugs from Jasmine Down Under.
AH-MAZING!!! What a great idea, and it looks fabulous!!!
You completely ROCK girlfriend! This project was so ambitious I’m dumbfounded that you totally pulled it off! I LOVE IT! I’m going to share it on my FB page tonight!
You are totally insanely creative and I love it. This is amazing!
You amaze me! I just would like a little peek into your mind! oH, by the way I found the cutest red velvet bench at the St. George DI today. And I thought to myself, “Self, it is a good thing that you found this before Mandi did, cuz I know she would have snatched it up!” Haha! now to recover it. I just need a little inspiration. Hopefully it won’t sit in my garage forever, while I wait for this so called inspiration and the perfect piece of fabric. Wish me luck!
ARE YOU KIDDING ME?!!! I want you to be my best friend, no, my sister!!! What in the world? That is amazing.
hahhahaha, how awesome!!!! I can’t believe you made this. So flipping perfect. You rock….like…so hard 🙂
Great job 🙂
DUUUUUUUUUUUUUUUUDDDDDDDDDDDDEEEEE Dudette? Seriously? Freakin amazing. Nuff said.
Deb
https://dejarenew.blogspot.com
Also, I would like to note that cutting up rugs and taping back together into awesomeness is ballsy as hell and I love it.
that is gorgeous! you are so creative to do that yourself. just amazing!
Whoa, that is super duper cool! I have never even thought of something like this! It turned out great and you did a fantastic job!
Blessings,
Mel
Please feel free to stop by: Trailing After God
All I can say is WOW!!!! This Rug turned out amazing! You are very creative… Perfect color and texture to blend with the rest of the rooms decor.
Sure Fit Slipcovers
UMMM…WOW! I’m so jealous. I have been trying to figure out how to make my own rug for my living room for 6 months now. Never once did the thought of cutting 2 cheaper rugs to make one rug of awesomeness run through my head. I was thinking I would have to weave my own rug! Lol! This is so much better than that! Thanks for sharing your amazing ideas!
knuckle pow!
Tasha
One word: wow.
This is awesome. OK, that’s more than one word… but really, great job!
I consider myself resourceful but girl you take the cake! You are the MacGyver of decorating. Are you too young to know who that is??? It was a tv show on years ago, here’s part of the shows bio…
he is a resourceful agent able to solve complex problems with everyday materials he finds at hand, along with his ever-present duct tape and Swiss Army knife.
Great job!
Wow that looks great! It looks awesome in your living room. Great job.
That’s crazy cool. I don’t know if I’d have the skills and/or patience to make this… but dang, girl. Color me impressed. Have you had any problems with it shedding?
I love seeing original ideas on blogs! That turned out great. Very innovative and creative. Great job.
Wow, this is awesome. Love it!
Fantastic!! This is amazing. It looks so great 🙂
You are my home decor idol. I am always amazed at the things you come up with and how great they always turn out.
This is very, very nice. I like it so much better than the $600 one you wanted. The different piled carpet adds such a luxerious texture.
One question, how does it hold up? Maybe you haven’t had it out long, but in a few months could you mention briefly in another post how it’s doing? Because I love it, and want to make it, but I’m always concerned about long term stability with projects I make. If I am going to work that long on hard on something, I am going to get attached and so I want it a very long time!
This is spectacular! I am so impressed!
That is such a good idea, which is why I’ve never thought of it. Even if I would have thought of it I would have been afraid to try it. Yours turned out great and so cool. I love your blog. You have a really good writing style and your projects are always interesting and fun.
Holy Cow that is AMAZING!!! I never ever would have thought to do that and it just looks incredible. You are a genius!
I’m linking up to this on my FB page!
That is phenomenal!!!
Questions? No, no questions! You are absolutely amazing!!! Amazing! … amazing!
I bow in humble adoration to your freakin’ amazing awesomeness. You are a DIY genius.
ps. Would you please stop stealing my ideas before I have them? I just had a similar idea TODAY before I even saw this post. What the Heck?! Again, I’m not worthy because you are the MISTRESS OF AWESOME!
I second Katie’s question about durability. Because it’s taped together, I would wonder if it would come apart and be in pieces in a few months.
If it holds up – sign me up!
Wow, insanely amazing! Great idea!!!
Holy Shiz! Seriously my mouth fell open when I saw it… by far the coolest project ever. You rock chic!
wow. Seriously? Wow. I’m speechless.
Wow!!! I am so ridiculously impressed!! Thanks for the tute!
Wow! that is quite awesome!
Holy crap Mandster I can’t believe how freakin’ awesome that turned out. I gave you a big thumbs up on SU. That rocks my world!
That is amazingly wonderful.
Amazing…I am speechless! That is the coolest thing ever…it’s beautiful!
That is CRAZY! I never would have thought about making a rug like that! Good job…
This looks amazing but how dose it hold up when you vacuum it? Dose the little ends come up?
awesome. yep, that’s all i can say…awesome.
Really fantastic DIY! I heart a little zebra myself.
Wow- this is incredible! What an awesome idea!
I do have one question- maybe I’m totally missing it, but what was the final size of the rug? I noticed the gray rug was smaller, and the shag was a bigger rug, so how did those manage to connect and piece together? Was the final rug the size of the smaller, gray rug?
Thanks for the help, and I “third” the question about the durability! The rubber glue/canvas idea sounds good, too!
LOVE YOUR IDEAS!!
Phenomenal. So the whole time I thought the first picture was of the $600 rug you wanted, then I got to the end and I was like “WHA WHA WHAT?!” That IS the rug you made. I’m speechless. I only wish I didn’t live 50 miles away from the nearest home depot and walmart.
That project didn’t even seem possible. Wow. I am simply amazed.
Woman! You’re nuts! I love yours even more than that other thing…and the different heights of the piles are what makes it awesome. Love, Love, Love!
Hey Everyone!
I just wanted to answer a few quick questions!
The size of the finished rug is 5×8
As for the durability I just finished it this morning so I hae no cue about the long run durability. The tape is SOOOO strong and sticky that I dont think it will fall apart, however I usualy just vaccuum my rugs and not shake them out.
I will keep everyone updated and if there is a problem let you know!!
Thank you all so much for the sweet comments!
Love your guts
mandi
Now tht’s creative. I would have gave up long before that! Lookin good!
This is absolutely awesome, I luuuv it. Also admired the art pieces on the wall!
great job!!!!!!!!!!! that is the coolest!!
Fabulous!!! This is quite an impressive DIY.
You are brilliant! I am in awe.
~Pam
pamspaintparlor.typepad.com
Idol worship will start now! This is too amazing! how do you keep coming up with this stuff. You will easily gett 200 comments on this baby! Project of the year!!! I am featuring this at somedaycrafts.blogspot.com
One word…BRILLIANT! Love it. Sarah@ NorthwestHospitality
Seriously fabulous!
Awesomeness!! I stumbled it ;o)
happy crafting!
Linda
I am amazed!! Really genius idea and it looks so great!!
xoxo
Karena
Art by Karena
Amazing doesnt even begin to describe this… WOW.
You are AMAZING!!!
Pure Awesome! Never in my wildest dreams would’ve thought to do this!
wow! what an amazing job you did!
OH, i love that rug!! So creative!! My grand daughter loves Zebra, that would make a great b-day gift. You did a great job on it!!
Diana
ok… that is ingenious. rugs are so dang expensive. plus, hello i love yours more!! way to go girlie!
Wish I would have known you were in the market…selling this on KSL classifieds: https://www.ksl.com/index.php?nid=218&ad=14437447&cat=366
Let me know if you know anyone who’d be interested! Yours turned out awesome though!
I think this is awesome. Being a 53 yr.old, I would probably add the canvas on the back for the long haul. However, under a coffee table it will hold up well, I am sure for stability,etc. I think you are super creative and I love it better than the expensive one. The different pile is beautiful and looks so exclusive! I am truly amazed! You go, Girl!! <3, <3 the decor!! JuJu
*also~ You are a fabulous teacher and the pics are amazing at explaining!!JuJu
OMG! I just gotta say that you are a FREAKING genius!!! LOVE that rug, you did an awesome job!
Tania
OMG!! This is absolutely the most amazing thing that I have ever seen. I live in a small town and basically my rug shopping is limited to walmart. I have been wanting a new rug but can not find one I like and I really don’t want to buy one online. Now I know that I can just make my own. Thank you so much for sharing. I’m trowing my first link party Monday. It would be great if you would stop by and add this tutorial. https://diyhshp.blogspot.com/
That was brilliant.
This is ridiculously amazing! How inspiring! Thanks for sharing!
OMG!
You are really crazy;) But in a good way;)
Love your living room, LOVE this idea, it turns out great;)
Thank you for sharing!
Lovely greetings…
https://pudel-design.blogspot.com/
Mandi, you are a freakin genius I swear!
You. are. amazing. Seriously, who thinks of making their own rug? It’s fabulous.
This is awesome. Got my creative juices going this morning!!!!
Another craptastic project girl!
Oh MY!!!! You are amazing! That is soooo awesome!!!! I want one!!!!
I love it!! It looked like a messy job, but so fun! I’ve been looking for a perfect rug in my house! This just might be my ticket! Thanks for sharing on Funky Junk! I’m your newest follower and can’t wait to see what you decide! I hope you have a blessed day!
https://brandlarge.blogspot.com
Please check me out and become a follower!
This is insanely amazing!!!! OMWord!!
that.is.so.awesome. NICE WORK!!!!
are you tired of reading how wonderful you are? if not, let me continue the adulation!! this is the greatest. kudos to you! jkj
FREAKING AMAZING… LIKE blow my mind, no flippen way! I LOVE IT. I hear you on the cost of rugs.. I so want a fab. zebra or damask rug… but the prices are killer. You did a -fab-O-li-O- job! winks- jen
Girl, you are crazy, but this is awesome. Go Mandi!
HOLY FRICKEN COW! You are awesome! I love this. Thank you so much for sharing! I would be honored if you would link up your super cute blog over on my blog stalkin’ page.
https://alaynahoward.blogspot.com/p/blog-stalkin.html
This is one of the most clever projects ever! I wonder how it would go with fake fur….
Thank you for the inspiration, truly.
so clever, so patient. im sooooo impressed!
-dani
ps – great tut too!
How did you even come up with this???? I’m terribly impressed. It looks so, so great :o)
Oh my gosh, I’m 48 and just getting into this crafting thing…. And I must say you and many of the other younger women I’ve been looking into are just plain genius!! I am loving all of it, but this carpet you made takes the cake…. AMAZING!!
your site rocks my world! i’m so glad i found you!
Mandi, just wanted to let you know I featured this awesome rug over at Killing Time
i/…i mean….like….just can’t…..really….awe…..for reals….just…
wow.
This is amazingly creative. Only YOU would think to do this. It turned out great!
Warmly, Michelle
This is AMAZING! I just ran in the other room to show my hubby. I mentioned a while back that I was going to attempt to make my own rug because I refused to spend $800 on the one i wanted. He looked at me like I was on crack! Now I have proof that it can be done! Great job! 🙂
After seeing the first photo and before I read how you did it, I thought it was one cut (white) rug, attached to a whole (uncut) bottom rug. If the bottom rug was woven, mat style, that might work well, though I’d have to look into adhesives for that. What a wonderful idea you have shared–thank you!
Your rug is gorgeous! I love the grey and white too, it makes a statement without being over the top! Amazing work!
HA! Brilliant! Your rug is amazing!
-Rene
WOW! I just discovered your blog when someday Crafts linked it to their site and I am BLOWN away! Even my husband thought it was the coolest thing he’s ever seen on a craft blog. He usually makes fun of little projects on blogs but he got all excited about this rug. Very awesome and I love your style!
okay, okay… I love the rug but I have to know about the big branch art on the wall… tell me they’re an original creation with an easy tutorial found elsewhere on your site??
Holy crap girl! Speechless. You are awesome!
OMG!!! You just freaked my freak! AWESOME!!!
This rug project is palstered all voer blogland you genius, you! Amazing!!!
voer=over 😉
REALLY?! This is amazing! I absolutely love it! You Rock! oh and I’m so stealing the idea 😉
Okay that has got to be one of your coolest projects to date. I mean its beyond killer!
This is awesome! FYI: If your rugs are both the same size, cut them out together (one on top of the other). It takes half the time and your pieces will fit together perfectly! (If you make one piece too wide, for example, it would be relpicated on the other rug, so no “mistake”!)
I love it! We have been searching for a new rug for our living room and to no avail. I’m trying this – this weekend! Have you attempted to vacuum it yet??
That is stunning. Absolutely stunning. I want to make one!
so what’s one more comment when you have a million already, but this is seriously so ridiculously good i had to pat you on the back for this. a mazing!
This is amazing! Very clever and creative, it looks great! I am totally having a rug dilemma and the one that I was leaning toward on overstock is now outtastock.
This is fantastic! It looks amazing and you would never think that it was a DIY project!
great great work!
thewonderforest.com
Not only is this so creative… but it’s gutsy and turned out AWESOME!
I also gotta know: Did you make the wall art behind your sofa? If so… how? Also… is that wallpaper or stencil pattern on your walls? I’m in love!!!
so animal print isn’t even my thing and i love this. you rock my socks.
You have been Featured!! I love this rug so much that I wanted to share your tutorial with my readers. Please stop by and check it out.
https://diyhshp.blogspot.com
WOOOOO WEEE! I almost couldn’t find the end of all the flippin’ comments so I could comment! WHEW…THAT was hard work! AWESOME JOB! SMOOCHES!
This rug is brilliant! The larger stripes really work. Another comment mentioned a local DI – I’ve seen it in other posts but can’t figure out what it stands for! Help.
I was like Wow when I realized you had done it yourself, oh such creativity! I forward this to all my girlfriends, I was so impressed! As the kids say You Rock!!!
wow! thanks for sharing this.. i’m inspired!! 🙂
What an amazingly brilliant idea!
if i were to do this with an 8×10 and a a 5×7 would the difference in size be too great or should i try to find 2 more alike? this is an open question to everyone~!
This is really beautiful and creative!
freeakedy freek freek. This is crazy good.
what a great idea! and it has so much dimension!
You have GOT to be kidding!!! I am dying over the awesome-ness of this. Wow!!! Love it!!
Spectacular and genius. The tape should work fine, I believe it is ‘Flor’ carpeting that sells their carpet tiles to be pieced together and they sell some kind of tape spots to put them together on the back very similar to this. But their rugs can’t hold a candle to the deliciousness of yours.
Great tutorial! We just did this and LOVE it! thank you, thank you, thank you 🙂
And I was going to make a latch hook rug… not any more! I am going to LOVE your blog!
Gayle
Australia
OMGOSH!!!!! Thank you s00000 much for posting this fabulous project! You truly are talented and inspiring! I cannot wait to make a mess doing this rug 🙂 I think I’m gonna convince my sister to do this with me/2 rugs!!!
This would be so great in so many designs/patterns with your idea here; I’m already thinking of ideas for my 1 year old son’s room………. maybe in his name???? He would love that! 🙂
Thanx again for sharing your talent with us!
Ode to a Zebra Rug.
There once was a girl named mandi
Who thought the living room floor looked bland-y
She made a big mess
Got an awesome rug for less
And now I am a really huge fan-zy!
You r amazing!
Thee End
Thank you for sharing
>Free bird 🙂
ok, wow! That is awesome. I’ve been wanting a rug just like that…I could have been your “2 for 1” friend…lol..might just have to try this…THANKS
Bernadette @ agirlandherhome.blogspot.com
I absolutely love this rug :)) Well done :))
heavy duty painter’s canvas should work great as a backer!
AHHHHHH-MAZING! Well done! If only I didn’t have carpeted floors…
WOW What a fabulous idea 🙂 I LOVE IT!
Girl, you nailed it! This rug is awesome. I would love to put this in my living room.
OH MY WORD! Your rug is SOOO Much better than the original from what I can tell!!! ANd your house is freaking amazing!! Thanks for the inspiration! I hope to try a couple of your ideas!!
LOVE ZEBRA, LOVE FLUFFY RUGS, LOVE THAT ITS DIY! I’ve featured you on my post:
https://jelly-bean-dream.blogspot.com/2011/04/aloooooha-friday-wrap-up-i-want-that-in.html
Thanks so much for sharing!
much love
~Jill from ‘Just Dream, Jelly Bean!’
Wow, this is amazing!
Great idea, I never would have thought of this, but it turned out fantastic! I must save it for my files, thanks for sharing.
Ballsy move! I LOVE this!!! Love your blog. I found you when I linked up to the lettered cottage.
xo
Mindy
such a creative idea, and it came out gorgeous, way to go! I wandered over form lettered cottage link party 🙂
It is awesome!!!!!!!! Great job!!!
You totally rocked it! I’m going to feature on the Decor Hacks Facebook page next week! xo
thats great..i made one like that, little different design, but i hand sew it..patty
Gosh, looked like A LOT of work but it turned out so well! I linked this to my rugs post too today, well done!
That is amazing. I am looking for a rug for my dining room but don’t want to drop the $500ish dollars.
Question, totally off the subject. I LOVE your wallpaper. Where did you get it?
THX
okay so i have been following your blog for a while now not on this blog on my personal blog and i keep coming back to this rug im in love I’m thinking of doing one for myself but i need to ask you how did it hold up if you could email me back that would be perfect [email protected]
thanks,
Mandi
So my sister and I tackled this project yesterday. We finished one fantastic rug and have the extra pieces for a second one. We used leftover carpet my sister pulled from her bedroom remodeling job and a super cheap indoor/outdoor rug from Menards. The total cost for the whole project was around $40! Love, love, love it! Thanks so much for the idea!
WOW! Absolutely LOVE your rug!!!
Great idea, how do you think of these things? Love this rug, good for you. I just had an idea, brown circle-ish areas would maybe look like cow-hide…maybe…
…I am Blue Wolf…
I knew you were a girl! I wrote about you, here, you have mind blowing ingenuity!
Love the rug!!! Amazing! Would you mind letting me know how the rug is holding up?
HOLY WOW!!!!!!!
LOVE IT! Amazing job!
LOVE.THIS!!! I want to know if you made the three pictures/limbs on the wall. They almost look like tumbleweeds?
This rug looks amazing, I wonder how is it holding up over the months?
OMG– my husband is going to pee his pants when he comes home to find me cutting rugs up someday (in the very near future, thanks to you!). This is an AWESOME idea! We’ve been without a rug in our living room for the last year since the one I’ve been lusting over is over $400.
hey, just wondering why you have to have the same pile of rug to use carpet tape? Could you use carpet tape and just use an old cloths iron to melt the pieces of carpet together for more durability?
WOW! That is freaktastic! I am so going to try this!
I really want to try this. However, I have a toddler and an infant in addition to tons of company. I’m a little nervous about how the edges would hold up to that much traffic. Thoughts?
I found this tutorial through pintrest, and I’m totally blown away. I even put the link up on my husband’s FB. I’ve been eyeing a rug with a river rock type design for quite some time. Problem is, I need one to cover a large area & boy! The price rose dramatically from one size to another. It has different textures & piles just like your zebra rug. After reading yours I’m ready to tackle this project of my own. I can’t wait! Thanks so much for this tutorial. Wish me luck! I’ve put this off for so long! I’m so excited!
WOW! Amazing for sure!
Truly amazing project and now I may have the courage to make my own version of your two pile rug!
So clever and so cool!!!!!!
I might adhere one of the cheapie rug pads under it so that it wouldn’t slip around. Or possibly use a old hunk of kitchen vinyl flooring and glue the rug to it. You’d get a little cushion from the flooring and some stability for the rug long term.
Nancy
You. Are. My. Hero.
Seriously that is awesome and I so appreciate that you are not an “exact” person 🙂 me either
you are so creative!!! awesome tutorial and diy!
jen
http://www.fauxtreschic.blogspot.com
Ooo, this is UHHHmazing!!! I love it so much! I too have been searching for the perfect zebra rug that doesn’t cost a zillion dollars.
I have a cheater idea…what if you took the same white 5′ x 7′ rug…and figured out your desired pattern…and just cut the shag down? If the pile was long enough, wouldn’t it just make the cut part a shorter shag? Then you could dye / paint the shorter sections??
Do you have any experience with dying rugs?
Maybe this is a crazy idea…but it might just work….
Hmmm….
LOVE your blog!
besos, Jasmine
Ummm… you are AHHHMAZZIng! nice job— thanks for the inspiration!!!!
Oh, my freaking word!!!!! This is insanely awesome!!!!!!!!!!!!
Wow, i´ve been the first time here and it is really amazing!Love to have a carpet like this!
Love it !!
Love, love, love it !!!
I just started reading your blog a few months ago and today was just clicking around archives to see what I missed before I started reading regularly. Holy goodness gracious this is an amazing DOABLE idea! I haven’t been able to find a rug anywhere near my price range and this could completely work, thank you 🙂
just found this on pinterest! im in love with this. im going to attempt to do this in leopard print but was wondering would it be possible, (in your case) to have just attached all the white pieces to the entire gray instead of cutting both.
This is one of the most creative DIYs I’ve seen in a while. I never would have thought it would work. It turned out great–congrats!
How does this clever work of art hold up to vacuuming? Excellent idea – rock on!
Love this, but I’m lost after you trace the second rug. Why did you need to cut it? Aren’t the white pieces laying on top of the 2nd (grey rug)? Forgive me, but I’m confused at that point.
Thanks
Actually, I think I now get it. Both become pieces that you need to patch together to make one rug. I think what threw me is it looks like one is glued on top due to the height and/or texture of the two rugs.
Brilliant work! 🙂
you make it look so simple – I might even try to make one myself.
Holy. Crap. I would have been terrified to do this. I still am.
Um, it’s actually two rugs for the price of… two rugs. Not one. LOL.
I used to make wall hangings that way in the 70’s (I’m old, lol) and was trying to remember how it was done. I believe I used burlap backing.
I used to make wall hangings that way in the 70’s (I’m old, lol) and was trying to remember how it was done. I believe I used burlap backing.
I like it better than your “perfect” rug!!
Oh! The carpet in the first picture is amazing!!!! We love carpets haha
I love it so much I can hardly stand it!!! I just have one suggestion, instead of cutting two rugs why not use a flat woven rug & glue the cut outs on top of it? Way less work & you wouldn’t need a drop cloth as another diy-er had suggested. It looks amazing either way.
HELLO my Hero!! LOVE IT! Wanted to see how it has held up?! This is amazing!!