*If you are visiting from the DIY club please feel free to hang out! There are some of my favorite projects on the left sidebar for your viewing pleasure!*
Ok heart to heart time. You guys know that I am totally honest with you right? You also know that you as my readers are my #1 priority, more than free product, or sponsors, or money and I would never intentionally lead you astray.
I have been talking for a month or so about stenciling my living room. I wish I could tell you that it was a cake walk like so many other bloggers do but, it wasn’t. It was hard and frustrating and really time consuming. If you follow me on Twitter you know that I about gave up. (and if you don’t follow me you should!!!)
But.
I didn’t and I am so glad. I love the way that my living room turned out, it is FAR from perfect but not really noticeable to anyone buy myself. Also I contacted the company and they said that they were making some video tutorials so that will be awesome. This is the technique that I developed, its not exactly what the company says but I just wanted to pass on what I learned.
So now that that all of the talking is out of the way on to the tutorial!
This is what I started out with. The infamous {Seizure Wall} I still loved it. But it was really limiting the design in my living room so I had to say bye.
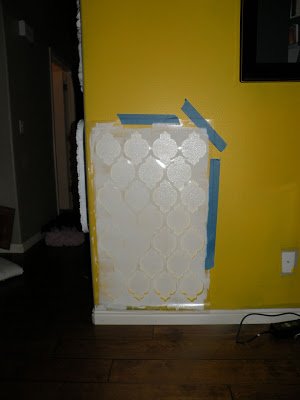
The best way that I found to tape it on is a piece at the top and a piece on the side. If you tape all 4 edges (which I tried) there is NO WAY to get it to even sort of line up, it just makes it more complicated.
You want to use a dense foam roller (the small white ones) Roll off all of the excess paint, and beginning at the top roll straight down. Then move to the next row and roll down again etc. If you roll sideways it bleeds easier.
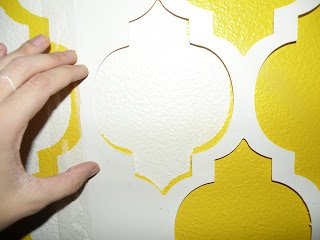
When you have finished the full stencil carefully peel it off and wait about 10 minutes until it dries to the touch.
Then move it up or to the side. You will use the previous row as a marker and line it up.
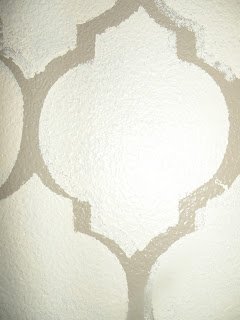
DO NOT repaint over your markers!!! They pretty much will not line up perfectly. Even when you try your hardest, so just know that going in and get over it. See these gaps?
JUST LEAVE THEM ALONE!! You will not be able to tell once they are painted.
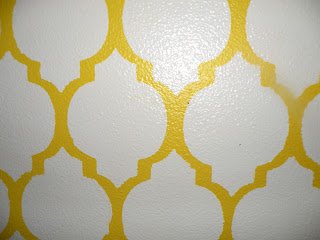
Can you tell were the gap was? Ya me neither.
BUT if you must see the results of painting over your markers let me show you what happens. Warning this is NOT pretty.
So dont do that mmmkay?
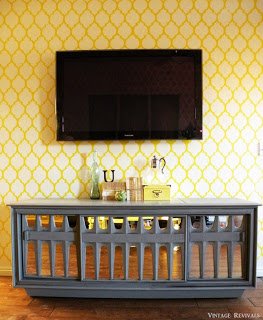
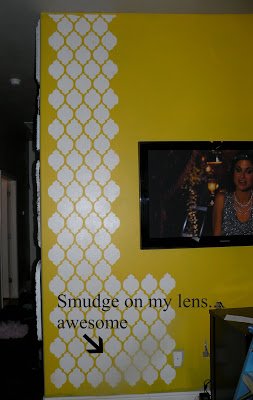
Just keep going and eventually you will end up with this
I am waiting to show you the other wall, but you can kind of see a reflection in the tv if you want a clue.
Love you guys!


I just discovered your blog and I love it! I am scared of stencils, I’ve never gotten them to work out for me, but I’m paint challenged. I love that brand of stencils though! You also may have given me your DI addiction!
Love it!! Great job! It turned out great! I loved your old seizure wall…but LOVE this new one! Love the color!
I’m doing this same type of project right now on my kitchen door. Yours looks great!
i love it! thank you for sharing. i might be brave enough to take on stencils one day
yeah, my stencil bled a little, but it’s so high up you can’t tell – I’m not sure I’m good enough to stencil at eye-level!
https://craftedition.blogspot.com/2010/08/wall-stencils.html
TOTALLY LOVE IT. Yellow is so cheery and happy too. GREAT JOB! jen
Wow! I can understand wanting to give up….lots of work. Glad you didn’t. It turned out great!
I like it better than having a seizure!!! Looks so nice with Vicky!
Love the color and stencil design
you did a great job! I am very much “stencil challenged”.
looks fab!
gail
Seriously, I can’t wait to see your finished living room! and bless you for having the patience to do all that stenciling! Amazing job as always 🙂
I LOVE IT! It looks just fabulous! I would love to come for a visit and take a tour of all of your rooms! I love what you have done! 🙂
Yay!!! I’ve been looking forward to your tutorial!! I am in the middle of re-doing my bedroom and want to try this out. THANK YOU so much for your tips and advice!!!!
What patience….love the wall too.
cheryl
http://www.paintedstudio.blogspot.com
So cute! And Bight and Happy. LOVE IT! I have actually been considering stenciling in my family room. I just can’t decide where I want to do it.
hate it.
absolutely.
it sucks
not
i love it more than my first born.
Girl you are a-mayzing for attempting that stencil. I think it looks lovely. And I can tell you right now that I would mess something like that up like it is no one’s biz-ness. Man I need a tour of your house.
I said it once and I will say it again! You are one patient determined girl, but boy it sure pays off!
I followed your tutorial on my bedroom last year when your did you previous wall… I want to show you a picture of it. do you have a flickr or something I can post to?
oh and SUPER fantastic job on the new pattern! I love it 🙂 and the colors are awesome!
It turned out so awesome! I think that pattern is so classy. The tutorial is going to be handy!
I am new to your blog! This is so amazing! Thanks for sharing!
Oh wow…. I want to try… I’m scared, but I’m going to try!
I love reading your blog I gave you an award over at my blog thejamesjunk.blogspot.com !
Goodness gracious lady! that turned out awesome!!!!! I especially LOVE what you did with the console, it looks amazing!
Pretty much in love with this wall!!!!! I never would have picked yellow….I’m too…well…yellow belly??? HA Okay I’m dumb….anyway….but the yellow is FABBBBB!!! I need to do some stenciling on my walls…hmmm….now where to start?!?!?! Thanks for the inspiration!
Turned out great when all was said and done, Mandi! Love the color.
I LOVE your new wall! in fact I’m thinking of stealing the idea and doing one wall in my dining room!! after your yellow did you just use white to do the stencil? I’m worried that it might be too crazy for my room.
Teach me your ways!! I totally L-O-V-E it! SOOOOOO MUCH! Did you make your own stencil or did you buy it? I wanna do this such a fab idea.
That called something creative. I like your ideas. I will try to sealed my bedroom with such a stickers.
girl you rock! I dont think I have the patience to do that..at all. I love watching your blog evolve. You have a crazy amount of followers now! Woohoo! Im actually going to shoot you a quick email here too..!Again, great work!
<3,
Adri
http://www.dreambookdesign.com
Mandi! I’m new to your blog, and I ADORE this wall. I need to know exactly what paint colors you used. Pretty please. I’ve been eyeing this exact stencil for a while now. Am I insane to think I could do a wall in balck and white? That is black lines, and white centers. Ugh, I’d have to paint the whole wall (walls, actually-was thinking of doing my tiny bathroom) black and then stencil over in some pretty seriously opaque white? Is this nuts? Any advice is appreciated! THanks! 🙂
[email protected]
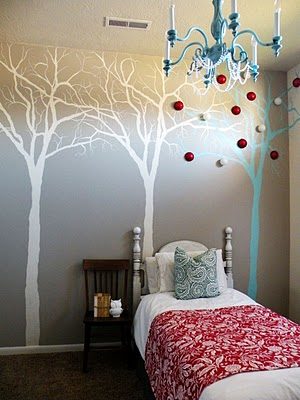
Hello. I saw you on the Nate Show and decided to check out your website. I loved your gray/white stenciled wall. Very cool. Can you tell what color gray and white you used? It looks like a pretty true gray and that’s difficult to find. Also, did you use satin, semi or gloss on the stencil wall. Any feedback would be greatly appreciated. Thanks Erin [email protected]
This is from a stencil-er from ‘way back!
Try stenciling the inside of your window screens, being careful not to fill the holes. In other words, dry stencil….getting most of the paint off on a paper towel. Put the screen up and wait for the magic when it turns evening.
im still shocked that your are so patience to do your whole wall like this i wish i have that patience…..
it looks beautiful love the color
I just discovered your blog tonite. Please forgive me if I tell you that I am coveting your house and am making plans to steal as many of your amazeball ideas as possible. Your house = my dream come true.