I hope that everybody had a chance to go and check out the Crafting With The Stars entries this round. They were in a word INSANE! Every.single.one of them. This was my entry:
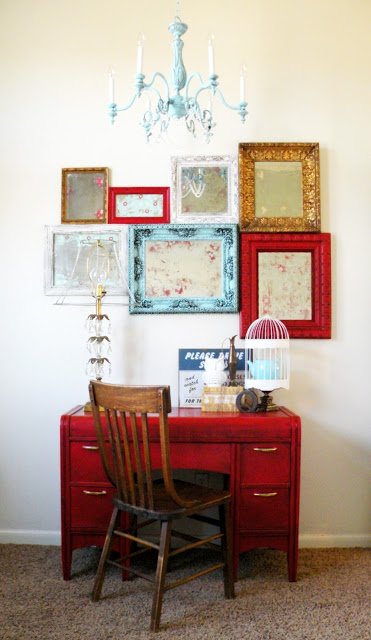
This is a little desk area in my 7 year old daughters room. I found the desk at the DI for $5.00. I peed a little when they told me that’s how much it was……cause I was so excited!
It needed a TON of work though.
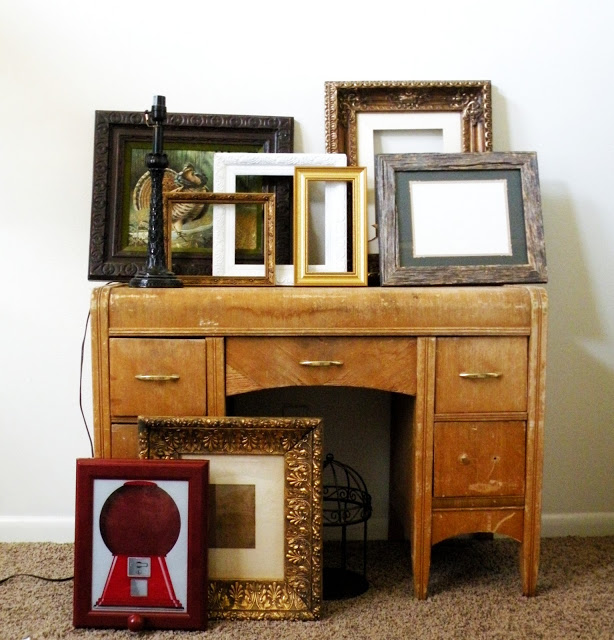
There were HUGE gouges in the top and the veneer was peeling off of the drawers. But I thought she was Beautiful!!
Kind of sick right?
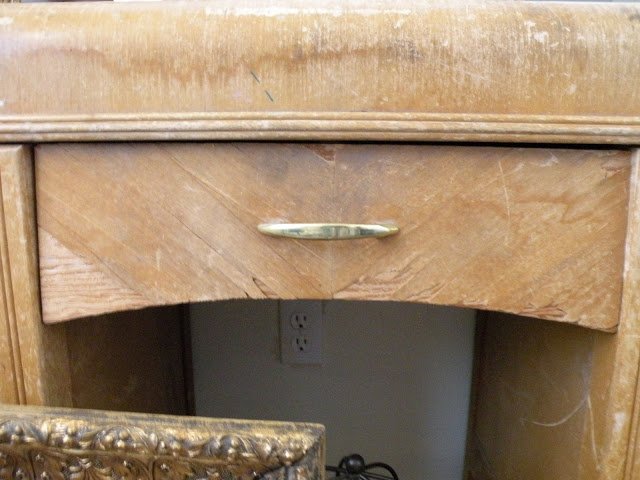
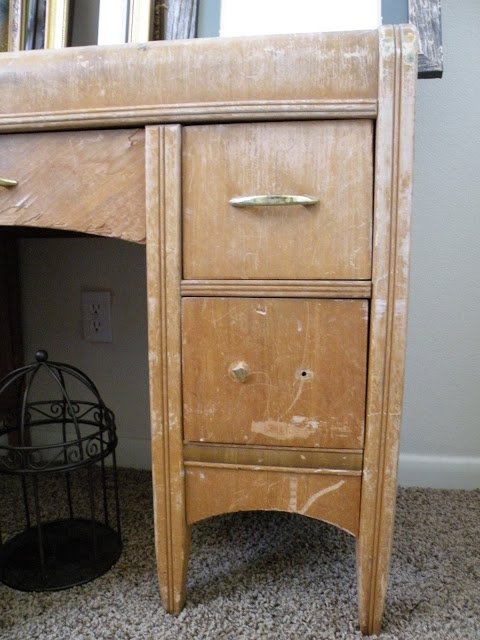
I started by peeling off the veneer on the places where is was chipping (the arch at the bottom of the drawers and the middle drawer) Then I used drywall putty and covered the entire spot. Once that was dry I lightly sanded the entire desk down.
And then I sanded the top more heavily with an electric sander to remove some of the scratches. (don’t forget to leave some character ladies!)

Once all of the sanding was finished I wiped it down with a wet rag and primed it with Kilz Spray Primer. (It took 1 and 1/4 cans) Then I went to bed. (which is why there are no pics)

The color I used is my favorite red ever. Its Krylon Banner Red. It has more of a orange undertone than pink. The best advice that I can give regarding spray paint is make sure (especially on the first coat) that its light. There is no way that you should even attempt to cover everything in one or 2 coats, you will just get a drippy mess.
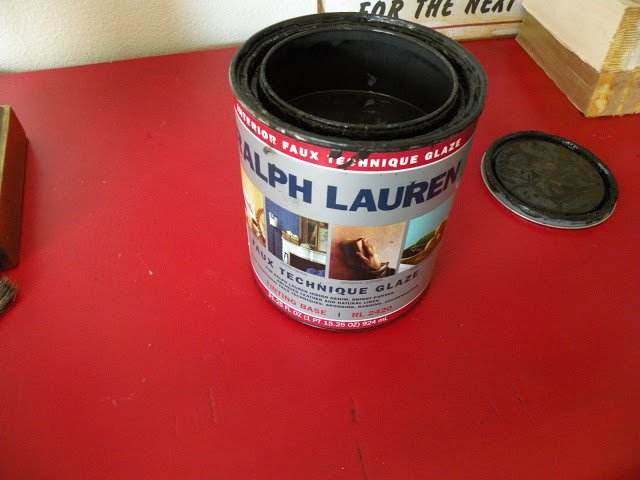
Next comes the LOVE of my life (besides my hubs) Ralph Lauren Faux Glaze in Black Silk. You can see my glazing technique {here}and {here}
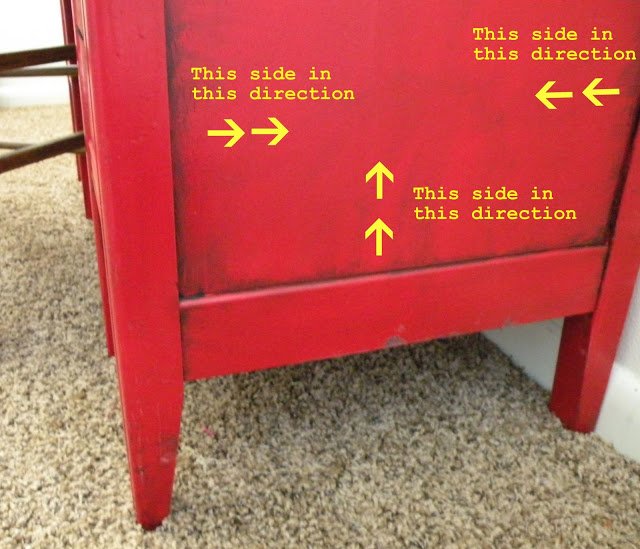
Glazing is really easy to do on heavily carved pieces, because there are lots of nooks and crannies to stick to. A piece like this desk is a little harder because its almost 100% flat. So I am going to show you my technique to glaze a flat surface.
Get your gear! I use an old t shirt with 1/2 of it wet. My glaze and one of the $.99 crappy brushes from Home Depot.

Start by putting the glaze in whatever crack you do have.
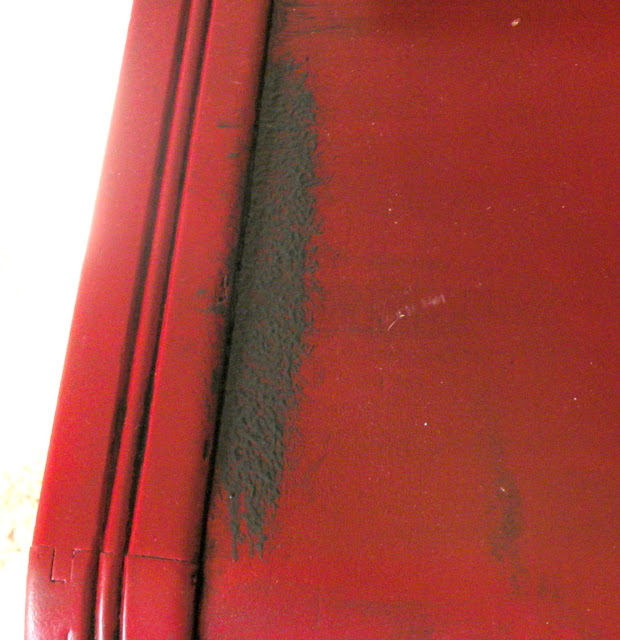

It will leave glaze in your minute crevice. Here is another example:
For the drawers I spread a small amount of glaze on the whole surface (concentrating on places that had cracks and dings.) Then I really lightly wipe it off. (picture the way the the 4th grade lunchroom workers would wipe a table off)
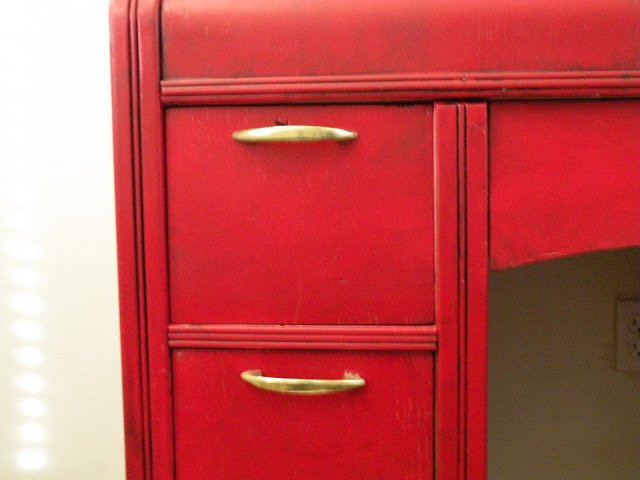
I loved the tarnished brass handles but the drawers needed a little updating so I moved them from the middle of the drawer to the top. Its a simple change but I think made a huge difference!
And there you go!
I knew this was yours.
For the record…
I voted for it.
I love this. I voted for it.
I’ve wondered how to do that glazing technique. The desk looks amazing!
You have been hard at work! I love the desk AND the mirrors. Gorgeous.
I knew you’d make it, and #2! You rock! Go you featured this morning 🙂 https://homeandgarden.craftgossip.com/desk-redo-and-acid-mirrors/
Gorgeous!!
yay! i am so glad to see that i voted fro your project!!!! i was hoping it was yours, but i just loved all the colors and vintage vibe!
you are flat-out AWESOME!
I love it!
Hi,
First off, I LOVE your blog!! We just moved into our first little house but are on a tight budget. I was so frustrated after trying to shop for some decor b/c 1. everything is expensive and 2.Everything all looks the same to me…boring! So when I found your blog it was so exciting to find some unique ways to decorate. Keep it up!! 🙂
I do have a question though. Do you know about how many cans of spray paint it took to paint the desk? I have never used spraypaint on furniture before so I have no idea how many to buy. I’m doing a dresser about the same size as the desk. Thanks!
[email protected]
I love the glazing extra tips….I needed that…congrats!
I totally DI-ed a bubble gum frame like the one in your picture! Nope, never even considered using it for something else!
I told you that you would get to the next round! Oh are you maybe doing some baby car seat covers for twins for your next round?
Good job Mandi, keep it up!
I’ve seen a lot of red furniture redos lately. Makes me want to try red. Thanks for the detailed info on how you did the glazing. This will come in handy for the project I’m working on now.
Gorgeous!
I have a desk I would LOVE to do this technique with, but I was wondering how well it would hold up to daily use, because it is our computer desk with a human being (almost) constantly sitting there with an occasional glass of tea. Is there some kind of sealer/protective coating you would recommend?
I know this isn’t the most complicated or detailed thing you’ve redone, but it is by far, my absolute FAVOURITE!!
This desk is fabulous. The color amazing and the glaze the perfect finishing touch! I just picked up a freebie desk and it is a MESS! Now I see hope!
This looks fantastic! Thanks for sharing the technique, I have some benches to work on.
You rock. That desk turned out amazing. Thanks for the great tips on glazing, too. (Oh, and the mirrors totally rock, too.)
oh lordy lordy…can I please share your photos of this on my blog? those frames and mirrors are so wonderful.
[email protected]
This desk is gorgeous! How do you glaze the top of the desk? Do you cover it all with glaze and wipe, or just pull the glaze from the corners? Thanks! 🙂
Kim
It turned out great! Love the color and the glaze. Love the mirrors too!
Your glazing techniques are spot on and I love your individual style. You are definitely a thrift store diva. 🙂
Saw this on Miss Mustard Seed and now I’m going to follow you! What a cool desk…red is one of my favorites.
I love the desk and I’m super jealous about the price. My DI never has that great of deals. Thanks for the info on glazing too. I’ll have to get some RL glaze now and try it out. Sounds like it will work better than some of the other glazing techniques I’ve been playing with.
Best wishes
April from HomeHinges.com
This is such a charming look. Great work. And thanks so much for posting tips on glazing a flat surface!
I love the frames!!!
What a great idea!! What great colors!
Saw you on Mustard Seed!
Stunning!
Mandy, you are my new hero. Period.
Totally in love with that desk and your blog!
Beautiful, stunning. You’re fearless! I love the results. Thank you SO much for sharing your awesome ideas and creative genius! 🙂
Roeshel
I clicked over from All Things Thrifty. I had to comment on her page because I’ve had some success with flat projects, too. And with straight paint via dry brushing. Anyway, I remember this from Crafting With the Stars. I bought that exact desk from the D.I. ten years ago while in high school (also for 5 bucks) and the veneer was coming to pieces and I scraped it all off and then just painted with a mistint I had then took it to college. My project was very, very, very, much less successful than yours. So when I saw it, “I thought THAT is what I should have done… I knew I wasn’t crazy for buying it!” I got crap all the time from my family for the things I’d bring home from the D.I. Anyway, glad to have found you! Into the reader you go!
That is just beautiful! 🙂 I love the new color of it and it just doesn’t look like an old desk anymore. Awesome! Thanks for sharing.
Adin B
i watched your tv spot with the mirrors. they turned out great and you turned me into a follower.
lauren
Hi ! I went to some flea markets today. Got some really cute, cheap mirrors and picture frames to paint. Then I went to the Home Depot in the town that is 20 miles away. I was looking for the Ralph Lauren Faux Glaze. They informed me that they are the ONLY Home Depot that doesn’t carry Ralph Lauren!! I just love living in po dunk, Arkansas. :/ BUT, they mixed some Behr faux glaze and tinted it to match the Black Silk. Can’t wait to try it out tomorrow!!! I’m gonna take before and afters. Love your Blog! Marilynn
Just found your blog, awesome projects! The desk turned out amazing!
I just heard that Home Depot is discontinuing Ralph Lauren. Gasp! Does that mean you cannot get the glaze anymore either? But I don’t have any yet! What is DI?
I tried hanging some pics of my kids together so all the frames where touching…talk about a nightmare!! Do you have a trick? I noticed all your framed mirrors are touching and I am in love with it…but how in the heck did you do it!!!???
What is the name of the teal paint you use? I love!
hi there, i’m new to your blog.
just wanted to say that i love the red desk. i’ve never used kilz in spray form before, but now i’ll have to try 🙂
also, your gallery wall of coloured frames is nothing short of amazing.
Absolutely love this (just pinned it!)…can’t wait to peruse your site further 🙂
Very cool, I loved all the glazing Brooke does at All Things Thrifty and I saw your comment on how to glaze flat furniture, which is perfect for me since I don’t seem to have a detailed piece of furniture in my home!
that desk is awesome sauce!!! I see a red vanity in my future. The glazing gives it so much more character.