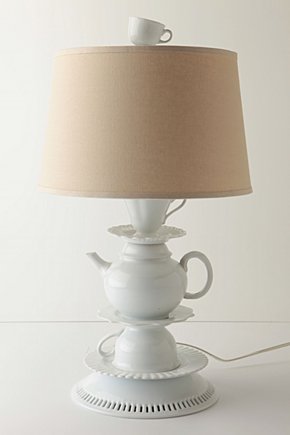
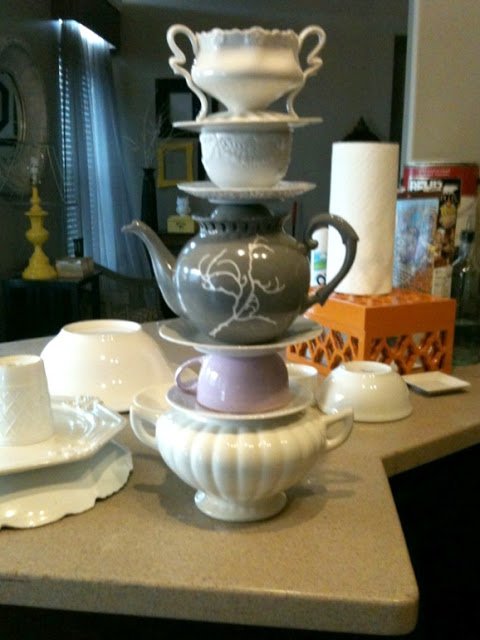
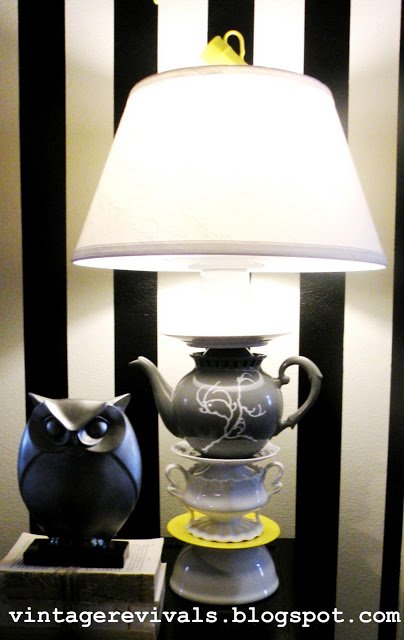
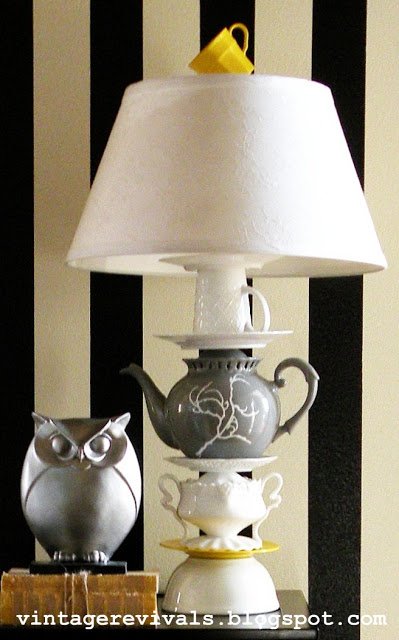
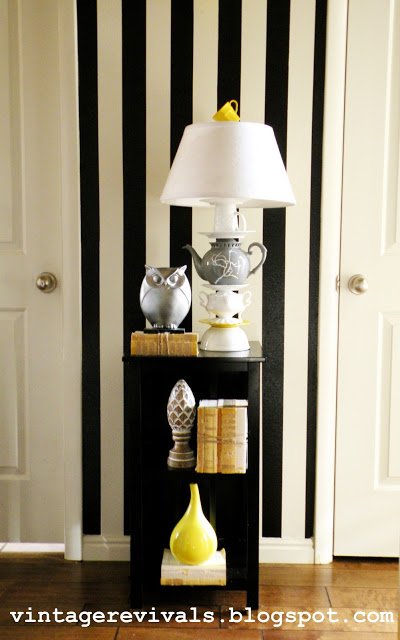
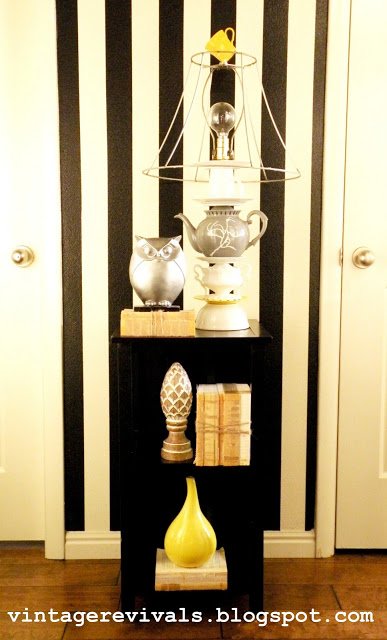
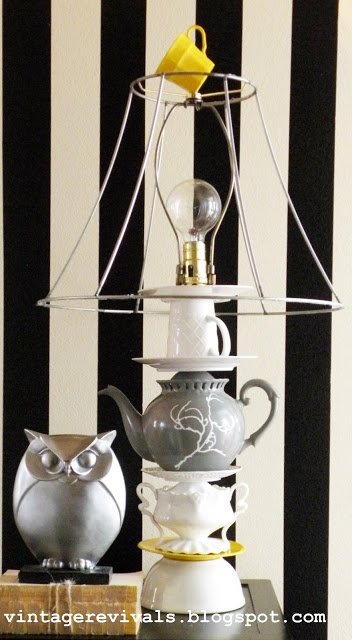
So for Crafting With The Stars this week I knew I was going to have to make my own Anthro Lamp. I love this “One Lump or Two” fellow. The teacups and teapot are so whimsical and totally my style! My knockoff turned out WAY better than the original. So heres how to do it yourself!Ok people, when I saw this lamp a few months back on Anthropologie I knew I was going to have to bust it out.
Apparently, I needed a special occasion. Enter “Crafting With The Stars”.
The Anthro version retails for $198.00, the grand total for mine? $31.99 and most of that was for the drill bit.
Any knick knack that you have will work, you can have a crazy awesome lamp for FREE. It’s genius I tell you….. GENIUS!! Muah haha ha ha (lightning bolts crashing and me with crazy hair, cause you know that I haven’t changed my ponytail for 2 days.)
OK so how many of you knew that this project from “Crafting With The Stars” was mine?

Do you love it? Do you want to make your own completely interchangeable lamp? Well good cause I am going to teach you!

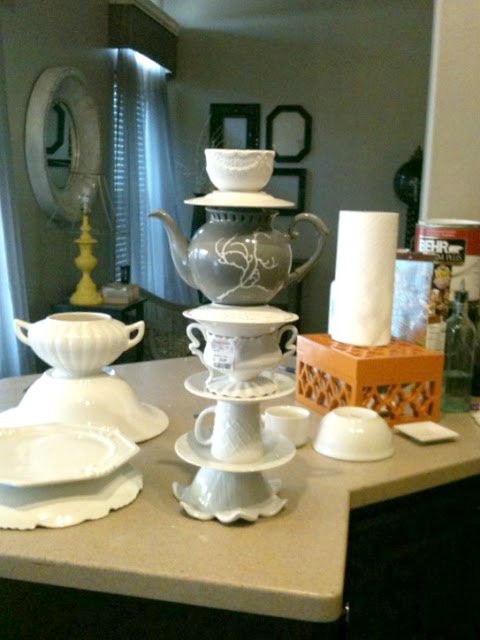
So you need to start by rounding up a bunch of dishes, knick knacks, basically random stuff that YOU LOVE! This is a lamp that you are designing, so make it yours!
FIGURING OUT YOUR LAYOUT
I tried about 87 thousand ways before I knew exactly how I wanted my lamp layout to be. Here are some that didn’t fly:
Once you get it figured its time to start drilling!
DRILLING YOUR JUNK
The type of drill bit that you need is one like this:
I got mine at Homie D’s for $18.00 (EXPENSIVE! I almost slapped the guy when he suggested it…..but so worth it) Mine is only the 1/2″ bit.
DO NOT BUY ONE LIKE THIS: This is what I originally bought but it wore out after 1 plate.
SO SO SO IMPORTANT!
You MUST use water to keep your drill bit cool while you are drilling. Otherwise it will ruin your bit. For instance I put as much water as the underside of each dish would hold. You can also pour it on as you are drilling if it is on a surface that wont hold any water.
Also, don’t put a ton of pressure on the item that you are drilling, let the drill just grind through it. If you put too much pressure when it goes through the other side you most likely will break something….:(
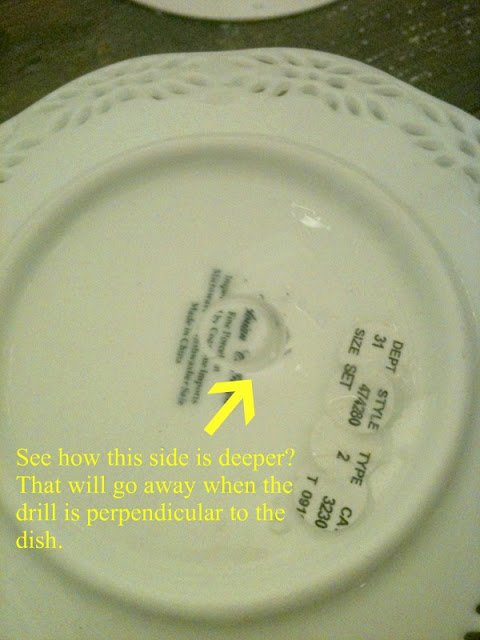
Start with your drill bit as parallel as possible to your surface:
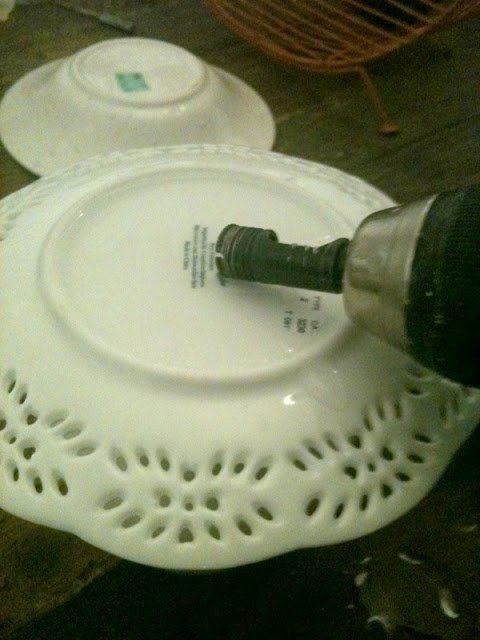
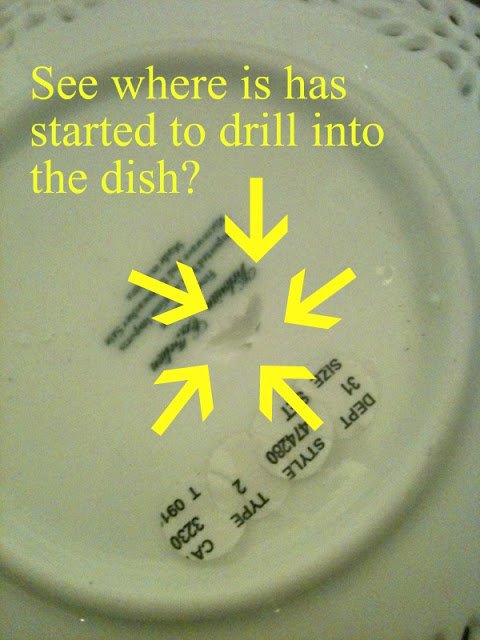
Slowly start drilling while firmly holding the drill in place (cause its going to start to dance like Derek Hough) Once it gets through the hardened glaze it will not move and you can drill at full speed.) It will start to look like this:
Keep drilling and SLOWLY while you are drilling move your drill into a perpendicular position with your surface (the way you would drill into anything normally)
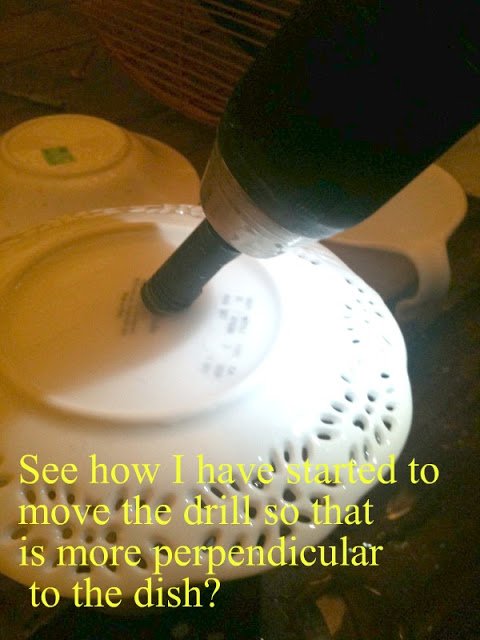
At this point your hole should look like this:
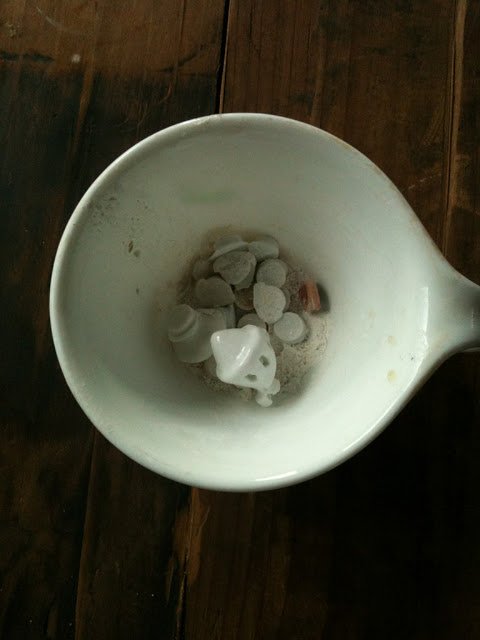
Just keep drilling and move your drill into a normal drilling position. You can kind of start to feel when its getting close to breaking through the other side, it will catch a little and BAM your through. So that I didn’t damage the surface that I was drilling on I used a teacup underneath to catch all of the water, and the core that you are drilling out. Also it protects your surface:
And this is where you will end up:

Also you may have notices in the teacup of remains larger bits of cuteness. When you are drilling through the tops of lids (mine were on my Teapot and Sugar Bowl) make sure that you drill from the underside and it will just take most if not all of the handle. If not I bet you could just “sand” it on your concrete or something.
REVAMPING
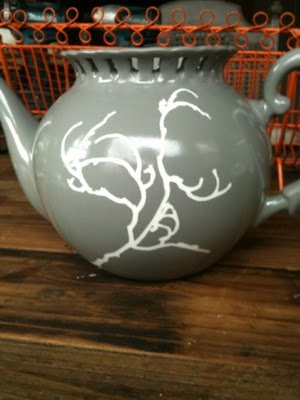
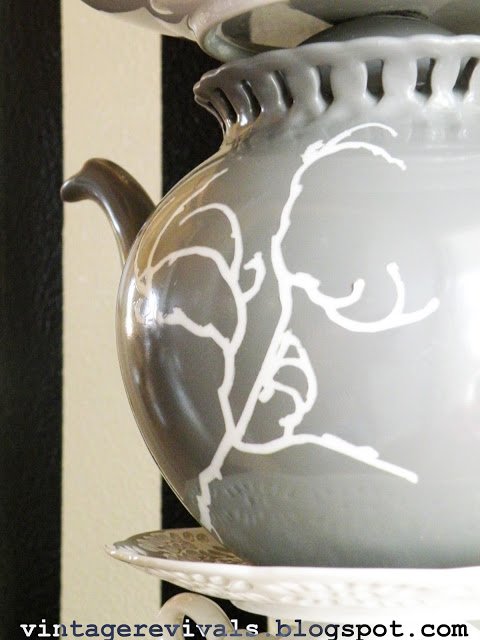
Sometimes whilst thrifting you find something that has major potential but needs a little love. This is what I did:
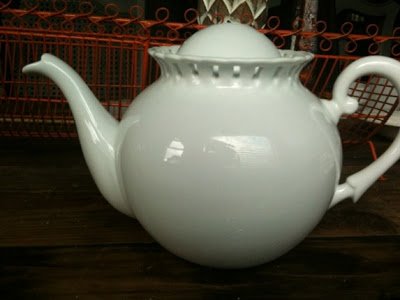
I found this Teapot at TJ Maxx for $9.99, Its not bad at all but it needed a little Vintage Revivals Jazz.
I used this vinyl tree branch:
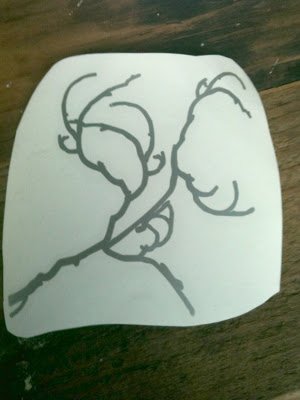
And stuck it on my Teapot. Its not perfect but as long as the edges were sealed I wasn’t too concerned.
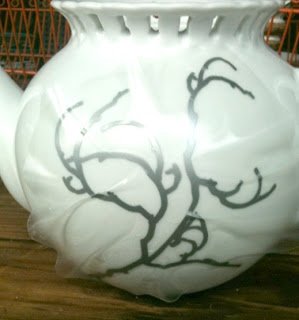
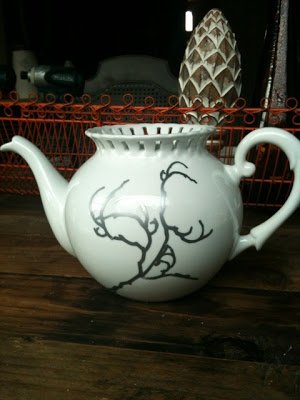
I think that its kind of cute just like that. Then I took it outside and sprayed it with Krylon Classic Gray. Then I took a razor blade and carefully traced it along all of the edges. You have to be super careful while you are peeling it off because paint will come off ceramic pretty easily. I found also that if you start at the tips and peel toward the center it works much more smoothly….
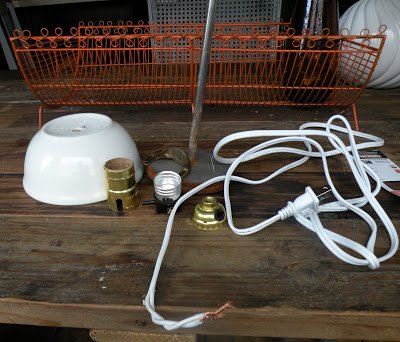
Originally I was going to Gorilla Glue everything together but as I was disassembling a lamp that I just put a new lamp kit on I decided to use its innards.
ASSEMBLING YOUR LAMP
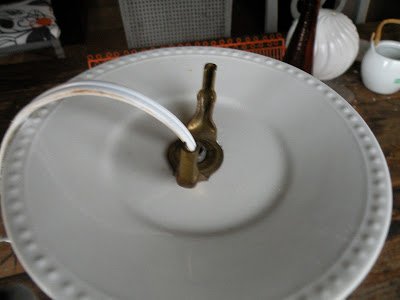
You will need a lamp kit (about $5.99 @ Wally’s)
A threaded rod which can be found at Home Depot, and some washers.
Get your gear:
(The top of the rod is cut off in his picture)
Start by feeding your wiring through your base (bowl):
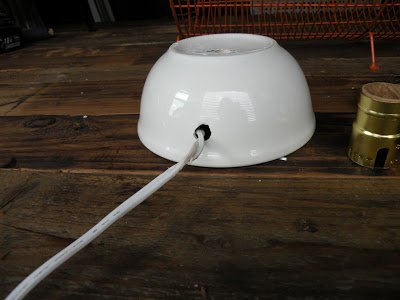
**In these pictures I used a lamp weight. You DO NOT need this. I actually took mine off the lamp. Thought I should clear that up since its in the pictures….
Next you will feed it through the hole at the bottom of your rod:
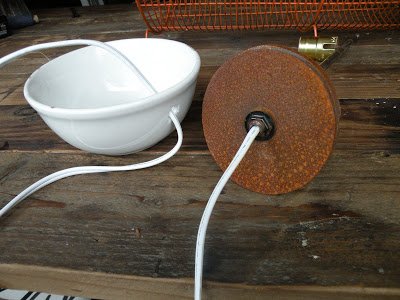
Feed it all the way through so that it comes out the top:
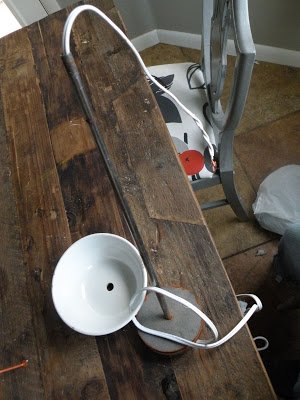
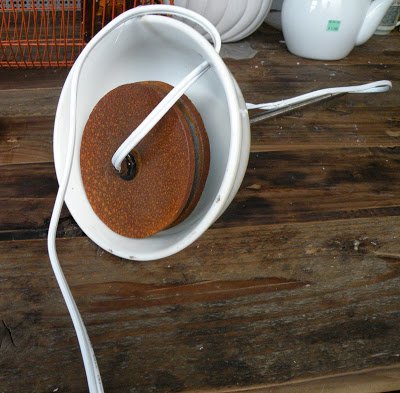
Now feed your bowl onto the rod and make sure that its all good underneath:
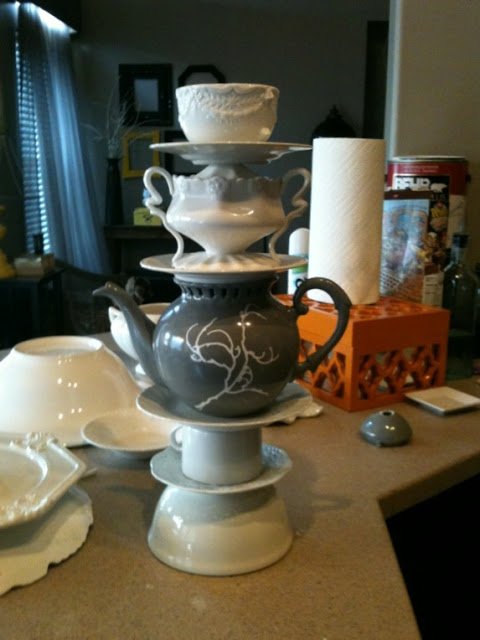
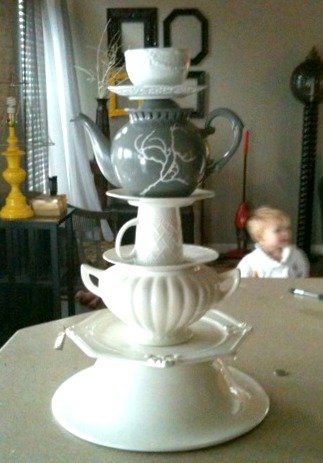
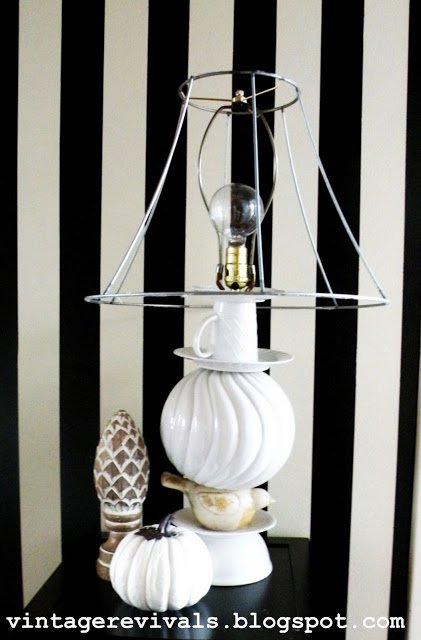
Now stack your dishes or whatever you are putting on your lamp. You need to make sure that when its all stacked up it is tall enough that it will pull the weights to the top of your base so that it is all held in tightly. (You will have to hold the weights up with your hand until you get your socket screwed on.)
Most light kits come with different size rubber washers. You can use them if you need a filler to hold your weights up. I didn’t have to use them on mine but they would be awesome.
Before you put your light socket on make sure you but the harp holder on….not that I did it in the wrong order or anything…..
Assemble your wiring according to the manufacturers instructions.
When you pick up your lamp it should be tight and not move. If it does then you need to add one of the rubber washers that came with your lamp or change out some of your junk to make it taller. Make sense?
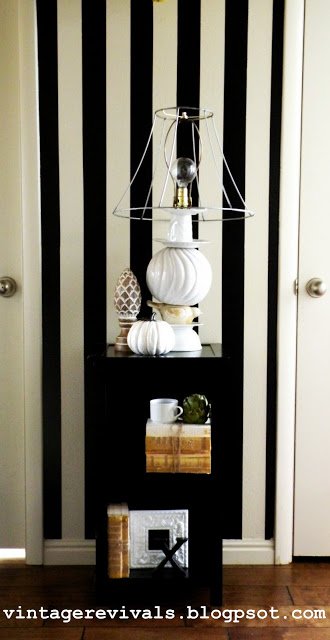
Tada! You have just made an AWESOME Anthropologie Knock Off Lamp! Congrats!
Now here is the genius part.
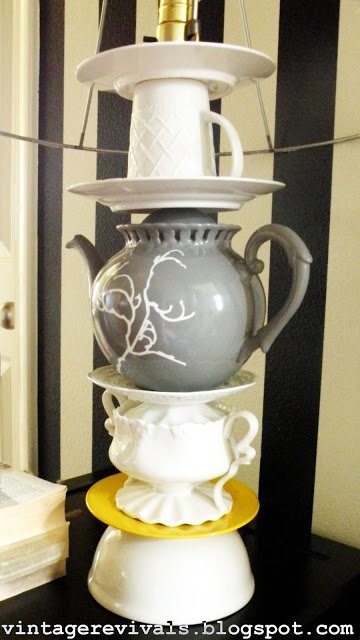
Because you didn’t glue anything together EVERYTHING is interchangeable! How cute would it be to have a Halloween themed one with pumpkins, some spell books, a jar of candy, and a little witch hat at the top? Or one that is made out of birds? This is a variation that I made with some things that I had around my house:
p.s. I am addicted to skeleton shades right now.
Here are a few more pictures:
If you make a lamp PLEASE let me know I would LOVE to Feature you!

That is the coolest lamp! I love it!
hahahaha! yay i so knew it was you!! congrats!
Congrats on winning! I love this project and have bookmarked it to one day try.
I knew it was you!
Like I said…can’t I just pay you to make one for me???
Girl, it is beautiful….but way too much effort for me:) I love the yellow accents.
Awesome!!
congratulations! this is so awesome!
i’m a follower now 🙂 and i’m featuring your lamp & linking to your tutorial today!
OH, I voted for you – I like yours better than the original!
I am speechless……its just so gorgeous
Woot woot. Your lamp turned out fab. I am so loving the combo of teacup lamp and skeleton shade. Congrats on your win. Can’t wait to see your next project. Oh…and your loser bits were the exact same one’s I tried using.
hahaha! I knew that one was you! It had your touch all over it!
Your project was so amazing. Thanks for showing us how you created it!
Congrats on advancing on CRAFTING with the STARS. THIS is an AMAZING project and better than the original.
I look forward to getting to know you better.
Cheri from ItsSoVeryCheri.com and TheDIYClub.com
No, I didn’t know it was you (guess I haven’t been following long enough), but I did vote for it – HONESTLY! It was definitely the most creative and fun project in the running. I actually like yours way better than the original. Thanks for showing us how to do it.
Congrats – this is fabulous!!!
OMGsh! Congrats girlfriend! You’re gonna win, I just know it!
yayayayayayay!!!!! i am so excited for you!!! and your is, like eveyrone has said, WAY better than the original. yours is the new original.
Great tutorial! Makes me think even I could attempt this project. 🙂 I love the pieces you chose to used and it looks fabulous right where its sitting. Your teacup makeover is super fab!
Congrats!!! Haha I knew that had to be yours. It looked like the same space you had your tin foil night stand. And nothing else looked like you either. By the way LOVE the striped wall…
Jenn
Gorgeous lamp! Fabulous job!!
yayyyy! I knew it was you.. well, no I didn’t. But now that I go back and read it, it totally makes sense and I can’t believe I didn’t guess it.
Love this so much, it is WAY better than the original, and congrats! You had my vote 🙂
I am so impressed and so in love with your lamp! Thanks for sharing your talents with us… I am going to make one too!!!
Congratulations on moving on to the next round. I am so curious to see what everyone comes up with next! Oh…and I wanna see the necklace when you make one!!
Love the lamp…
BTW – put a piece of masking or painters tape down where you want to start drilling. Still start slowly but it will control the skating quite a bit.
You did a fabulous job. Congrats!
CAN I GET A WHOOT, WHOOT?! Congrats:P
Jen
I voted for this one! Whoot! The reason is because it’s darling (duh) and because my mom made a teapot (only) lamp once and it’s NOT easy. So I knew how hard the person worked on this one. Great job!!!
Looove it! I totally knew it was you! I have only been following your blog for a couple months now and I looove it! SO since you now have two lamps can i buy one???? 🙂 im serious you know, i don’t see myself being able to make that, though i so want to.
~Cami
Oh yes! I love it… you can make more then one and each one would be unique. fantastic!
When I have to drill in somthing like this or ceramic, I put tape where I want my hole. It’s help my drill to stay at the same place.
have a nice day!
Thank you, thank you. I always wondered how to drill through china. But how did you put the little teacup on the top? Great job. Ann
It’s Freaking cute!!!!
I totally knew it was you!!! And of course I voted!!! I’m freakin IN LOVE this!!! Can’t wait to see what your doing next!!!
LOVE it!
Knew it was you before I finished the first sentence! Of course then the striped wall confirmed it for me! It turned out super cute! Good job Mandilou!
Congratulations with winning- this is fabtastic- what a great job you did – to die for! What a great project!!
Wow! I LOVE this! Great job!
Ok not trying to come across stalker-ish but I love you! I voted for you and am so happy you won! I read the whole tutorial and I may attempt this in the future even though I’m scurred. Your blog is awesome and you are seriously hilarious! I’m your newest follower. I only wish I had found you sooner! 🙂
Wow, this turned out fabulous. I actually like your version more! I’m also loving the striped wall & the yellow. Great job.
Warmly, Michelle
This is freakin’ awesome. I love it. The colors, the choice of ceramics….amazing. You’re brave! I’m not this brave, but I want to be, because I LOVE this!
Hope you can check out my necklace giveaway going on now!
https://alittleknickknack.blogspot.com/2010/11/rhonda-michaels-jewelry-giveaway.html
love this tutorial. please share it here
so our readers can learn about it too:
https://www.finecraftguild.com/diy-linky-party-19/
rose
This is amazing!
I think you’re the coolest person ever
Thanks so much for the step by step on how to drill china! I have been wanting to do something similar but had no idea where to start!!
Love the lamp!
Wow! You are amazing! I love the lamp and I’m seriously considering making one myself! Thanks for the tutorial–I’m following you now–hope you’ll stop by my blog and follow back if you’d like!
http://www.homeandholidaykeepsakes.blogspot.com
Thanks!
Jessica
I watched this on Studio 5 today. Amazing!!
I just stopped over from My Repurposed Life to check out what you used the drill bits on. This is such a great tutorial. I’m definitely going to give it a try!
(I’m signing up to follow you )
OH my gosh, this lamp is amazing. I love it. I was reading My Repurposed Life and Gail recommended checking out your blog, I’m glad I did.
Fuzzies,
Michelle
Your finished projects always look way cooler than the inspiration! You are inspiring!!
Oh, not only did I read your ‘Story’, and was impressed at the people that you came out of that to become, but I, as a gifted creator of junk can be so inspired by YOU…another gifted creator of junk! Thanks for sharing Mandi…I am in your debt. Terry
I loved your lamp soooo much I had to make one of my own. Great tutorial! the step by step instructions and pics made it easy. only one question…How did you make the yellow teacup on top stay??
Mandi, I LOVE this lamp!!! If you have gone on my blog at all, you know I love lamps. I have shown how to make several on there. I have a tip for you for the next time you make one. Wrap several layers of masking tape around the bit so that when you do drill if you accidentally go thru the bowl or whatever you are drilling it won’t break it. And thanks for the tip on what kind of bit to use. I have always used the one you said not to use and not been happy with it. I’ll have to try the other kind next time!
Mandi. Holy Cannoli. I just stumbled across you today and I am hooked. You’re on my blogroll and i LOVE poking around to see what you’ve got. Keep up the AWESOME work.
xoxo
Margaret
http://www.sugarandspackle.com
Thank you for this post! I was thinking about remaking this lamp myself and you just made my life a whole lot easier! Fabulous job! I think I actually like yours better than the actual one at anthropology! I just found your blog recently. Keep up the great work!
– Kat
So, you are pretty much my hero.
I saw this lamp online the other day and was totally lusting after it even though I knew I could never afford it.
I seriously just about pissed my pants when I saw that you had a DIY for this lamp for a fraction of the price.
Can’t wait to try it out:]
AWESOME!
hilariously written! i love it and will be busting out the power tools once i get my dishes together. 🙂
I just wanted to say! I am so in love with this lamp! I have been busy getting out teapot shopping! so far i have 3 pieces! so hard to find the right pieces!
This is incredibly cool! I love the grey/white colour scheme and the shape and interest of the vintage tea cups is just amazing!
Mandie, you are a heaven sent! I love your ideas, it’s my style- vintage chic! Just want to say that you are in my ‘she-ro’ list ;-). Thanks for sharing your passion!
I love reading your blog Mandi. I just wanted to stop by and let you know I linked to this post on my blog today. I see where it’s already listed in the list below but wanted to tell you anyway. Thanks!
OMG… this is amazing! You are amazing! LOVE IT!
~tiffany
ladycrafter14.blogspot.com
Seriously the coolest thing ever! I love the yellow one on top, thats the best!
Megan
https://1funkywoman.blogspot.com
I DID IT! I’d love to hear what you think!
https://www.violetskiesstudio.com/2011/05/vintage-revivals-anthropologie-lamp.html
Thank you so much for the tutorial!
Splendid. Love it!
Saw you on the Nate Berkus show the other day, and HAD to go find your blog! I LOVE Everything you do! Am so going to attempt this teapot lamp idea, and am contemplating using the old silver or bronze tea pot sets – if I can find some at Goodwill or garage sales! And I am on the lookout for fancy mirrors 🙂
You are amazing…you have inspired me. I was reading your blog at work (I’m a nurse…probably not in my job description) and I got the itch to be crafty, so I stopped at DI on my way home and got a lamp. Hope I can make it cool like you!
I gotta make this lamp. Just what I need another lamp. lol. Hmm why not try doing it with some of my pigs??????? From my collection of them. I do have tea pot pigs. Thanks for the inspiration.
I just had to pick my jaw up off of the ground. This is so fantastically amazing! Thank you for so much detail in your tutorial, I can’t wait to try it!
Hi, this is a great tutorial!
But a little tip: if you put on a few strips of masking tape where the hole’s gonna be, the drill won’t “dance” as much. =)
Hi… stumbled on your blog and love it. I’d spied the same lamps, but hadn’t figured out the right drill bit so you revived my languishing projects!!! LOVE them!
https://javanutknits.blogspot.com/2011/09/my-favorite-lamps-at-long-last.html
your are completey amazing. im so stuck in a redo rut. my husband is going crazy with all my thrift finds. i love them just dont know how to put things together! im totally making this lamp and teacup clock. thanks for the inspiration!
Thanks for the tip on the drill bit. I wondered which was the best kind.
This is sooo awesome! I am having a little girl and i am currently planning a vintage more crafty alice in wonderland theme. I really wanted to have a teacup lamp to go with the room and found this blog! I have my teacups/items and i just need to get the drill bit. . . I also love that it is recreated from an anthro piece! That is one of my favorite stores! I am excited to start the project but the drilling makes me nervous, cause i just don’t want to shatter all my cups! good thing I bought super cheap thrift store ones just in case! I will let you know how it turns out!
Wow! That was fabulous, from start to finish! Love it! I’m needing some of those drillbits now! That’ll freak my husband out…me buying them. hahaha!
I am new to your blog, and am so glad I found it! I can’t wait to make a flea market/thrift store run to get some cool stuff to fashion into a lamp! Thanks for the inspiration! Peace, Allison
what a wonderful design, you made a fantastic lamp 🙂
best regards from Germany
Annemarie
omg do you know I went to Lowes yesterday and was looking for the lamp kits….not realizing Ineeded to buy the other crapola (like rods ect) that go with it! I’m thinking it all comes together…ugh, printing this sucker out (your post) and bringing it with me ! If my iphone was bigger (I was trying to read your post on my phone) I probably would have realized this! I’m going to try and make one like your pendant light on your master bedroom post! yay! You rock cute little chicken! he he:)
You may have just changed my life! I have been dying to drill through glass, but have been to chicken to try. Thank you, thank you!
this is pretty fabulous! great job! love!
Awesome tutorial!! You’re super creative!
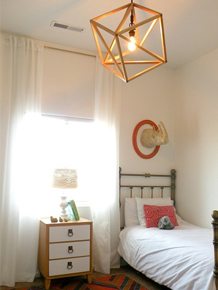
Mandy where did your find the owl that is next to that fantastic lamp?
Thanks for the tutorial. It is very helpful.
Your lamp is just lovely and that’s a great tutorial too, thanks! I have this linked to my lamps & lights post too today, for inspiration!
i was just given an old tea set that i used to play with at my grandma’s house when i was little – i think i may just use it to make a fun lamp or two for my daughters room!! 🙂
I am so impressed and so in love with your lamp! Thanks for sharing your talents with us… I am going to make one too!!!
I need to know how to attach that top piece — the little yellow teacup on your lamp. If anyone has figured this out, I’d sure appreciate your sharing the information. I don’t have any of the “profile” names so I’m posting a “anonymous”, but I’m really Kathie from MN.
Great Post!! Just a tip when drilling into ceramic/porcelain, if you use a sponge with water an hold it next to the drill bit; slowly squeeze the sponge to let out a bit of water and this will make it MUCH easier!
Great Post!! Just a tip when drilling into ceramic/porcelain, if you use a sponge with water an hold it next to the drill bit; slowly squeeze the sponge to let out a bit of water and this will make it MUCH easier!
To hold the water you could make a circle with plumbers putty. Good for surfaces that won’t hold water when you are drilling.
Can I ask what drill bit you did use? Wanting to make several of these for Christmas presents and have all the stuff to do it with just wondered which bit you used.